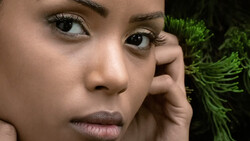
I have always been obsessed with color. Skin tones are one of the most challenging things for many people if you are picky, because there are so many factors that can affect them.
I like getting technical with the skin tones in my images, and the method discussed in this video is a great way of seeing your target skin tone by looking at it by the numbers, as your eyes can deceive you tremendously based on the surroundings of your subject.
What Unmesh Dinda is showing us here is that by using Curves by the values, we can trust the output rather than our eyes to make the correction toward your target skin color, and what I have found is that after doing so, the colors do in fact look better to the eye. Using average, a blur method in Photoshop, is a great tool for analyzing your color; now with the suggested Curves adjustment, you can see what to do with those colors you sampled.
I advise at least looking at your colors in this way. In addition to matching a skin tone you may wish to achieve, you can also use it to check consistency across a session of your own. Many times, I see photographers post several images from a session, and the subject's skin tone will be vastly different from frame to frame, and I really think that's a disservice to customers. Taking the extra time to make these types of adjustments can really improve the quality of your work.
It's worth mentioning of course that if you don't prefer the skin tones in the sample swatches Dinda provides in this video, you can of course make your own from images anywhere. Some like warmer skin tones, some like super saturated, and some don't, so feel free to create sample numbers for the tones you prefer in your finished work.

Join the Fstoppers community for free
-
Post comments and join in the discussions
-
Browse the site ad-free
-
Share your work and get featured in the community
-
Compete in the photo contests for fun and prizes
4 Comments
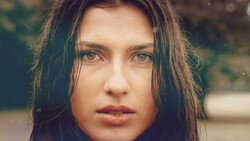
For the lighter skin he did a decent job. For the darker skin he completely ruined it, and lost all of her undertones and made her look insanely ashy.
What works best for me, MUA and capture one, but 99% if not more is done in camera
That would have been so much easier in LAB. Basically, make A and B roughly equal. Values in the range 20-30 work well. Also, the curves adjustment layer lets you type in values. That is much more precise. As a side bonus, the luminosity doesn't get messed up when you change the colors. Finally, if you like the overall white balance of the photo, you can drop a point at 0,0 for both A and B and then all other adjustments will not affect the white balance.
The RGB numbers on his 4-color reference image are valid only for sRGB. If you're editing in some other color space, your target numbers will be different.