
Just before you decide to throw out that old laptop and upgrade to a new one you might be surprised to find how a very quick and easy hardware swap could actually change everything.
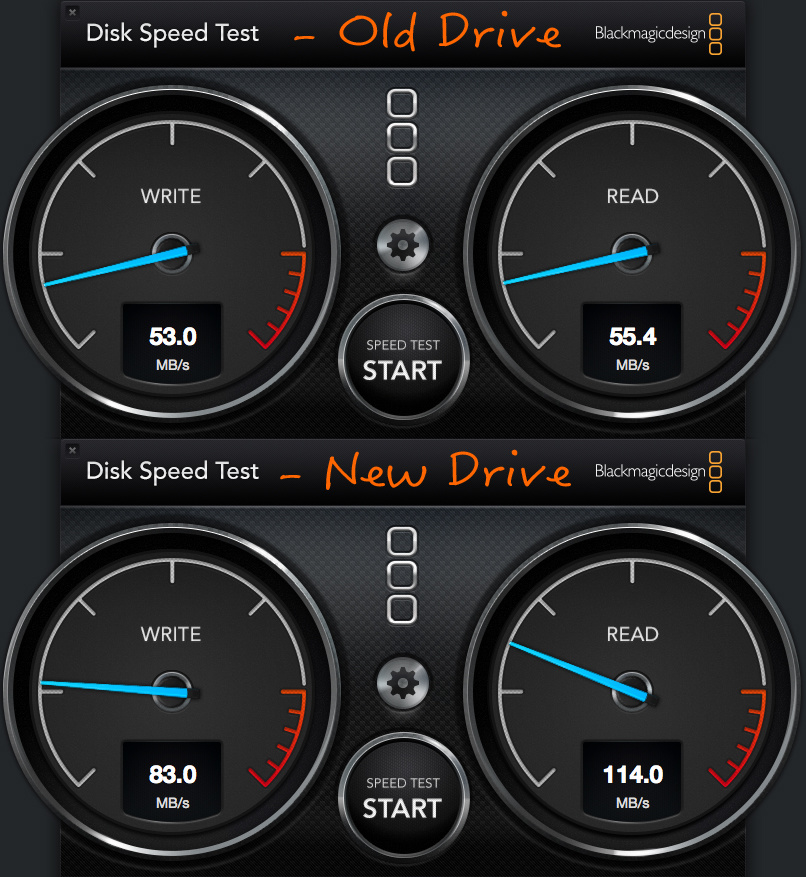
The hard drive inside the old laptop I use while on the road recently died which gave me the good excuse to upgrade things a little. The machine in question is an HP Probook which I predominantly use for my Fstoppers writing duties, tethering while on location, and some Photoshop work. Even though this laptop is a good few years old now, it still manages to keep up with most things I throw at it. The drive which died was a 320GB 3Gb/s 5200RMP drive which by today's standards is crippling slow. I instead opt for a 500GB 6GB/s 7200RMP drive which still isn't amazingly fast, but the difference experienced after installing the new drive and restoring all my old files back onto it was still noticeably faster.
This is where the story could have ended but after the performance improvements, I wondered what it would be like to add a second drive in place of the old optical drive which never gets used. This particular hardware swap was something that I had been meaning to do for a while and as I had a few spare hard drives lay around doing nothing special, now was as good a time than ever to make the switch.
For those who don't know, the optical drive is the name used for the CD, DVD, or Blu-ray drive inside older desktop and laptop machines. Most optical drives and hard drives share the same computer bus interface of SATA which makes the task of swapping an optical drive for a hard drive a very easy one to do.
The things you will need to add an extra hard drive into your laptop:
1. Removing the Existing Optical Drive
Before we start removing anything you will find it much easier to take the optical drive out if the tray of the drive is in the open position. While the laptop is still powered on hit the eject button and then shut down your machine. Resist the habit of a lifetime to shut the tray while your machine is shutting down.
2. Release the Screw Holding the Drive

More often than not the optical drive will be held in place by a single screw. Obviously, the placement of this screw will vary from computer to computer so please refer to your laptop manual if you have trouble finding it. On some laptops, the screw will be accessible from the underside, while in other cases you may need to remove the bottom cover of the laptop first. It is at this point that you should consider wearing an antistatic wristband as you are coming into contact with delicate computer components. Some may say this is unnecessary but it's always better to be safe than sorry.
3. Remove the Optical Drive

After unscrewing the release screw its time to remove the drive. If you haven't already, this might be when you need to remove the bottom cover of the laptop so you can see how the drive is being held in position. This next step will vary from machine to machine, but all drives will be held in place with the help of one or two plastic tabs. To release the drive from the laptop you just need to lift these tabs away from the laptop case so the drive is free to move a little. Then it's just a matter of carefully pushing the drive out with the help of a screwdriver. This is where the open tray from step one will come in handy as you can gently pull on the tray to help encourage the drive to come out. If you are finding removal tricky it might be worth turning the laptop until gravity is on your side.

Once the drive is out you will see a small bracket on the back of the drive. This is actually what the screw you removed from earlier was connected to. Remove this bracket and keep it safe as we will be using it on our new hard drive caddy later.
4. The Hard Drive Caddy
![]()
The hard drive caddy is a very similar shape to the optical drive that is being removed and is what will house your additional hard drive. Once your hard drive is seated inside a SATA connector on the outside of the caddy will connect it to the SATA port on the inside of the laptop. There is a wide range of caddies for sale out there so please do your homework to make sure you buy one which actually fits. I found the best way to guarantee you buy the correct one is to remove the optical drive and measure it. You can also visually compare the shape of the drive you have just taken out to the caddy you hope to purchase to make sure they are close in appearance. It is also worth noting that these caddies tend to house the 2.5 inch hard drive so make sure the drive you plan to use will fit the caddy you buy.

Place the drive inside the caddy and follow the instructions which came with it. There will be four screws which will hold the hard drive in place on the underside of the caddy. You need to screw these four screws in as well as applying the bracket you removed from step three before you slot everything back into the laptop.
5. Slot in the New Hard Drive Caddy
Now it's just a matter of slotting the caddy into the laptop. If you look carefully into the slot where your optical drive once was you will see the SATA connector inside the laptop which your caddy will be connecting to. In my case, I found that the height of the caddy and the position of the SATA port didn't quite match up as the caddy is slightly too thin. To make sure the connectors lined up I turned the laptop upside down which let gravity allow everything to line up. After that, all that is left to do is tighten up the screw you removed in step one and reapply the bottom laptop cover.

6. Adding a Faceplate

Most hard drive caddies come with a standard looking faceplate which resembles the face of the optical drive you have just removed. If the stock one provided works for you then go ahead and install that. I found on my machine that due to the curved lines of the laptop body it didn't come close to being either ergonomically or aesthetically pleasing. For this reason, I removed the original faceplate from my optical drive and after trimming the back slightly was able to superglue it onto the caddy for a seamless finish.
Benefits of Having a Second Internal Drive for Photographers
There are many ways you could benefit from having a second drive installed inside your laptop, here are four ways I can see photographers taking advantage of the additional hardware.
Cloning Your Main Drive
I find the idea of having a clone of the main hard drive inside my laptop at all times a very appealing one. For Mac users, you could set up Time Machine* to copy over all files at regular intervals. If you wanted to have more control than Time Machine offers, look at using something like Carbon Copier or if you are on a Windows machine try using Easeus Backup Software.
Extra Storage
If you have enough backup strategies in place or like me, you only use this older laptop occasionally, then maybe just having all that extra storage would be a good way to use the drive. Keeping most of your files on this second drive and your operating system on the original one can only help improve the performance of the machine.
Scratch Disk
If you do any kind of editing on your laptop then having the luxury of placing your scratch disk onto a separate drive will help to keep everything running smoothly. Nothing beats additional Ram in a laptop but having a generous scratch disk is a close second.
Create a Second Bootable Drive
Similar to the clone technique mentioned above you could also include your operating system onto this second drive. I am leaning toward this option for my own laptop as I like the idea of having a nice clean install of my operating system ready to be used if my main drive was to die while on the road or on a shoot. Some of you might like the idea of installing a different operating system on the second drive altogether.
So there you have it, how to breathe new life into an old laptop that you thought was beyond use. The hardware used for this demonstration is incredibly modest when it comes to speed but you should still feel both the performance and practical benefits of doing it. If this was my main machine I may have thought about using a few solid state drives instead and if your budget will allow it, I would advise that you use the fastest hard drives you can afford. The main reason for this article was to suggest a solution for those who have a laptop with an optical drive they never use. For such a small investment of time and money (my caddy only cost $8!) the addition of a second drive really does open up a world of options.
Inspired to give this a try? I'd love to hear how you'd best take advantage of a second drive in the comments below.


On a MacBook Pro it was super simple to replace the hard drive for a SSD. When you have it open, it is also a good time to upgrade the memory also.
Definitely. That's the one thing that saddens me about the dropping of the super drive was that now I can't have a built in time machine backup any more.
It's crazy how much comfort having a built in time machine gives me. Especially when traveling. Hope you get yours sorted soon it have another data backup strategy in place??
I have a usb ssd that I use for backups right now, but of course, it isn't automatic.
I have to admit that apart from time machine my backup process isn't automatic either. I prefer to manually do it.
I have a MacBook Pro and I bought it with a SSD drive , am I able to replace with larger capacity one. ?
Unless it's one of the newer ones, most of the parts on it are soldered to the main board and are no longer user replaceable.
I didn't know that about the newer MacBook pros. That really changes everything. So when a drive goes what happens?
Everything is soldered on the Motherboard, meaning if anything break (memory, SSD, touchbar) you have to get ... a new computer ! :/
(my source is ifixit : https://www.ifixit.com/Guide/Vue+%C3%A9clat%C3%A9e+du+MacBook+Pro+13-Inc...)
Ouch! I'm sure Apple share holders loved this design decision. Not great for customers or the environment though...
When a drive goes... or video card, or motherboard, or ram, or a usb port or ethernet... really, if ANYTHING breaks on it, it's basically either:
1) pray to any and all Gods that you're in your warranty period, and if not
2) beg them to please end your suffering quick if the cost of a new board (which has basically everything soldered to it) is cheap, spoiler: it's not.
3) buy a new laptop.
Bummer.
But apparently the new (to be released around 2019) Macbook Pro, iMac Pro, and Mac Pro will be modular, so hopefully this is a short term problem with Apple's "Pro" line. Apple has commented saying that they have "designed ourselves into a corner" as far as upgradability and thermal control goes.
Thanks for the info Carl, I really hope Apple are good for their word & will actually go away from such a shortsighted manufacture process. Definitely going to avoid those particular models which don't...
I've seen nothing to indicate that MBP's or iMacs will change to being modular, but yes for the Mac Pros. I read an article where an Apple senior director was talking about the timeline for new Mac products and the new modular Mac Pro. He only stated that the MBP and iMac were good tools. Yes, they do need to be modular, but whether Apple will concede to doing so thus likely requiring to increase size a little will remain to be seen.
Thanks for the info Tommy, I do hope Apple see sense on this. Doesn't sound very environmentally friendly... :/
No, but it IS financially friendly to Apple. ;)
Not the newer ones where the flash and RAM chips are soldered onto the logic board.
Thanks for the info. Sorry to hear this from Apple but I'm not surprised. Going to investigate this some more...
It really is a good excuse. Wish I'd done it sooner myself. Glad it worked out for you!
once you do this where do you get the OS to reload it ? my MacBook pro 17 is about 10 years old and needs new life but i don't want the latest OS, i want what it has now.
You can clone your current drive onto a new SSD/HDD before (or after) you install it. I did just that, used drives and mounts and everything from OWC for my 2012 MacBook Pro. Went from 500gig to 1tb SSD and 2tb HDD. Was super easy, took about 25 minutes to do.
Excellent advice Carl, great to hear you did the switch to ssd. How are you finding the performance improvements?
Well, I did the swap about 3 years ago, and my laptop was always full and struggling to run basic word processing. Now, 3 years later, and I have an awful habit of having 200 or more tab's open in chrome, iTunes playing/or tutorials playing on a second screen, and either editing photos in lightroom/photoshop or writing music in logic. Went from being a crawling snail, to better than it was new. That said, I spent about $1000 making the upgrade. Took about 2-3 hours to clone my old drive onto the new SSD for my boot drive, and about 25 minutes to pull the laptop apart and install the SSD and the HDD, following along with OWC's tutorial, which was idiot-proof in it's simplicity (which I was very grateful for!).
So all up, it was a huge improvement in performance, most of which is from upgrading from a slow read write HDD to an SSD for a boot drive, and having extra space for the RAM to off-load inactive stuff on to.
You sound even busier than me with all those programs running! Glad the upgrades worked so well for you. I'm not the most technical person in the world but it's surprising how easy it is to do these upgrades. That was part of the reason for the article. Much cheaper than buying new machines every few years...
Keep up the good work!
Hey Michael, you are going to struggle to get the older OS from official sources as Apple remove them from the App Store once a newer OS is out.
They should however stay in the downloads section of the App Store of your Apple ID if you ever actually downloaded them from the App Store. If you didn't & someone else you know did you could potentially log in with their details to get it. The key is they must have downloaded it back then.
You say the laptop is over 10 years old and I'm not sure which OS you got up to. Let me know which OS you was thinking of installing.
Snow Leopard OS retail DVD can still be bought be you're going to want to upgrade it to something a little knewer ideally.
I have just installed Yosemite on an older machine & am loving it...
You're right Alexander, the machine I did this on is just a laptop I use occasionally. SSD would have been better but I had some HD at hand & as it isn't my main computer or a machine I need a lot of power for, I opted for what I had.
I also wanted this demo to be more accessible to those on a budget. If people want to upgrade this upgrade with SDD they can. :)
I would have gone for a 2.5" SSD main and a large scratch space in the dvd caddy. You'll be amazed how much life that breaths into a machine.
Also, some of the older laptops have msata / m2 interfaces for an SSD on the motherboard. Often, the cheaper configuration didn't come with an SSD out of the factory, but with that slot unpopulated. After the warranty expires, opening it up and add an SSD, install your OS on it, and make it boot from there, and you could use your old HD as storage.
I did check the maintenance manual on your HP Probook 4530s, but didn't spot one there, at least not spelt out by the manual.
Hey thanks for going to the effort of checking my particular machine! I am definitely going down the larger scratch disk route with my upgrade. I really do love my probook so eventually will probably upgrade them to SSD too. :)
Did caddy+SSD swap which replaced optical drive on MBP and kept HD for files :). Bought externl optical drive LG for $28 from amazon :) slow app running speed issue solved :)
That's great to hear Jozef, what size drive did you get for $28 from Amazon?
2018 and not using an SSD, and claiming performance
Well I am enjoying the extra performance on my second machine. :)
Even a jump from the old 5200RPM to 7200RPM makes a pretty substantial difference.
I can vouch for that! I loaded all my junk back onto the new 7200RPM drive & the improvement really is noticeable...
For Mac upgrades, I have used OWC - Other World Computing on several occasions. They have drives and RAM for any model that can be upgraded and video tutorials to guide you through the procedural "tall weeds". Quality stuff - look for bargains elsewhere. It is also a good source before you buy a Mac - can it be upgraded or is everything soldered in?
Never heard of OWC, will have a look at them thanks!
i did this on my old laptop.
I instaled the SSD HD inside and removed the Optical and instaled a second HD with the HD Cady to extra
storage
Great to hear, are you glad you did it? How do you make use of the extra drive? I'm loving mine.
Hi
yes, im very happy
on the SSD i basically have Windows, photoshop and CaptureOne.
The second HD is were ia have all my docs, other softwares and qere i store the images.
Hmm, never realized you could add a second drive to a laptop via the optical drive port. Damn, I would've done that ages ago, although I do make use of the CD/DVD drive on occasion. I would add two SSDs tho, laptops are slow enough, having a high speed scratch disk for apps that use scratch disks would go a long way to making a laptop more functional.
I'm so glad I made the switch myself. You know with a very cheap sata to USB cable you can continue to use the removed optical drive like an external optical drive. I should have added that to the article!
I actually miss my previous MacBook with the data doubler from OWC. Having all that room was a major convenience. Great post Paul Adshead
Cheers Mike! Glad so many people have already taken advantage of this hack. :)
Not sure I am brave enough to do that myself but this excellent article has prompted me to get my PC improved.
Thank you
Rick McEvoy
http://www.rickmcevoyphotography.co.uk/
Thanks Rick, I can assure you that I don't have much experience in computer upgrades but found the whole process very easy to do. Plugging the new caddy in is as easy as pushing a video into a VHS player!
All the best with your upgrades :)
Hi Paul
I upgraded the RAM. It was incredibly easy to do - there really was no need to worry!
Thanks for giving me the nudge to act.
Rick
http://rickmcevoyphotography.co.uk/
Awesome tips
Not sure if this has been said yet or not — and I'm also I'm not certain of the exact specs/models — but by using a caddy in a MacBook Pro you may lose the accelerometer that protects a hard drive from falls and bumps. The accelerometer for the DVD drive was built in, I believe, and by removing it you leave the spinning disk in the Hard Drive vulnerable.
Oh wow, that is an excellent point. I'll look more into that. Thanks Stephen. :)