Lightroom isn’t as powerful as Photoshop when it comes to retouching portraits, but that doesn’t mean you can’t use it to get good results. This guide will get you started using Lightroom and also give an idea as to why it can be faster and more effective than diving into Photoshop.
Photoshop offers seemingly infinite tools when it comes to retouching skin and the level of control makes it the obvious choice for professionals. However, sticking with Lightroom can be useful if:
- you have a large number of images to edit
- you’re not preparing an image for a large print or where the skin is going to be shown in close-up
- you’re not too familiar with Photoshop or simply don’t have time for a roundtrip
This guide is split into two halves: hiding blemishes, eye bags, and wrinkles using the Spot Removal tool and improving skin texture using an Adjustment Brush.
Blemish Removal
Lightroom’s Spot Removal brush (keyboard shortcut Q) does a lot more than remove spots and has evolved significantly over the years.
For simple blemishes, it’s a quick and easy method for tidying up the skin. The tool has two modes: Clone and Heal. For the vast majority of skin retouching, it’s better to use Heal as Lightroom will intelligently blend in textures rather than directly copying a section of skin from elsewhere. Click on a blemish and watch it disappear.

For better blending, keep the Feather relatively high — around 80 or above — to ensure that you don’t create any strong edges.
If Lightroom doesn’t do a good job of choosing where to take its sample from, hit forward-slash and Lightroom will have another go at picking a sample area.
Opacity can stay high as well. The lower this figure, the more that the original part of the image will show through. A lower opacity becomes useful when dealing with larger and more complex areas of skin (see below).
If the overlays showing all of your Spot Removals are becoming confusing, press H to toggle them on and off. This also gives you a bit more freedom when creating new Spot Removals as existing Spot Removals will no longer get in the way — something that can be quite annoying if you’re doing a lot of close work on a small area of skin. Very often ,you’ll find yourself wanting to create a new Spot Removal but instead, you’ll drag or resize one that already exists.
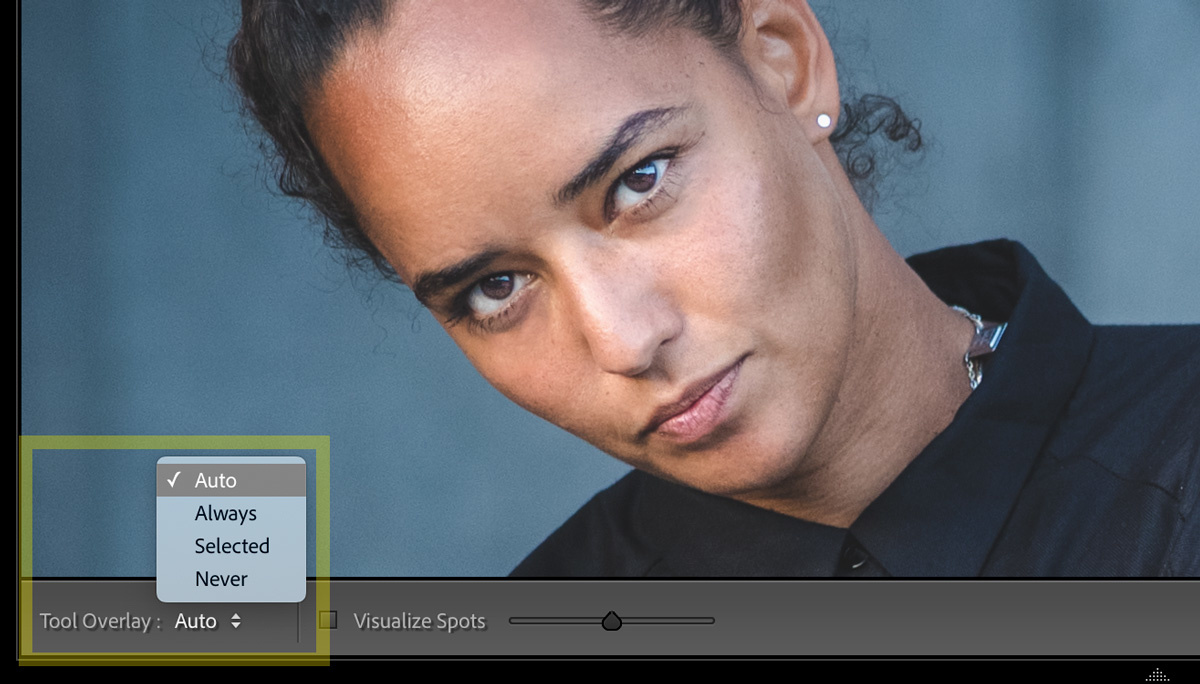
You can change the behavior of these overlays in the Toolbar (press T). The default is “Always” but I recommend switching to “Auto” as the overlays will disappear when you move your mouse away from your image. (Pressing H will toggle between your selection and “Never.”)

If a blemish doesn’t look quite right after a first attempt, hit delete to try again, or simply repeat the process. Older machines may struggle if you start accumulating a large number of spot removals, but otherwise, there’s no real disadvantage to having a few runs at removing something. It’s all non-destructive, and you can hit delete at any point if something’s not working.
Removing Wrinkles, Scars, and Eye Bags
The Spot Removal tool allows you to draw complex shapes, making it possible to remove much more than just spots and moles. Simply click and drag.
That said, Lightroom appreciates cloning and healing in small chunks. For example, drawing a series of small lines when trying to remove a long wrinkle will be easier for Lightroom to manage. Lightroom needs to find a uniform section of skin to use as its source which isn’t always available if the patch you’ve created is too big.
Every photographer has been guilty of overcooking a retouching job, and the Spot Removal tool is a quick and easy way of making someone look like their skin is made of latex.
Reducing the opacity of the Spot Removal tool is a good way to ensure that you’re not over-editing. People naturally have eye bags and wrinkles, and although a photograph can make them seem more pronounced than in real life, that’s not a reason to remove them completely.
This is where the Opacity slider is key. Typically, you start on a portrait with a high Opacity and go through removing anything that’s not going to be on a model’s face after two weeks. For everything else, drop the Opacity to around 50; wrinkles and eye bags are reduced, but they don’t disappear completely.

1:1
Every job will be different: beauty photography shot under studio lights will require perfect skin, while casual family portraits will require a more honest approach. Working out how to find this balance comes with practice. It’s worth communicating with your subject so that there aren’t any weird surprises when you deliver your images.
An experienced retoucher would be firing up Photoshop and perhaps using techniques such as a High Pass Filter (check out this example from PiXimperfect) to clone out the dark shadows under eyes rather than simply doing a straight clone/heal. This gives much more control and retains the original texture of the skin, but it’s also far slower. When you’ve got a number of images — from a wedding for example — this can be a huge amount of work.
One of the advantages of Photoshop is that you can manage changes through the use of layers. By contrast, Lightroom’s Spot Removal tool piles up and can quickly become unmanageable. In addition, all of your wrinkle edits in Photoshop might be placed on one layer, allowing you to control a number of adjustments with one opacity slider. By contrast, Lightroom’s Spot Removal has an individual opacity slider for each individual use of the tool.
Skin Smoothing
Lightroom can feel a bit lacking when it comes to refining skin. Photoshop gives you a huge amount of precision, while the likes of Luminar will use AI to smooth out skin with just a couple of clicks.
If Lightroom is your tool of choice, you can smooth skin by using an Adjustment Brush and various sliders.
There are two options. Route one: paint your mask into place with a flow of 100 and then start tweaking the sliders. Route two: set up your sliders in advance and make your changes as you apply each brushstroke, keeping a lower flow (50-60, perhaps) and building up gradually.
Route One: Slap It On, Scale It Back
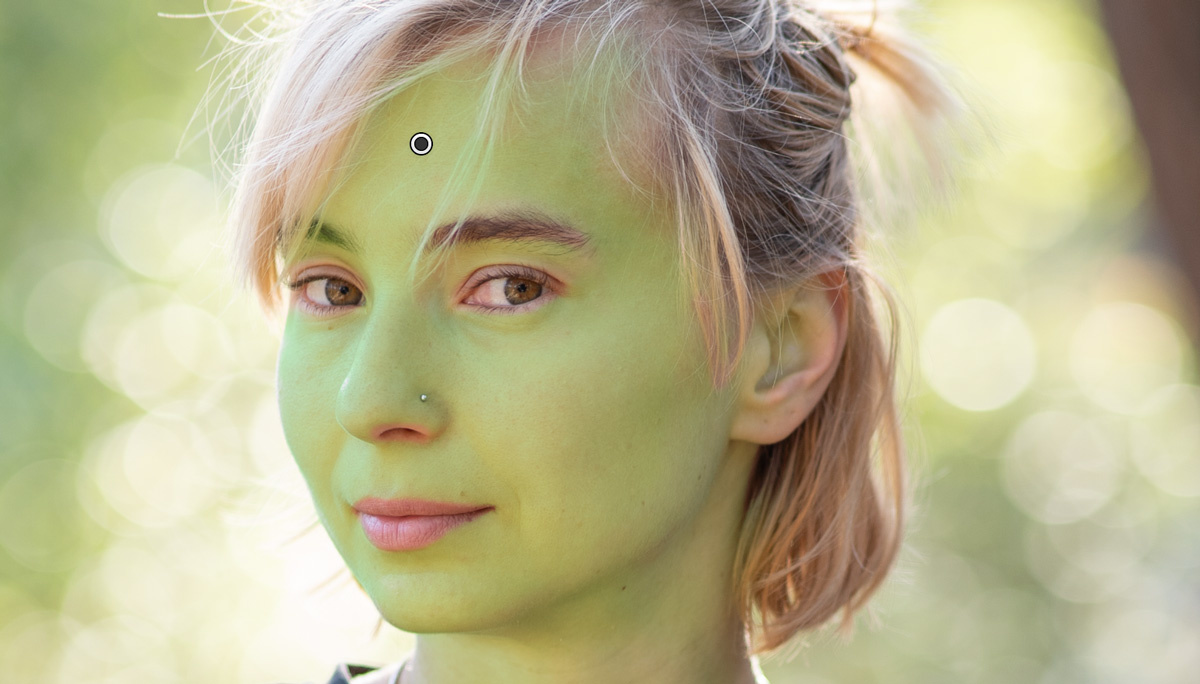
Route One can give some quick and dirty results, which is a good way to see how it all works. Press K to create a new Adjustment Brush and press O to show the Mask Overlay (alternatively, press T to show the toolbar and tick the box next to “Show Selected Mask Overlay”). The default color is red but I’ve changed mine to green (Tools > Adjustment Brush Overlay > Green), as I find that it stands out better against the skin.
Double click “Effect” to reset all of your sliders, set flow to 100, and start painting on the areas of skin that you intend to smoothen. You don’t want to cover out the entire face, so avoid the eyes, nose, mouth, eyebrows, etc. as these areas are structural rather than textural and need to retain their contrast. If you need help not to overlap from the face, make sure that “Auto Mask” is selected (or press A to toggle it on and off). To remove any clumsy brush strokes, hold Alt (Windows) or Option (macOS) to switch the Brush to the Erase tool.
Once complete, hide the Mask Overlay (O). You can hide the pin by pressing H.
You can now start playing with the sliders in the Mask panel to see how they affect the texture of the skin. Make sure you are zoomed in to 100% and try dragging the following sliders to the left: Texture, Clarity, Sharpness, and Dehaze.
The Texture slider is a recent addition to Lightroom and has massively improved the potential for smoothing skin. It targets contrast in medium-sized details, while Sharpness targets super fine details. Clarity tends to shift the edge-detail of midtones and will also affect the luminance (i.e., brightness) and saturation.

Left: Unedited | Center: Texture -10, Clarity -5, Dehaze -2 | Right: Texture -20, Clarity -10, Dehze -5
Photoshop allows you to dial back your overzealous retouching by reducing the opacity slider on a particular layer, and Lightroom has a similar function to reduce the overall impact of a specific adjustment. Click on the dropdown triangle in the top right of the "Mask" panel, and all of the sliders will be compressed into a single "Amount" slider.
In this example, we've made changes to the Texture (-20), Clarity (-10), and Dehaze (-5) sliders. Once compressed into the single "Amount" slider, Lightroom gives us an overall (and slightly random) value of 20. If you slide this to 10 and re-expand, you'll find that Texture is now -10, Clarity is -5, and Dehaze is -3. Basically, halving the Amount slider will halve the individual sliders.
Route Two: Go Slow, Add Via Flow
Rather than creating a uniform mask, you may want to brush in your changes bit by bit. Dial in your settings, this time setting the Flow between 50 and 60 so that you can build up the effect in areas that need it. You might also want to leave Dehaze at 0 so that you're not painting in brightness.
The reduced flow means that you can scale up your brushing to target specific areas by painting over a specific area multiple times. This method is more targeted, but it can be trickier to be consistent.
Create a Preset
To save time, click on "Custom" (just to the right of "Effect") and choose "Save Current Settings as New Preset." This will add this brush to a list of presets.
Final Words
Photoshop might be the more powerful tool, but Lightroom offers some reasonable options for those who are in a rush or prefer not to add complexity to their general workflow. Whichever route you take, remember to zoom out regularly and return to an image with fresh eyes to avoid overcooking.


While I agree Lightroom isn't as powerful as Photoshop, if you know how you can do all your retouching in Lightroom. The only time I feel the need to go to Photoshop is to clean out extend backgrounds.
Thanks for the great piece. I've been using LR from it's inception and I learned several things!
Glad it was useful. 😊