
This tutorial is for beginners who may want to start learning photography during the lockdown periods around the world.
If you have been meaning to start photography as a new hobby but never had the time to do it, this downtime caused by the coronavirus may be the perfect time to do so. You may think that it’s not at all possible to do because of the fact that you won’t be able to leave the house or that you can’t be in contact with an actual teacher, but know that anyone with a camera of any sort right now can start to learn photography on their own simply because of the abundance of time to practice.
In this tutorial, we will go through a simple approach to teach yourself basic photography and understand the foundations of the craft using whatever camera that you may have available.
The Basic Approach
Learning photography, contrary to how many photographers may make it seem, is easiest with a simple camera. Much of the beauty of a photograph, in general, relies on two fundamental factors: exposure, which is the balance of lights and shadows in frame, and composition, the creative placement of everything in the image. Having a simple camera with automatic functions can help you fully understand the two factors before you move on to a more advanced and more complicated camera.
Learning Composition With a Basic Smartphone Camera
A basic smartphone camera is one of the best tools for learning photography. Basic smartphone cameras use the smartphone’s computer to determine the necessary exposure setting for you to achieve a balanced shot. Having this allows you to focus on composition for the time being and lets you explore the possible perspectives of shooting your desired subject.
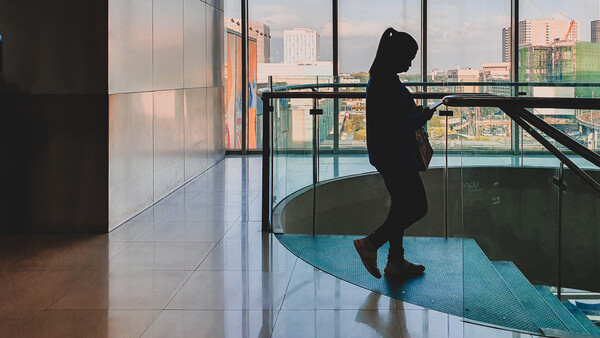
If you’re reading this at the time of the worldwide lockdowns, I strongly suggest that you practice on still life for the time being. You can use different items like toys, food, plants, or any other small object. After a bit of practice, you can move on to shooting portraits of people you live with or your pets if you can make them hold still.
At this point, your focus should be on composing your image. Composition, in this simple sense, is placing your subject creatively within the four corners of the frame and making sure that the other objects in the frame are complementing it or giving it some sort of emphasis. Below are a few of the simplest ways to compose your images.
Rule of Thirds
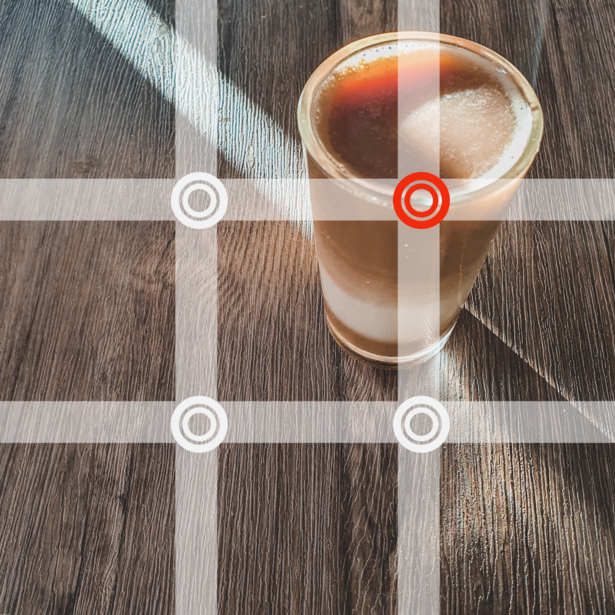
The rule of thirds is by far the most basic and most popular composition technique. Though it may be misleading as it is not an actual rule, following the rule of thirds can be one of the easiest ways to compose your photos. This is done by simply dividing your frame into thirds horizontally and vertically, leaving you with nine equal rectangles (or squares if your aspect ratio is 1:1). Once you have divided your frame into the thirds, simply place your subject on one of the four intersection points of the lines. In situations where there is more than one object in the frame, your supporting elements or objects can be placed at the other intersection points. This then gives a perception of balance in your frame. Your use of empty space can also give additional context, so be sure to explore zooming in or cropping to give due emphasis to your subject. Empty spaces that are too big can often overpower your subject.
Symmetry
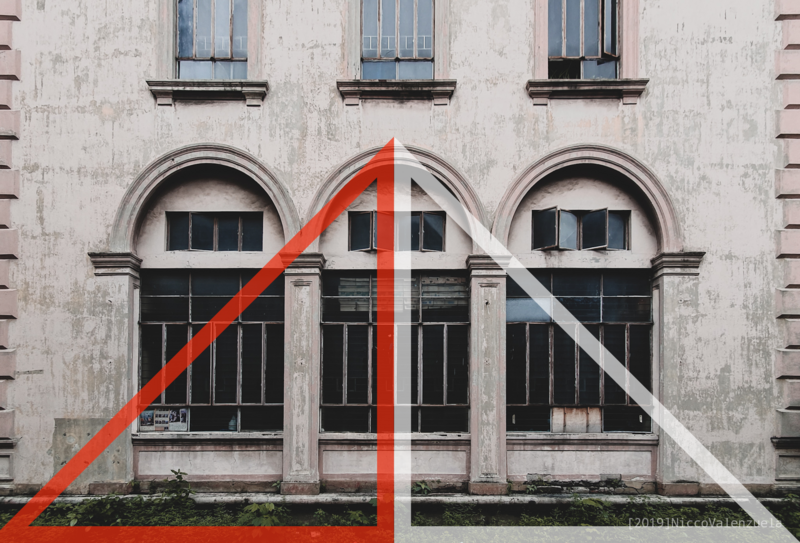
Another easy and satisfying technique is the use of symmetry. Symmetry makes use of the satisfaction of seeing the absolute balance in your frame. It is, however, not as readily applicable in most things. In the simplest sense, achieving symmetry requires putting a single object strictly in the middle of the frame, and the two halves of the frame must be mirror images of each other.
Rule of Edges

To achieve an aesthetically pleasing image, your subject should be given enough emphasis, and any other object in the frame should be able to complement or, at the very least, not clash with your subject. One simple way is to make sure that no elements along the edges or your frame are either significantly large or significantly bright. Anything that fits that classification may take away the attention from your subject and confuse the viewer. Simply exploring different angles and cropping your image can help you attain the necessary compositional harmony.
Learning Manual Exposure With an Intermediate Camera
For the sake of this tutorial, we will classify both smartphone cameras with manual modes and point-and-shoot cameras with manual modes as intermediate cameras. For the first step of your learning, it would be helpful to first learn composition by setting your camera in automatic mode and using it as a basic camera, as mentioned above. Once you have practiced your composition enough, you can move on to manual exposure settings and explore the different effects that they have on your shot.
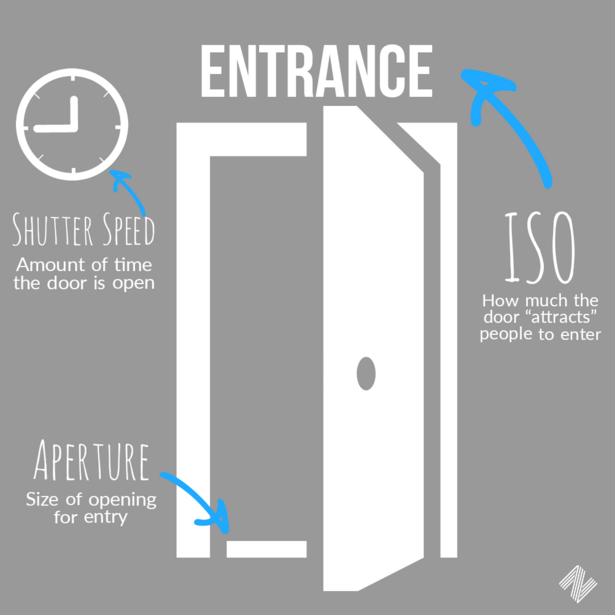
Shutter Speed
Shutter speed, also known as exposure time, is the amount of time that your camera is recording light. A camera works by recording light that travels from your subject, through the lens, and onto the sensor. Imagine that your shutter is a door, and the longer you keep the door open, the more light comes in. In the same way, the longer your shutter is open (and your sensor is exposed to light), the brighter your image becomes. However, for most cameras with standard zoom lenses or wide-angle lenses, a shutter speed longer than 1/50th of a second might create blurry images because of camera shake. To explore this, it would be good to use a tripod or at least secure your camera on a flat surface to make sure that it does not move while taking a photograph.
ISO
This pertains to the sensitivity of your camera to light. The higher the number on the ISO, the more sensitive to light your camera becomes, and consequently, your image will also become brighter. To stick to our door analogy, think of ISO to be how attractive the door is to people. However, using higher ISO gives more affinity to having digital noise. In the simplest sense, digital noise decreases the quality of your image. An overabundance of noise in your shot can lead to losing detail.
Aperture
If the shutter speed is the time that your door is open, the aperture is the size of the door. If your door is bigger, more people can enter the room within the same period. Aperture is a setting expressed in f-stops on your camera. For now, all you need to understand is that as your f-number goes up, the opening gets smaller, and your image gets darker (unless you compensate with the other exposure settings). Consequently, as your aperture gets smaller, your depth of field becomes wider. That means that a larger fraction of your frame becomes in focus.
The Exposure Triangle
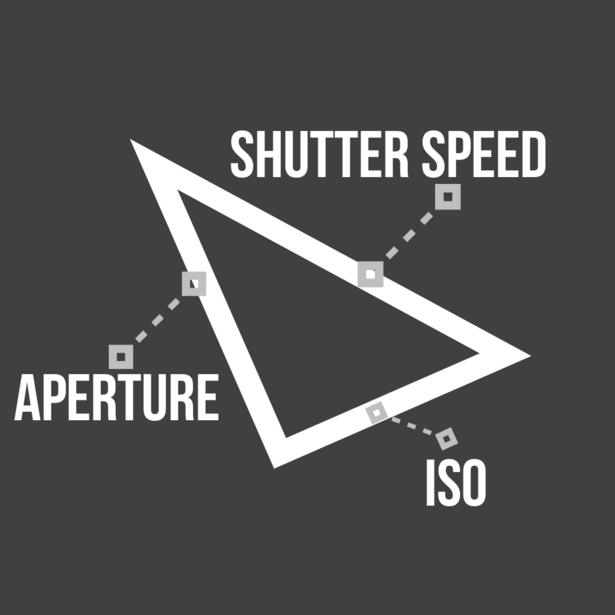
The relationship between the three exposure settings has been referred to as the exposure triangle. This is simply because to achieve a balanced exposure, you need to find the right balance between the three inter-related factors. However, the definition of a balanced exposure is entirely based on the photographers’ preference. Still, for the sake of achieving clarity, your shot should show enough detail without losing depth and contrast.
What to Do Next
Once you’ve mastered the basic controls of your camera, you can eventually move on to more advanced pieces of gear. Having the foundations of exposure and composition secure will allow you to deal with the other factors of photography that can make it too complicated for someone who might not understand them yet. Once you have understood how all these factors affect your images, you can now explore more advanced cameras and the wide array of lenses available for them. You can also begin to explore shooting in raw and editing on dedicated software. The important thing to do at this point is to seek inspiration on social media and forums like what we have on Fstoppers and practice by trying to achieve the same effect.
Join the Fstoppers community for free
-
Post comments and join in the discussions
-
Browse the site ad-free
-
Share your work and get featured in the community
-
Compete in the photo contests for fun and prizes
No comments yet