Allowing your shutter to stay open for longer can transform your images from mundane to something enthralling. Here’s how to precisely achieve various creative effects to tell your photographic story.
I’ve always been fascinated with long exposures. Something is compelling about showing the world in a way that we can’t perceive, and a photograph always does just that.
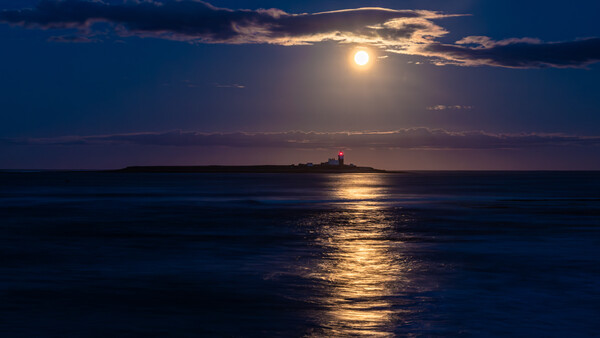
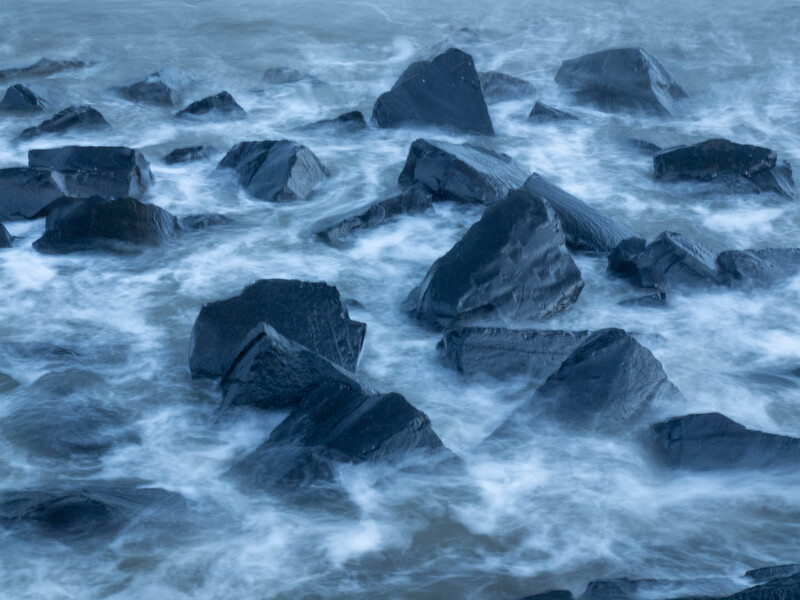
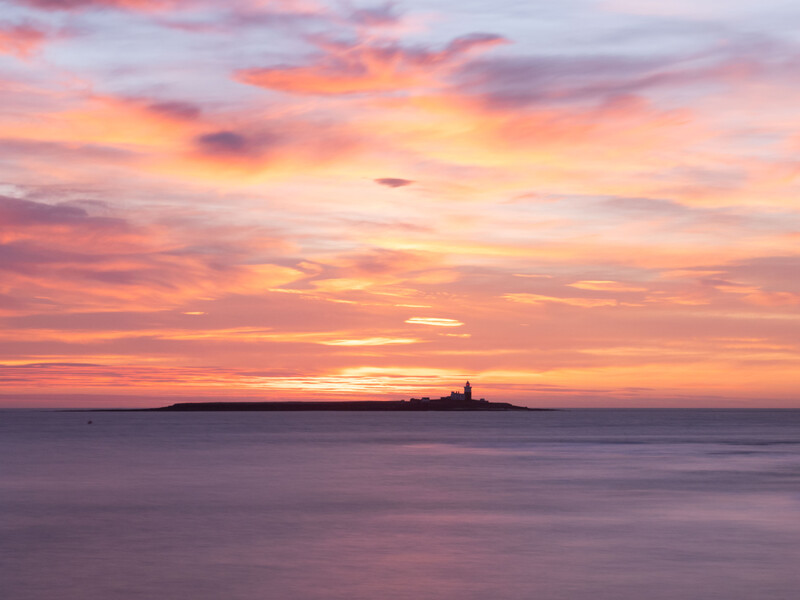
ISO 200, 40mm, f/4, 23 seconds, shot in low light and using the LiveND filter of the camera.
Long-exposure images are not without their detractors. The weak argument put forward is that a long exposure is not real. More than once, I’ve had photographers argue that my long exposures were not valid because they do not look like reality. However, the most argumentative and vociferous of those detractors shot images of birds on sticks with a far shallower depth of field than we achieve with our eyes. No photo is an exact representation of reality, but that’s for another article.
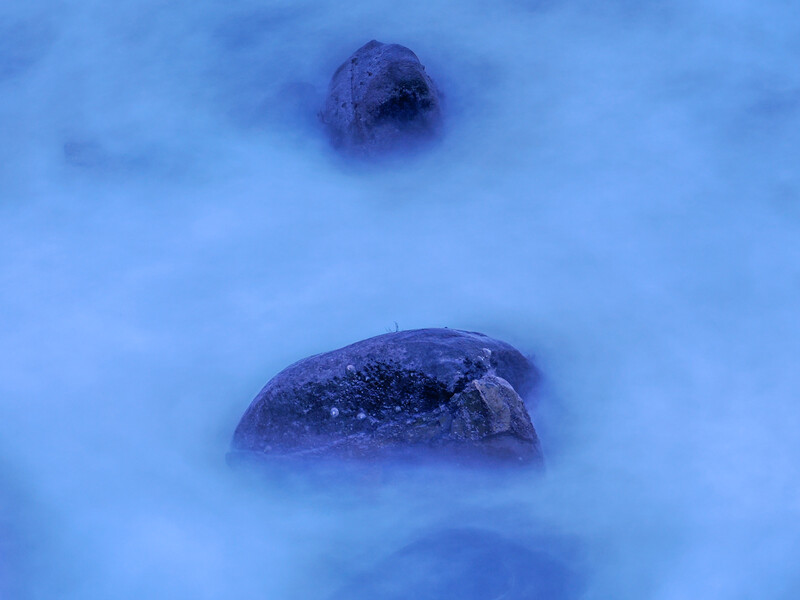
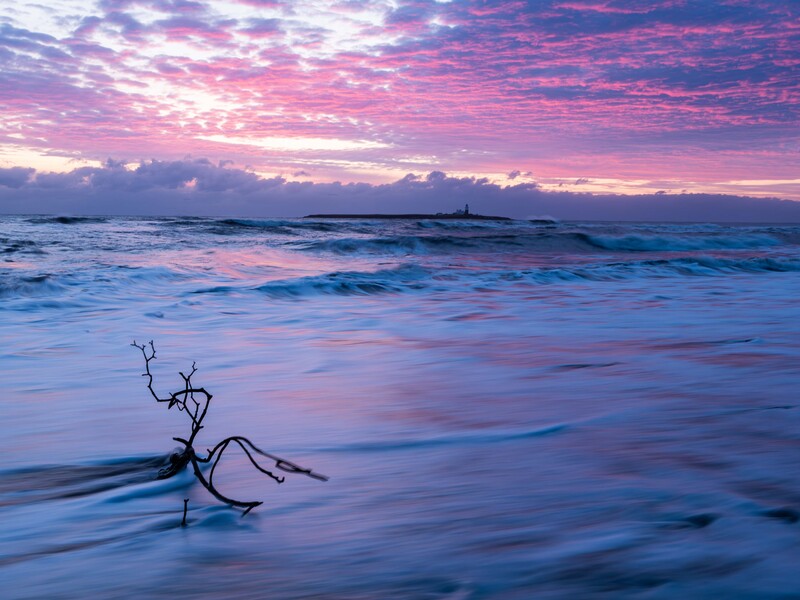
Compare the detail in this image with the previous one. At just 5.2 seconds, there is a lot more detail in the water. They are both long exposures although the effect is very different. ISO 200 40mm, f/13, 5.2 seconds, ND1000 and Live ND32 filters.
What Is a Long Exposure?
There are a multitude of prescriptive answers to the question of how long, in seconds or fractions of a second, a long exposure is. However, I think of it as a how-long-is-a-piece-of-string type question with a less precise answer. It is relative to the speed of a moving subject, its proximity to the camera, and the focal length of the lens. I think that any photograph that shows significant movement blur is shot with a long exposure. Of course, there are different extremes of movement blur.
A simple way of differentiating between long exposures is by splitting them into categories.
Category 1: Parts of a Subject Sre Slightly Blurred or the Entire Image Is Blurred Slightly
Level 1 blurs are often accidental. One of the most common shooting errors that I get asked to help people with is unsharp images resulting from camera shake, and it's usually caused by the photographer jabbing at the shutter button. The unwanted slightly elongated light trails of stars resulting from the rotation of the Earth would also count as a level 1 long exposure.
Although they often result from a mistake, Level 1 long exposures can be deliberate too. For example, short trails of splashing water over a rock in a babbling brook or light shining through fast-moving droplets from a breaking wave can be appealing.
ISO 200, 36mm, f/10, 1/8th second. Note the movement is more pronounced closest to the camera. This falls into Category 1, but is bordering on Category 2.
During my first forays into bird-in-flight photography many years ago, I made the mistake of not shooting at the right shutter speed. Intending to stop the motion of the birds entirely, I ended up with blurred wing tips. However, I quite liked the effect and pushed on with it and took it to Category 2.
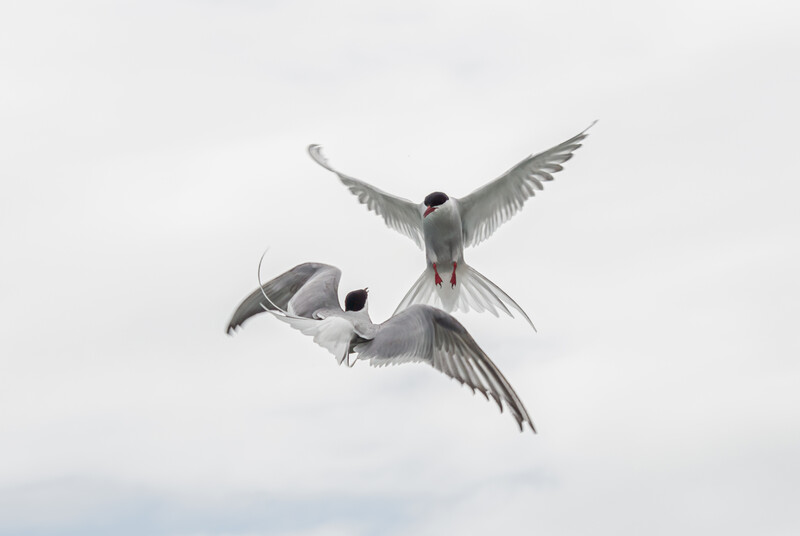
We would usually not think of a 1/1,250th exposure being long. However, it could be argued that the blur seen on the wingtips of these Arctic Terns puts this early bird in flight photo into that category. It was a mistake I learned from.
ISO 200, 89mm, f/9, 1/1250
Category 2: Entirely Blurred Subjects
This is where the entire subject is blurred but is still instantly recognizable. Falling within this category are images where the photographer has tracked the subject, and the background has become blurred.
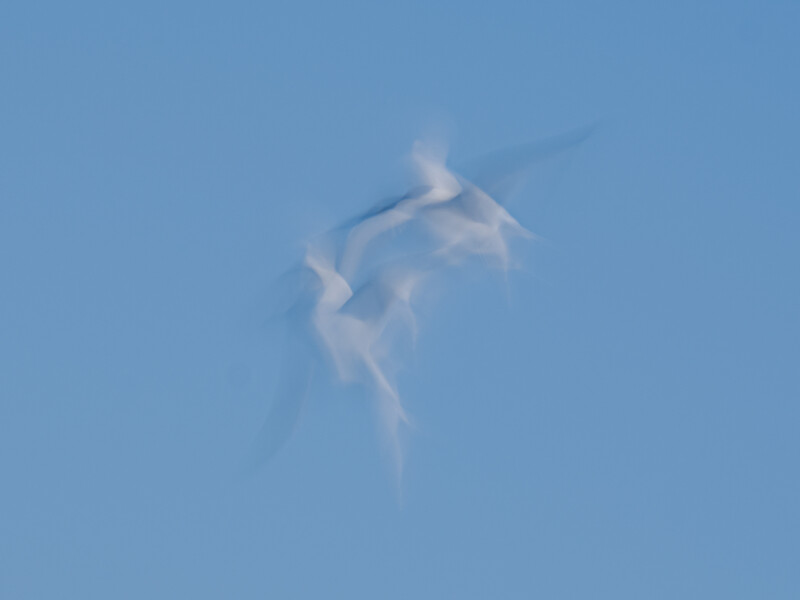
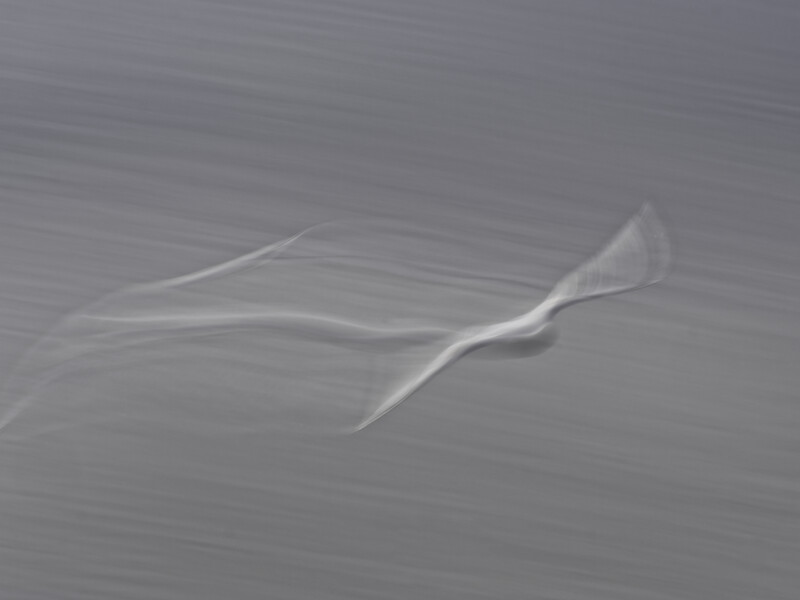
ISO 200, 150mm, f/20, 0.5 seconds. Although significantly blurred, the gulls are still recognizable as such.
I am not a sports fan, but I was blown away by one photo. It is of the Jamaican runner Usain Bolt at the 2016 Rio Olympics. The image was shot by the amazing sports photographer, Cameron Spencer.
In it, Bolt dominates the shot. He towers above the other runners who are trailing him, and he is looking towards the camera as if to give the photographers the perfect image. His legs and arms are blurred, as is the background of the scene.
Most of the images in my continuing project of birds usually in flight fit into this category. The birds are recognizable for what they are, but their movement is exaggerated.
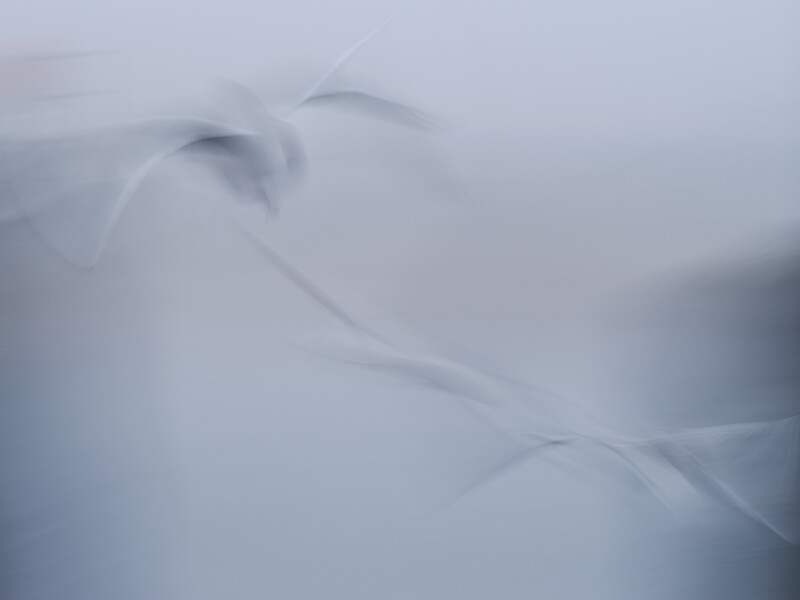
Fast waders over the sea. ISO 200, 150mm, f/8, 1/5th second.
Most intentional camera movement (ICM) shots would fit into this category.
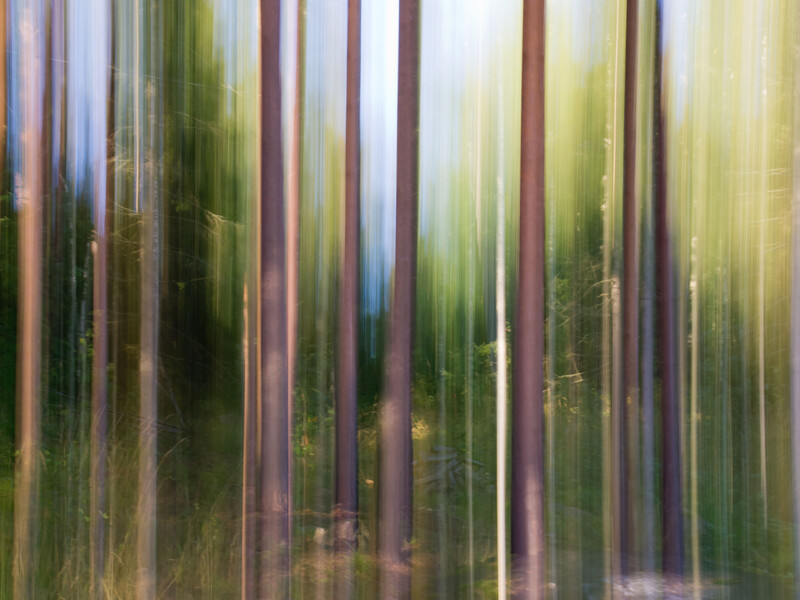
Shot 12 years ago in Finland, keeping the camera still for half the shot and then moving gave this double exposure effect. ISO 200, 35mm, f/22, 0.6 seconds.
Category 3: Where the Subject Has Blurred Beyond Instant Recognition
I would include the following image where the shape of the subject is nearly unrecognizable until studied.
Long-exposure seascapes where the pattern of the water is just discernible would fall into this category too.
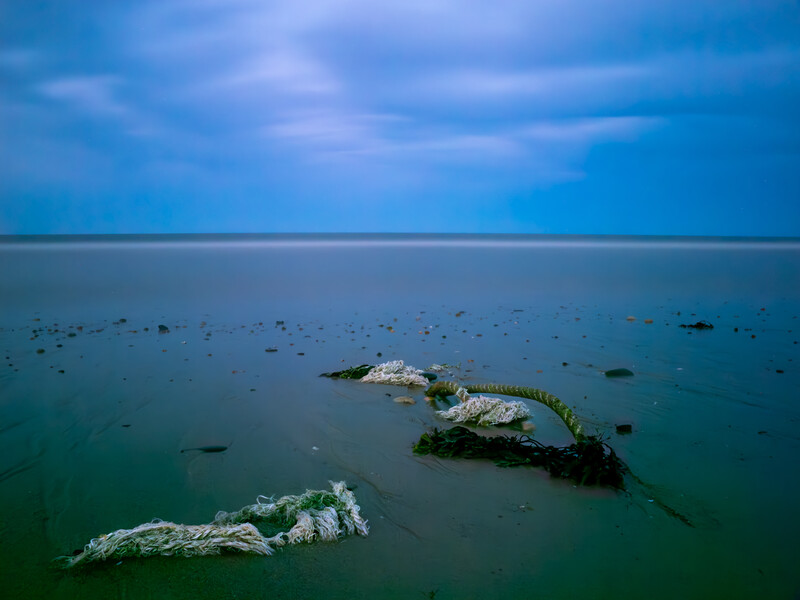
ISO 200, 17mm, f/8, 13 seconds. The movement of the water is still discernable. I would count this as Category 3 bordering on Category 4.
Category 4: Very Long Exposures
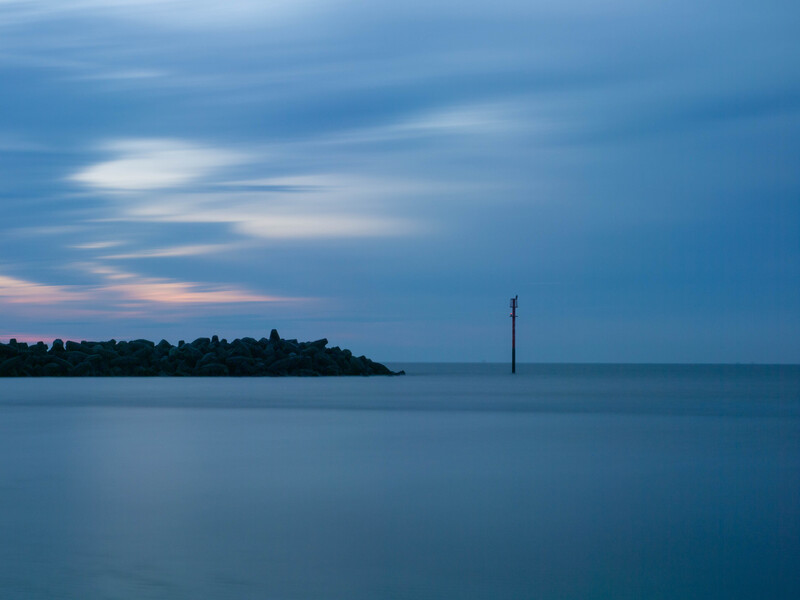
ISO 200, 17mm, f/5.6, 109 seconds, ND1000 filter. Note the elongation of the closest clouds and the smoothness of the water. The very slight texture in the foreground is caused by the ripples in the wet sand, not the water. This would be a Category 4 long exposure.
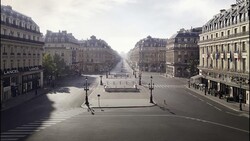
These are where the moving subject has disappeared altogether or moving light trails exist but, otherwise, only stationary objects appear in the photo. Increasing the exposure length any further would make little or no difference to the photo. Street scenes where the people have vanished, car light trails where the actual vehicles are invisible, smooth and milky moving water, and exceptionally long star trail shots would all fall into this category. Nighttime light painting would also fit into this category.
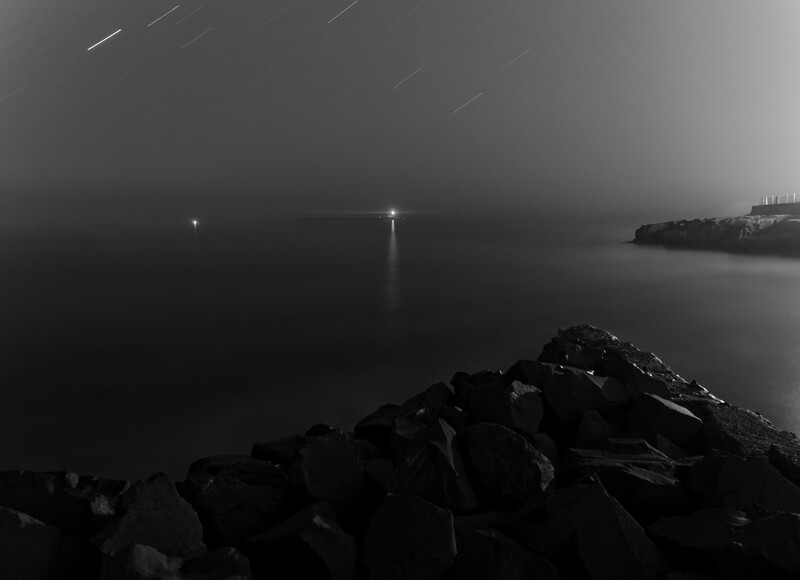
Category 4: ISO 200, 12mm, f/2.8, 766 seconds.
Methods of Achieving Long Exposures
If you just left your shutter open for a long time without accounting for that in other ways, the picture would over-expose. Consequently, one must reduce the amount of light reaching the sensor. There are several ways of doing this, and they can be used in isolation or combined. Like everything in photography, each has its advantages and disadvantages.
ISO 200, 42mm, f/22, 2.5 seconds. This image was achieved by the combination of low light and the smallest possible aperture, which came at the cost of the softness seen in the rocks.
Two techniques are easy to implement because they are in-camera adjustments. Firstly, reducing the aperture lengthens the exposure time – assuming a constant light level and ISO setting, that is. However, it has the disadvantage of causing light to diffract around the aperture blades with more of an effect on the image than a wide aperture. Therefore, the image will be softer.
This may not be an issue for some long-exposure techniques, such as ICM.
Intentional Camera Movement (ICM). Pilgrims Way to the Holy Island of Lindesfarne, Northumberland. Low light and ND8 filter, ISO 200, 60mm, f/13, 1.4 seconds.
Secondly, on some cameras, it’s possible to lower the ISO setting below its base. Doing so, though, can reduce the dynamic range of the photo.
Another solution is shooting in low light. However, in many situations, low light is also flat light and not necessarily what the photographer is seeking.
ISO 200, 36mm, f/10, 152 seconds. Low light plus the camera's Live ND32 filter.
You can also use an ND filter. These variously darkened pieces of glass that fit in front of the lens are a great way of reducing the light coming into the camera. A 10-stop (ND1000) filter will lengthen a 1/1000-second exposure to one second. However, good quality filters are expensive, and I would always recommend using a good quality filter. But even the good ones can reduce image quality and introduce unwanted lens flare.
ISO 200, 36mm, 241 seconds, ND1000.
In-camera ND filters are great and worth a mention. The disadvantage is that they are currently only available from one camera brand. Nevertheless, the feature called Live ND I find invaluable. I especially like combining the camera’s Live ND or Live GND (graduated neutral density) filters with low light or with an ND1000 to achieve 60-second exposures in bright daylight.
ISO 200, 12mm, f/14, 4 seconds. Low light and using the Live GND feature of the camera.
One final method of slightly extending your shutter is to over-expose the image. So long as you don't blow out the highlights, making them unrecoverable, then increasing the length of time the shutter is open by one or two stops will produce an image that is recoverable in processing, especially if you shoot raw.
Additional Camera Features and Accessories to Assist in Shooting Long Exposures
Camera Choice
In P, A, S, and M modes, I would expect 60 seconds to be available as a standard for Type 4 long exposures. However, many cameras are very limited in their ability to shoot long exposures with an inadequate minimum shutter speed of 30 seconds or less. Beyond that, the photographer must resort to using bulb mode. For most cameras, this means either bringing a separate light meter or guessing the length of the exposure.
ISO 200, 12mm, 867 seconds (14.45 minutes), f/11, low light, ND1000. The correct exposure was achieved using the camera's Live Time feature that lets you watch the image develop on the screen.
For those wanting to shoot longer exposures, some cameras have been around for twelve years or more, allowing the photographer to watch the exposure gradually develop on the Live View screen. One just stops the exposure when it is bright enough, which you can judge either by looking at the picture or, better still, reading the histogram as it moves to the right. Setting the screen refresh at its longest interval – every sixty seconds – you can watch the image develop over 24 minutes. If you want an even longer exposure, how far the histogram has moved in that time gives a good idea of how much more exposure is needed.
Composite Shooting
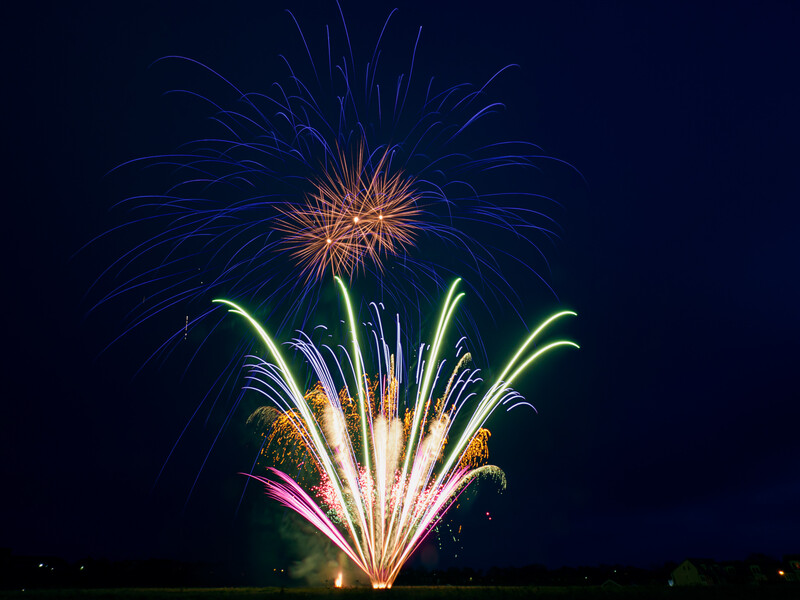
An in-camera composite mode has been available in some cameras since the early 2010s. This is where one can shoot a single long-exposure frame and then only add new light to it. It is superb for light painting and for photographing fireworks.
A single one-second exposure with the new light of various fireworks addes to it over a period of about 45 seconds using the Live Composite mode. ISO 200, 9mm, 1 second, f/9. Low light.
Remote Triggers and Tripods
Avoiding unwanted camera movement is essential for long exposures. Wirelessly firing the shutter using a smartphone is a commonplace feature that helps avoid camera shake. Wired and wireless remote triggers are great too, but don't offer an on-screen Live View like a smartphone or tablet. Using the camera's silent mode can also help as it removes the camera shake from the shutter.
A sturdy tripod is also a must. Although for some long exposure shots less so because of enhanced image stabilization that gives eight or more steps.
ISO 64, 12mm, f/5.6, 31 seconds, ND1000 filter.
How to Go About Capturing Long Exposures
The joy of long-exposure photography is that it changes the way moving subjects appear (or disappear), which is so different from the way we see them with our eyes.
For the pictures to work, either an element in the photograph or the camera must move during the exposure.
ISO 200, 43mm, 10 seconds, f/5.6.
I find it essential to plan the shot and decide what I am hoping to achieve before I set out. I consider the weather and the brightness of the day, the subject, the lens, and the ancillary gear I need to take with me. I get the camera set up before I leave the house. With sufficient experience, I know what will work for me and what won't.
ISO 200, 35mm, f.5, 4 seconds. Look at the difference a few seconds makes. Learning how settings of your camera will affect the image will lead to greater precision at achieving the result you want.
Camera Settings for Long Exposures
As I mentioned earlier, the final look of the picture will very much depend upon the length of the exposure, the speed at which the subject (or the camera) is moving, along with the focal length, and the proximity of the subject. The size of the camera’s sensor will make a difference too.
ISO 200, 36mm, 28 seconds, f/5, ND1000 filter.
Consequently, given all those variables, any definitive list of camera settings to achieve different results will be erroneous. For example, all the photos in this article were shot with Micro Four Thirds cameras. I've included the settings for you, but if you use a full frame sensor camera, you will need to either double the shutter length, double the focal length, double the speed of the subject, or halve the distance to the subject to achieve a similar result. But hopefully, they will give you a good frame of reference.
Therefore, the best thing to do is to go out and experiment. See what results you can get. Mix various techniques and explore your creativity. Only by learning the performance of your camera and the results of different shutter speeds at different focal lengths will you achieve the photography you envisioned.
ISO 200, 20mm, 0.2 seconds, f/9. Low light and ND8 filter.
Let's See Your Results
ISO 200, 150mm, f/22, 0.5 seconds.
Please post your results in the comments. It will be great to see your long exposures. Thanks for reading.
Exposure calculator app on your phone is huge help. Photopills probably the best and works on both, Android and iPhone.
But you can try Lee filters exposure calculator, Nisi exposure calculator and so on.
Guessing is not the best way to go and all the old exposure calculation tables are museum stuff.
Not sure about other brands but Canon has Bulb timer build in, so you don't even need remote shooter in cases of shooting in bulb mode ( longer than 30 seconds)
Is the bulb timer universal for all Canon cameras? I am pretty sure the client I was working with last week didn't have that feature, but maybe I missed it. (Edit: Just checked with Canon, it's "Some cameras." My client's camera didn't. Phew!)
You are right, Photopills is an excellent app that I use a lot. However, neither it nor a bulb timer gets over the issue of measuring the exact length of time the shutter should be open in the dark. What method do you use to differentiate between a 15, 30, or 45, or 60-minute exposure? Do you have a light meter that can measure that?
That's why I particularly like the feature where I can watch the image gradually develop on the screen. It is limited to 24 minutes, however, for longer exposures, I can judge how far the histogram has moved to the right in that time and multiply up to know when to stop the exposure. I'm usually doing this from a phone or tablet wirelessly tethered to my camera. As far as I am aware, that capability is only available in the OM System cameras. It takes the guesswork out of it.
It will be different for night shots with the exposure calculation, but daytime is straight forward.
I'll shoter test exposure... So let's say my test exposure for correctly exposed shot is 3 sec, f/11 at ISO 100
You take this exposure and calculate how your ND filter going to affect it (see photo attached)
Since Canon 5D mk4 I am using in camera bulb timer. I think that very easy way to find this out is that canon cameras with this function will have B on the top dial.
I think cheaper models going to bulb from full manual mode (M on the dail) when you get over the exposure limit of 30 sec. But I am not sure about that.
Now actually I remember I was doing the same for night shots. Shooting test exposure on really high ISO with shutter open and calculating time for foreground with that informations and it worked great.
Every image of yours makes one to go and try something, BAVO! One tool of cameras that very few, even pros, Reps and reviewers, know about is the Sony A7,r,s mod 1's and 2's and the on camera apps. https://www.playmemoriescameraapps.com/portal/
One is the "Digital Filter" which allows the camera to capture the sky and ground and a 3rd area with each section controlled with any and all camera settings getting a raw, jpeg or both with the ability to adjust on the horizon up or down before sending to the SD card as a whole image. And there are many more apps. The very sad thing is sales have ended for owners unaware of them. But many owners have them on their cameras and still can download the ones that they may bought not have until August 31, 2025.
You can no longer buy but if you bought some you can still download only directly to the camera not a hard drive.
Back in '14 when I bought my A7s and learned about the apps and filled it with all the apps also when I went and bought the A7SM2 and the A7R2.
If you go to the site you can see all the apps available and there a many good one even a Smooth Reflection for long exposure and Star Trails.
This is my thoughts, Sony has been selling the the A7mod 2 new even today as a first camera to get! Also my three cameras are still great and will be for years to come as well as millions of mod 1's and 2's with some not having the apps.
One reason I went Sony was because my Canon T2i was removed from Canon's site so no more updates that were on other model T3 or T4.
Sony management has started to be like others and basically getting rid of the first models that will be great for years to come, I mean how many are bought used by beginners and someone not able to buy a $2k camera.
Most used camera sellers will reset the cameras deleting all the apps.
When you first get a camera you play with it to learn all it can do and basically the only difference from a mod 1 and mod 2 is IBIS and the least known is "Bright Monitoring" great for night framing.
So when you buy a used Sony A7, r, s mod 1 or 2 ask if it has the apps on it! The S models are the only ones with Bracketing of 5 images at +/- 3EV. Great for sunrises at +/- 2EV and moons over a city/town/buildings at +/- 3EV. A lot of playtime with just that.
I say this long information for those wanting to learn long exposures that there are camera apps to help learn.
I used the "Digital Filter" back in the beginning doing astro Milky Ways getting the MW over bright towns/cities/area. Yes a little long to do. But an idea say you want a long exposure of some surf but want the above clouds to freeze motion, with this app you can and will not need PS to merge in post.
3. Is when I learned the A7RM2 would do 3 at +/- 2EV hand held.
4. A7RM2 long exposure hand held a learning time.


8 Comments
Exposure calculator app on your phone is huge help. Photopills probably the best and works on both, Android and iPhone.
But you can try Lee filters exposure calculator, Nisi exposure calculator and so on.
Guessing is not the best way to go and all the old exposure calculation tables are museum stuff.
Not sure about other brands but Canon has Bulb timer build in, so you don't even need remote shooter in cases of shooting in bulb mode ( longer than 30 seconds)
These are great. I love those.
Is the bulb timer universal for all Canon cameras? I am pretty sure the client I was working with last week didn't have that feature, but maybe I missed it. (Edit: Just checked with Canon, it's "Some cameras." My client's camera didn't. Phew!)
You are right, Photopills is an excellent app that I use a lot. However, neither it nor a bulb timer gets over the issue of measuring the exact length of time the shutter should be open in the dark. What method do you use to differentiate between a 15, 30, or 45, or 60-minute exposure? Do you have a light meter that can measure that?
That's why I particularly like the feature where I can watch the image gradually develop on the screen. It is limited to 24 minutes, however, for longer exposures, I can judge how far the histogram has moved to the right in that time and multiply up to know when to stop the exposure. I'm usually doing this from a phone or tablet wirelessly tethered to my camera. As far as I am aware, that capability is only available in the OM System cameras. It takes the guesswork out of it.
Thanks for your super contribution.
It will be different for night shots with the exposure calculation, but daytime is straight forward.
I'll shoter test exposure... So let's say my test exposure for correctly exposed shot is 3 sec, f/11 at ISO 100
You take this exposure and calculate how your ND filter going to affect it (see photo attached)
Since Canon 5D mk4 I am using in camera bulb timer. I think that very easy way to find this out is that canon cameras with this function will have B on the top dial.
I think cheaper models going to bulb from full manual mode (M on the dail) when you get over the exposure limit of 30 sec. But I am not sure about that.
Now actually I remember I was doing the same for night shots. Shooting test exposure on really high ISO with shutter open and calculating time for foreground with that informations and it worked great.
Every image of yours makes one to go and try something, BAVO! One tool of cameras that very few, even pros, Reps and reviewers, know about is the Sony A7,r,s mod 1's and 2's and the on camera apps.
https://www.playmemoriescameraapps.com/portal/
One is the "Digital Filter" which allows the camera to capture the sky and ground and a 3rd area with each section controlled with any and all camera settings getting a raw, jpeg or both with the ability to adjust on the horizon up or down before sending to the SD card as a whole image. And there are many more apps. The very sad thing is sales have ended for owners unaware of them. But many owners have them on their cameras and still can download the ones that they may bought not have until August 31, 2025.
You can no longer buy but if you bought some you can still download only directly to the camera not a hard drive.
Back in '14 when I bought my A7s and learned about the apps and filled it with all the apps also when I went and bought the A7SM2 and the A7R2.
If you go to the site you can see all the apps available and there a many good one even a Smooth Reflection for long exposure and Star Trails.
This is my thoughts, Sony has been selling the the A7mod 2 new even today as a first camera to get! Also my three cameras are still great and will be for years to come as well as millions of mod 1's and 2's with some not having the apps.
One reason I went Sony was because my Canon T2i was removed from Canon's site so no more updates that were on other model T3 or T4.
Sony management has started to be like others and basically getting rid of the first models that will be great for years to come, I mean how many are bought used by beginners and someone not able to buy a $2k camera.
Most used camera sellers will reset the cameras deleting all the apps.
When you first get a camera you play with it to learn all it can do and basically the only difference from a mod 1 and mod 2 is IBIS and the least known is "Bright Monitoring" great for night framing.
So when you buy a used Sony A7, r, s mod 1 or 2 ask if it has the apps on it! The S models are the only ones with Bracketing of 5 images at +/- 3EV. Great for sunrises at +/- 2EV and moons over a city/town/buildings at +/- 3EV. A lot of playtime with just that.
I say this long information for those wanting to learn long exposures that there are camera apps to help learn.
I used the "Digital Filter" back in the beginning doing astro Milky Ways getting the MW over bright towns/cities/area. Yes a little long to do. But an idea say you want a long exposure of some surf but want the above clouds to freeze motion, with this app you can and will not need PS to merge in post.
3. Is when I learned the A7RM2 would do 3 at +/- 2EV hand held.
4. A7RM2 long exposure hand held a learning time.
Lovely work, and thank you for that excellent explanation.
Welcome
Thanks for the article. I enjoy experimenting with long exposures.
Fabulous, Remona. It's definitely an area of of photography to enjoy. Thank you for sharing and for signing up to comment.