One of the most fundamental artificial lighting techniques is the use of fill flash. It is a versatile technique that can quickly and drastically improve your on-location photos. This helpful video will show you the basics of fill flash, both why and how it is used.
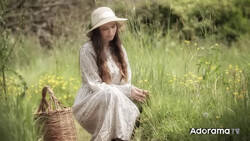
Coming to you from Mark Wallace with Adorama TV, this helpful video will show you the basics of fill flash. Fill flash is a common practice for on-location portraits. The issue with these images arises when one is shooting backlit portraits. Photographers often love to place a sunset behind their subjects for dramatic effect. The issue then, however, is that if you expose for the sky, your subject will be underexposed, and if you expose for your subject, the sky will be overexposed and you will likely blow out your highlights. Since you can't control the level of the ambient light, you are forced into exposing for it, thereby underexposing your subject. To compensate, you can then add a bit of flash on your subject to balance out the exposure. It is a highly useful technique that can really improve your on-location portraits. Check out the video above for the full rundown from Wallace.


5 Comments
a easy go to from a dinosaur film burner. Lie to your flash. Set the ISO/ASA to a stop faster than your shooting at. IE: shooting at ISO/ ASA 100 on camera. Set flash to ISO/ASA 200. Works TTL, Auto and Manual. Volia, perfect 3:2 fill.
Yes, that is exactly how it has been done already at least 30 years ago. Works perfectly. Shot several weddings (analogue, manual focus and exposure) this way. Did not use TTL with fill flash though. The above screenshot of the video is a rather bad example of fill flash.
LOL. This dinosaur just might know a thing or two...Have a drink on Me!
How do you set the flash ISO? Aren't the adjustments by power?
power adjustments are on monolights and strobe units and some speedlights for Manual control. On Speedlights or camera mountable units there should also be a button or dial or menu choice to manually set the ISO/ASA. Check your instruction book for you individual flash.For strobes and monolights where there is a power output adjustment use the inverse square so whatever power setting you have the main strobe set at for correct exposure "N"you are going to have to cut the power output of the fill by a factor of 2. In this example the main light is the sun. Because 1 stop = 2X as much light. and as the distance from the light source to subject doubles you need 4X as much light or an increase of 2 stops of light. IE.: N=1/125 f/8.metered ambient. set power of unit that correct exposure of fill unit light is1\125 f/5.6 . 1 stop less the amount than the main Expose at the Main ambient reading this case 1\125 f/8. You will need a flash capable light meter to do this. When metering the fill use same method as ambient (incident or reflective). The Profoto A's and Chinese clones that you can camera mount set the power by fractions of the whole power output. When in doubt you are going to have to meter ambient to strobe and calculated a 3:2 ratio.