The five-in-one reflector is one of the first accessories any photographer should own, and it's something you'll likely hang on to throughout your career, as it proves itself endlessly useful and versatile. This great video shows the wide range of different looks you can achieve using a single light and reflector.
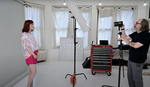
Coming to you from Daniel Norton with Adorama TV, this awesome video shows off the versatility of the five-in-one reflector. Light modifiers can be awfully expensive accessories, but as you'll see here, Norton uses a monolight with just the built-in reflector, then uses the five-in-one reflector to achieve a variety of different looks. My personal favorite is using the diffuser panel. It's a great way to instantly turn any hard light source into a soft, flattering one, and it's actually what I use most with my five-in-one reflector. As long as it isn't too windy out, it makes it easy to shoot at any time of day and get a flattering light on my subject, even during midday, when the sun is high overhead and producing the most difficult light. It's one of the best and cheapest tools any photographer can have. Check out the video above for the full rundown.


+1
I'm a studio noob, what's the benefit of using a reflector as a diffuser like this versus a softbox? Or is he just saying you can use it to diffuse non-strobe light sources like the sun? It seems like the two modifiers would create similar results, assuming they're the same size relative to the subject.
Yes. Using the translucent part of a 5 in 1 reflector will achieve basically the same results as a softbox. But as you stated the scrim gives you a bit of extra use by holding above the subject on a bright sunny day to knock down the contrast. It's obviously less cumbersome and easier to carry if you plan on walking a great distance with or w/o an assistant.Using a scrim in the studio also allows you to allow the extra light from a strobe to be directed at other areas. The late great Dean Collins did many awesome tutorials on this technique but YT has tons of them too. Eg- shine a strobe at the back or side wall of the studio but place the diffuser between the strobe and your subject. Hope that gets you started.
Using a simple diffuser in front of a point light gives similar results as a softbox only if the subject is not too much reflective. So for a person, that's similar. For reflective subjects such as glass or metal, that's another story. On those surfaces you will see direct reflections of the light source, just like in a mirror. That means if your light source is a softbox, you'll see its reflection : a uniform rectangle of light (it is so because all the reflectors that form the inside of the softbox). If your light source is a point light behind a diffuser, you'll see its reflection: a beautiful gradient of light raking across the diffuser. And more often than not, in product photography, you're after those smooth gradients so you even go one step beyond: placing a diffuser in front of a softbox :-)
Cost.
I use mine more for video or from below since sometimes you can't get stands to go low enough. I used to try and use it if they were on there knees or lying on the ground but now I just have them up on a table higher to the lighting and make it look like ground. In the case of him pretending this is the sun you'd probably want two reflectors, one to diffuse the sun and one to bounce fill back in. Less hassle if you just take a strobe and shoot them with their back to to the sun.