Color toning is one of those finishing touches that can add a lot of personal style and elegance to a photo. This great tutorial will show you how to quickly and effectively color tone an image.
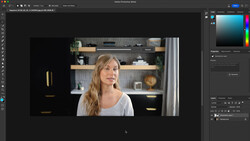
Coming to you from Aaron Nace over at Phlearn, this helpful tutorial will show you how to color tone an image using the Levels adjustment layer in Photoshop. The trick comes in switching to the individual red, green, and blue color channels in the dialog box to adjust their relative levels in the shadows, midtones, and highlights. Two things to remember: first, less is generally more with this sort of thing. It's very easy to go overboard with something like color toning and end up with a rather tacky result. Remember, you can always use the opacity slider to dial back the effect. Personally, I recommend stepping away from an image for a few minutes after you finish an edit and giving it a second look with fresh eyes. Second, pay close attention to skin tones when you color tone, as those are something you don't want to inadvertently adversely affect. Check out the video above for the full rundown of the technique.


1 Comment