
Have you ever been to a spectacularly picturesque location and envisioned a perfect image in your head, only to never commit and follow it through? I’m far too guilty of that, but this time, I was determined to get the shot I wanted, no matter how many ridiculously hilarious mistakes it took along the way. Here’s how I did it.
Photography can be a perfect moment frozen in time, where the gods smile on you and conspire to deliver everything you need at a critical instant. It’s what makes the iconic photos stand out from the rest. The only problem for most of us is that those moments where all the elements of a composition come together simultaneously in perfect synchronicity are about as rare as relaxing midnight skinny dips in a bitter Finland winter.
We might look at a location and see the potential for an incredible sunrise in the left part of the frame. Or for perfect golden light to hit a particular element in the right side of the frame. Or for your subject to be positioned in a specific way at a precise time with a certain kind of hue kissing them. But how often do you get them all at once, especially when there are people involved? It’s virtually impossible to guarantee a perfect result in a single exposure, so that’s why blending can be hugely beneficial.
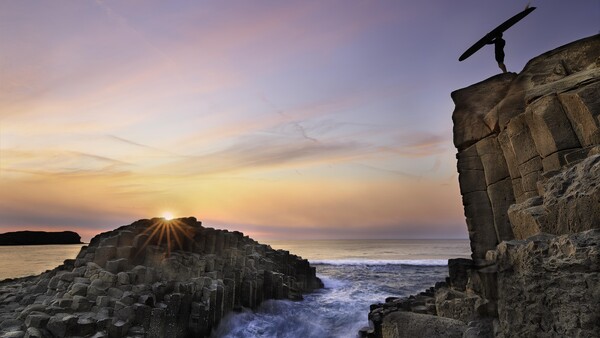
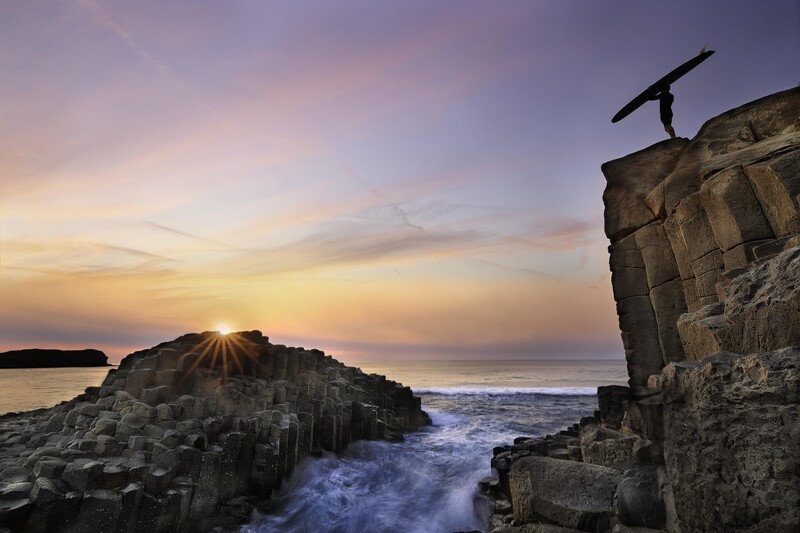
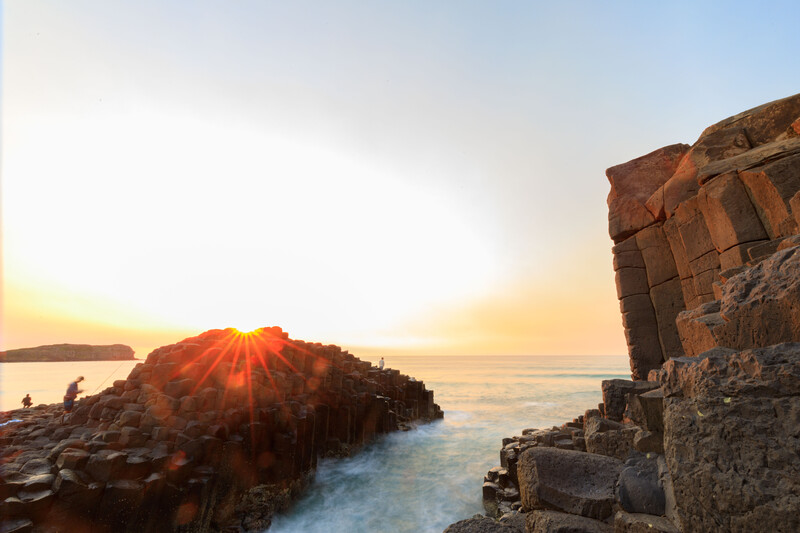
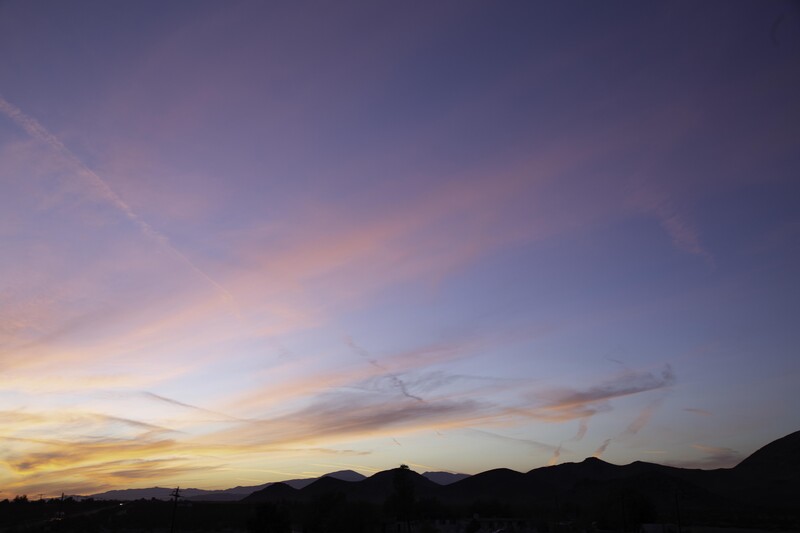
On a recent trip back home with my family, I had an idea for a photo at a location in far north New South Wales on Australia's east coast. It's a tremendously popular location because of its views and rock formations and has been beautifully photographed by many talented people. However, I had an idea for an image that I'd never seen from that location before and had run it through my head countless times before the trip. I'm ecstatic to say that everything I'd envisioned came to fruition, the result of which you can see just below. It's six different exposures blended together for a single final image. I'm pretty happy with, it and I want to run you through the entire process so that you might get some inspiration to try something similar.
Planning
When you're considering a shot that will involve multiple exposures, I can't emphasize enough how important actual planning is. For this shot, I went out to the location the previous afternoon and scouted lots of different shooting positions. It's also vital that you take the gear you're likely to use with you on your reconnaissance mission. You might think you know which lens you'll use, but invariably, you find out that a different lens might actually be more ideal. I took my entire kit out the day before and experimented with different lenses from different vantage points.
I'm glad I did, because my original idea was to position the subject on the rocks to the left and let the sunrise come up directly over the top of the silhouette. However, I soon realized that wouldn't be possible because of the high tide the following morning and the dangers of trying to get to the rock with a giant surfboard in my hand. So, I opted for the subject to stand atop the cliff face on the right, which meant I needed my wide angle lens. Finally, once I'd decided on the composition and taken a few test shots, I marked out the rock I wanted to place the tripod on and put down some clearly identifiable markers. When you're out on rocks like that in the dark of morning, the last thing you want to be doing is searching around for a good place to shoot.
Shooting Multiple Exposures
As the title suggests, this is a blend of six different images, so I had to use a tripod. When you know you're going to be shooting for ideal light in different parts of the frame at different times, it's important that your camera's still and there are no moving parts. If you don't use a tripod, it makes post-production a nightmare, if not impossible. You can see the shots I used for this blend all lined up in Lightroom below. Most importantly, they're all from exactly the same position.
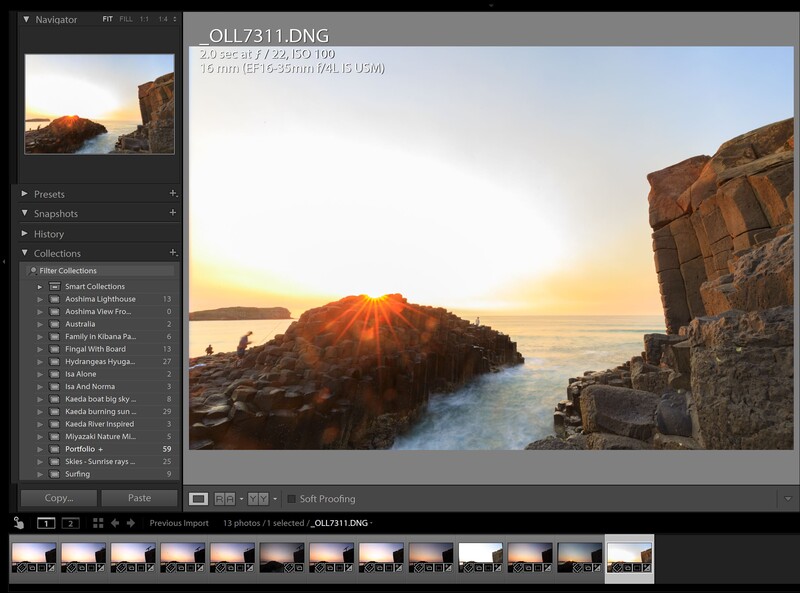
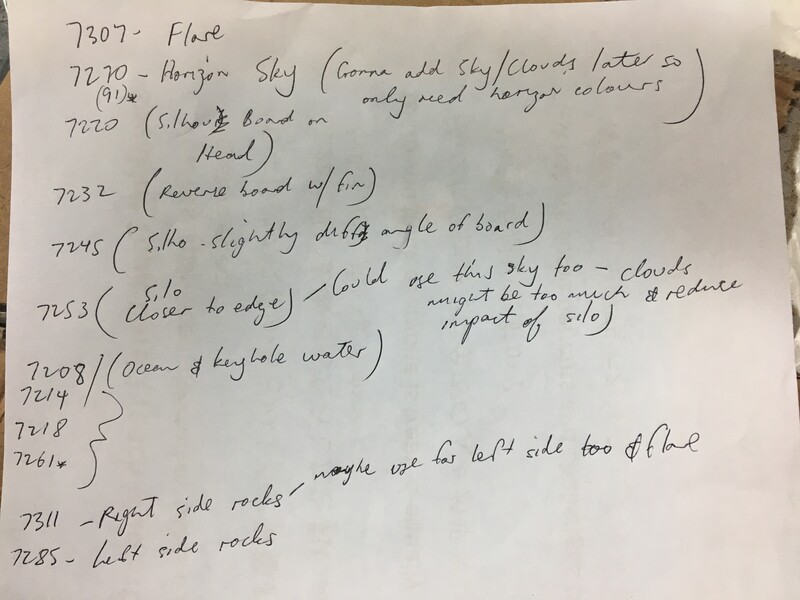
In total, I took something like 60 shots (excluding the shots of the surfer) and then narrowed down the potentials to the 13 you see above. Once I got all the shots onto my hard drive, I went through them one by one and made some notes on a piece of paper before importing into Lightroom (I use Fast Stone Image Viewer to run through photos initially). You can see my handwritten notes in the image below.
After that, I did some minor tweaks in Lightroom. It's a good idea to try to find some consistency with white balance and exposure so that the blend will be as seamless as possible, though when you're doing so much masking, it's not the end of the world if you don't. I did all my minor adjustments such as lens corrections, horizons, sharpening (removing), and a touch of whites, highlights, shadows, and blacks in Lightroom and then sent them all over to Photoshop.
Different people have different workflows, and you should do whatever works for you. I tend to stack my exposures together by the proximity of the elements so I can work on things that are close to each other and get consistency of light that way. Therefore, in this image, I started with the rocks on the right, as in the image below. I really wanted some warmth on the face of the rocks, so it was one of the last shots I took that morning. Funnily enough, I liked the sun flare here too, but the top part of the sun was far too blown out to be of any use to me. It's important to remember when you're aiming to blend images that it doesn't matter if some parts of the frame look horrible. All that you need to get right is the element you want to blend later. In this image here, pretty much everything except for the rocks on the right are useless, but that's fine, because I only wanted the rocks on the right anyway.
After that, I worked on the water in the keyhole. For that exposure, I left the shutter open a little longer in order to get that wispy, ethereal effect in the water. I took about 10 shots here, and it was essentially just trial and error with timing the waves against my exposure setting. After a few errors, you start to get the timing right, and then, you just have to wait to get the right one. One thing to keep in mind is that you don't want to spend too long on each exposure. When you're working with ever-changing light and a looming sunrise, you need to be as precise as possible and not linger and wait for the absolute perfect shot for each exposure. If you do, you'll leave yourself short of time for other exposures. I got three or four I liked, then settled on the one below.
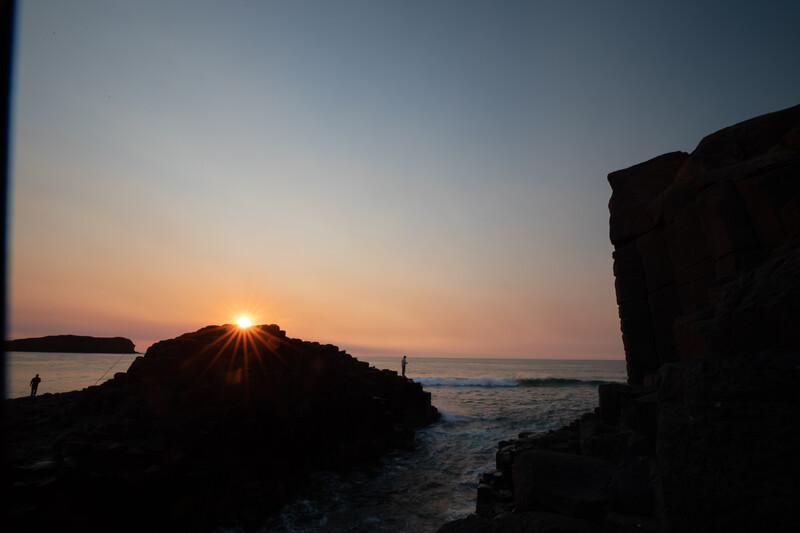
I went through the same process for other parts of the image, so I won't bore you with every last detail. I'll just make a short mention of two more things: the sun and the surfer standing up top. For the sun, I wanted that starburst effect. In order to get that, you need to wait until the sun is visible but partially blocked by something. In this case, it was the rocks on the left. As the sun rose, I narrowed my aperture (to f/20) and took a few shots. I didn't want the flare to be too big or overwhelming, because I wanted the viewer to focus more on the surfer standing on the cliff top rather than the sun. So, I was happy with the politely modest sunbeams I got here. You can see some of the ND grad filter on the left part of the frame. For this shot, I was using a 2-stop filter. You need a holder, which I put on the lens before everything began in order to minimize camera movement on the tripod during the shoot. It doesn't matter that some of the filter got in the frame, because I only needed to mask in the sun.
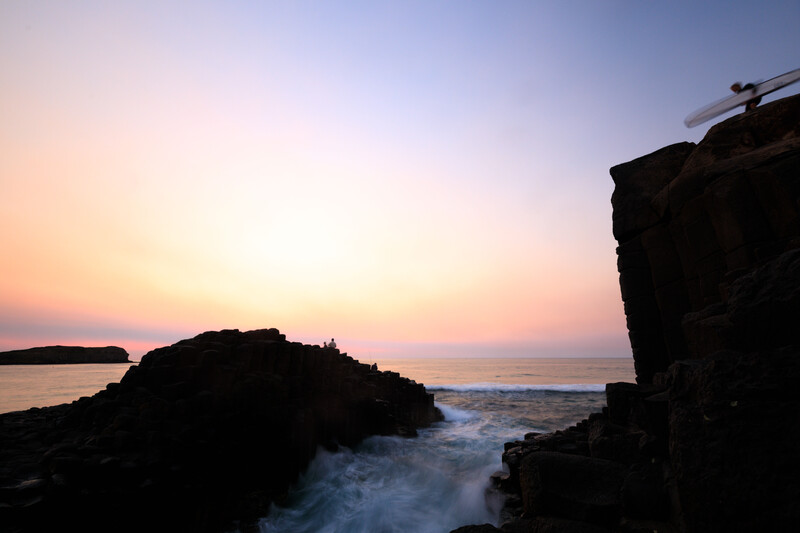
Finally, the fun part: the exposure of the surfer up top holding the surfboard. It was a rather arduous task lugging that big longboard up to the headland before 5 a.m., and it was with a great deal of trepidation that I left it up there while I took the exposures below, not for fear of theft, but fear that it might get blown away off the rocks and come crashing down to an explosive pile of failed glory beneath me. It's rather windy up there at the best of times, so I tried to find a protected spot and then hoped for the best. When it came time to shoot, I set the camera up to take about 60 shots at two-second intervals. That gave me enough time to scoot up the rocks and get the board, then get into position, then try different ways of holding the board. It was all guesswork, but I had marked out a spot the previous day that I knew would be approximately right. Then, it was just up to me to hold the board steady for each exposure and slightly shift my weight or the angle of the board.
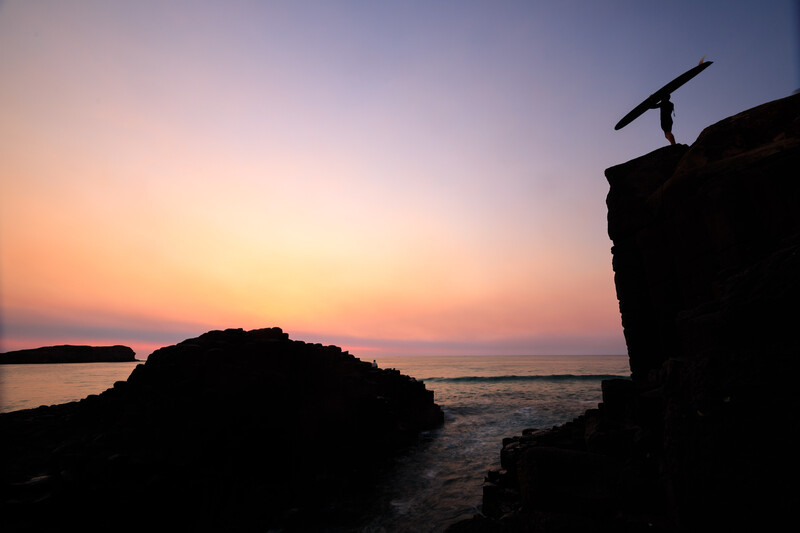
After about three minutes, I'd scoot back down the rocks again and check the focus and the position of the board and the silhouette. A couple of times, I didn't like how the fin was angled against the sky or the position of my arms, so I'd set the interval timer again, hit the shutter button, then hightail it up the rocks to repeat the process. All up, I did it four times for a total of about 240 exposures. I narrowed it down to about six possibles and finally came up with the one below. The main reason I liked this one is that the board is angled directly toward the sun, which, in all honestly, was rather fortuitous (though in future discussions, I'll insist was deliberate).
For each exposure, I'd just mask in the elements I wanted and ensure consistency of colors. Then I'd hit ctrl + shift + alt + E (Windows) and start working from a new base layer.
Adding the Sky
The last piece to the puzzle was the sky. As you can see from the previous exposures, there wasn't a lot of interest in the sky. That's actually a good thing when you want to blend skies, because it makes the transition much smoother. I trialed a bunch of skies and finally came up with the one I have below. What I was also wary of was getting a sky that had too much going on in the top right corner. That's where my subject was standing, so I didn't want anything detracting from that.
This sky is not too loud and offensive, nor is it out of place. The trick with sky replacements is subtlety, so you should always try to go for something that adds a little spice to your image rather than overpower the whole thing. To make this blend, I simply used the Blend if option in Photoshop and tweaked the sliders to fit. If you'd like to read more about doing sky replacements effectively, I've written about them here.
My Mistakes
Ah yes, the mistakes. What would a shoot like this be without mistakes? When the final result all works out, you tend to gloss over things you messed up, but believe me, there were plenty of amateur shenanigans going on during the creation of this shot. Here are just a few:
- I put my wetsuit on backwards, then put my clothes on top. I didn't realize until halfway through the drive, meaning I had to change in the carpark. In the dark. And get naked in front of a bunch of fishermen.
- I charged two batteries overnight, then forgot to bring them. Thankfully, I had spares.
- I left the fin in the car and didn't realize until I'd walked about 200 meters with the longboard and camera bag slung over my shoulders.
- In my haste, I dropped my surfboard. On my foot.
- For my first interval timer run, I forgot I'd set the camera to a two-second delay for each exposure.
- I didn't have enough money in my wallet to celebrate my success with a coffee on the way home!
Summing Up
We all go to great locations and create wonderful compositions in our minds. But due to life or laziness often getting in the way, we rarely follow through with the ideas that our imaginations conjure up. I knew I wouldn't be returning to Australia for the best part of two years after this trip, so I was absolutely determined to get this shot done, no matter how many obstacles were in my way. In the end, I realized that it's eminently doable, as long as you plan beforehand and have a very precise idea of what you want before you go. When you're racing against time and a rising sun, you can't rely on making snap decisions without any forethought.
So, if you've always had an idea about an image you'd like to create through blending multiple exposures, I hope this has given you some food for thought. Hit me up with any comments or questions you might have below, as I'd love to hear from you.


Join the Fstoppers community for free
-
Post comments and join in the discussions
-
Browse the site ad-free
-
Share your work and get featured in the community
-
Compete in the photo contests for fun and prizes
29 Comments
What is going on with the blending in your shot? Something seriously went wrong there
Thought it was my eye...there is strange things going on, and clear halos
After reading through the article again it seems like they freehanded the masks instead of using luminosity masks
Yes you’re exactly right. In my haste to get this article (and edit) ready that’s a big oversight on my part. I wanted to keep some of the sun flare from the first pic in the ‘Shooting Multiple Exposures’ section of the article. But that’s obviously not the case with the final result. Fresh eyes are always helpful. Cheers
Hey, I think you did an awesome job on this article. For one, I don't have to watch a video, and 2, your examples and walkthrough are great. I learned a couple things I didn't think to try before.
Nice job.
Thanks Phil. As mentioned above, there are a couple of post-production/masking issues that need to be fixed but that's easily doable in this world of digital photography. The most satisfying thing for me was having an idea in my head, putting it down on paper, then going outside and going through the different stages of getting it. Some minor issues obviously but the entire exercise was eminently pleasing for me,.
Nice to see a positive comment here on FStopppers. Increasingly we are seeing more and more angry-white-guy comments here no matter what the topic of discussion is.
The cliff on the right is glowing / halo, I can see it on my phone screen itself.
I suppose that blending exposures isn't easy.
Yeah definitely some more cleaning up to do
Love these 'How I did it" articles! Including the mess-ups. I'll have to make a check-list to make sure I bring all the batteries that are still on the charger. And bring more money!! :D
Cheers. Ultimately, we’re all just photography enthusiasts. Just coz we write here doesn’t mean we’re mistake-free. I have since started making a checklist to go thru before I walk out the door to save me from such ridiculous mistakes pre-shoot!
As others have said, the blending is a mess. Overall though, the shot just isn’t that good. Why go through this much effort on a mediocre composition? And the worst/weirdest part is that you didn’t even have a sky. Why not put the Milky Way or a giant moon behind it? If you’re going to make amateurish digital art, why not go all out?
Not photography, (weak) digital art.
Nice of you to create an account solely to troll someone.
Each to their own. Aside from the obvious blending errors I like the composition a lot. I’ve shot that location in single (and bracketed) exposures many times, as have 100s of others. It’s a great spot, but shot to death. I like trying to create things I haven’t seen before and this was a very enjoyable and rewarding experience for me.
Miles, if you shot the original photos used in the composite, I don't care how much you manipulate it. That's indeed photography. If you used stock images to create something then that's not photography.
You must be one of those people who have weak post processing skills, and then when you see other people's nice photos you cry "it's photoshopped". In the end it's your own attitude that's the limiting factor on how great you can get in photography.
Yeah I think the title and the article shows pretty clearly it’s a bunch of shots put together. I had the idea and took all the shots in a single shoot (except the sky). Whether that’s photography, digital art, compositing, or whatever is open to discussion. I don’t mind criticism as long as it’s constructive and instructive to all readers. Cheers
Back in to your cave, Miles. Iain, just ignore idiots like Miles who's comments are worth nothing.
Haha all good mate. You can never please all of the people all of the time. Cheers
Ive just begun taking single exposures again and giving bracketing a rest. its definitely an effective tool but rarely does the image end up looking real so ive decided to start lifting the shadows on a single exposure and my last 2 shots are much more balanced.
It was on the back of a Joe Cornish editing tutorial video where he did that exact thing.
I think the blending errors came here coz of my haste in putting all the exposures together, but also coz they didn’t come from a single (bracketed) exposure. The whole thing took about an hour from beginning to end with various shots at various times. The last few (still on tripod) showed evidence of the slightest bit of camera movement.
Even <1mm can play silly buggers with post if you’re not really really careful and thorough. I paid more attention to the idea, the planning, and the process and not enough to post. The good thing is that with all the RAW files post is the easiest thing to fix. I can’t exactly fly back to Australia this evening.....
I’ll check out Joe Cornish. Cheers
Yeah its a great image, like you say with some minor tweaks.
I think its the OnLandscape youtube channel it was on, he was editing a sunset shot right into the sun and he lifted the shadows from basically nothing then said modern cameras are amazing with dynamic range now so it got me thinking.
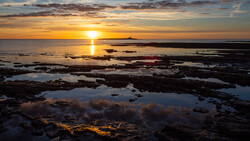
This is my shot i took anyway, single exposure.
Nice shot. The main thing I’m wary of with lifting shadows to max values is increased noise but if that isn’t an issue then yeah, bracketed exposures aren’t the be all end all. Thanks for sharing
Because its so easy on the Fuji to select bracketing mode i normally shoot 5 shots at a time with 2 over and 2 under then when i get home if i cant get the results from a single exposure ill merge a few in Aurora HDR.. its a bit of a safety blanket then isnt it.
and like you said you cant easily return to locations/conditions so its best to get the shots first and foremost:)
You are right about the noise, but ive found its more in dark scenes that happens, which would definitely benefit from bracketing.
You just have to find what works for you and learn from others who’ve figured out good ways to do things. The best way to learn os get out there and do it often and then put into practice what you’ve learned.
Yes absolutely Iain:) Ive learnt all my skills so far from the internet and people like yourself posting articles.
Including my mistakes. They are just as important to learn from :)
This shot should be on IG's @kook_of_the_day
Idk why photographers have this constant need to circle jerk about what time they woke up. My bf wakes up for work at 4:30 am 5 days a week, I used to wake up at 2 am to be at a bakery for 4, its not some life shattering event lmao.
Actual serious questions, not just sarcasm lol - does anyone here care that this guy woke up at 4 am? Did it make you look at the article differently?
I respect him for getting up at that time to head out and take photos.
I take it when you refer to circle jerk you are implying no female photographer would get involved in this, its only the males?