
Breathing new life into your studio space shoot after shoot doesn't have to be difficult and it doesn't have to be expensive. With just a few simple DIY tricks, it's actually pretty easy to transform a plain white studio space into a stunning set.
My goal for this shoot was to take our simple white studio space and create a dramatic dark image with our model using some tricks I picked up shooting our tutorial with Clay Cook. The first step was to change the look of the set. For the background, I chose to add a medium brown cloth backdrop that has a nice texture to it. To give some dimensionality to the set I added a piece of foam core from Home Depot which I had painted with chalk paint. Finally, to hide the white floor space, I spread out a cloth backdrop on the ground and slid some sandbags under the cloth to give it some extra shape.
Lighting
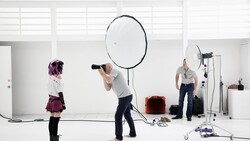
With set was built, I had the model sit on a stool and staged the lighting. I set up a 3-foot octabox on a boom stand with a Profoto B1 and put it camera left, the direction my model was facing. Putting the light close to my subject meant that the light would fall off quickly from her face to her lower body.
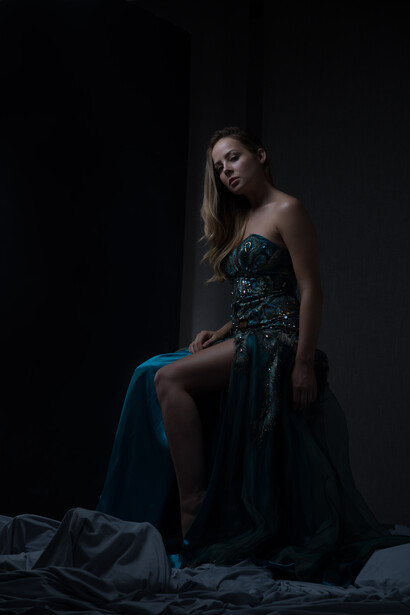
Placing the light so close to my model definitely brought the right mood to the image but the as you'll notice from the picture, the background is almost completely lost. To help bring out some of the texture on my foam core, I added another light with a 10-degree honeycomb grid on it to keep the light contained to a small area on the background.

With my background where I wanted it to be, my attention was next draw to the floor. The background cloth that I had covered the ground with was a little lighter in color than I would have liked. Although I could easily darken this in post-processing, I wanted to diminish the amount of light that was hitting the ground so I added a black card to cut off as much light as possible from spilling downward, while also maintaining the light I had on the models face.

The final touch was to bring out cut out the models leg and dress from the background a little more. I added a third light with a small softbox slightly behind her leg and dress and kept it on a low power setting.

With the lighting all set, I dropped my camera a little lower to bring emphasize the texture of the floor and give the model a more empowering pose. We shot a bunch of frames to nail the final pose and I chose my favorite to edit.
The Final Shot
In post, I cleaned up the model's skin and touched up some spots on the background, then added a final look to the image using Alien Skin.
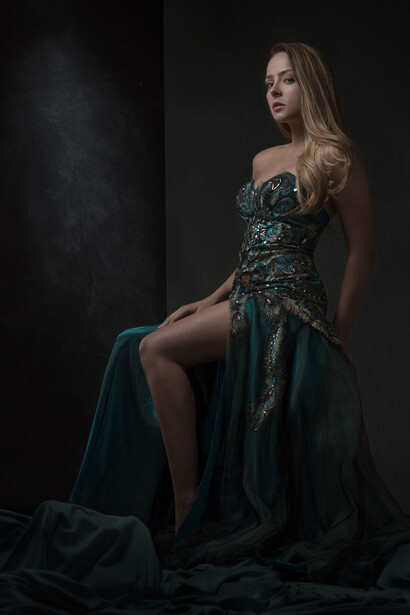
When you see this image, it's hardly obvious it was shot in our standard white studio space. All it takes to create a mood like this is a little creativity with set building and backdrop materials. Hopefully, this inspires you to try something new on your next studio shoot.


Join the Fstoppers community for free
-
Post comments and join in the discussions
-
Browse the site ad-free
-
Share your work and get featured in the community
-
Compete in the photo contests for fun and prizes
15 Comments
Dude that's poly board, not foam-core, my feelings.
What is poly board? I've never heard it called that before. This was essentially the same board you use for those 5th grade science projects.
Was referencing the 4x8' panel around the one minute mark. Anyways, it was meant in jest. Good content in the video.
Ah, that's actually insulation board used in attics and walls here in the US. You can find it at any home building store.
Patrick, could you please criss-cross your camera strap? I am watching the video nervously hoping the camera does not slip off your shoulder :-)
I always wear my camera off one arm like that....unless I'm walking in a busy area where crime could be an issue. It never falls off 🤷🏻♂️
If it works for you, great. Anything with a strap I criss-cross. When relying on one shoulder you raise the shoulder to hold the strap, bad for the back.
Nice video. Cheers.
Cool, Love it
Some nice info there, thanks. Funny, I've been thinking of making some micro sets for a series of comps I've been working on forever. That foam core board can be useful. Does it come any thicker?
If you are talking about what he's using @ 1:05, it's polyboard. I can get up to 2" thick local, "Expanded Polystyrene Foam Insulation", may come thicker, not actually sure. It paints really well, and if you run a piece of gaffers around the edges you can help it last longer.
Beautiful work and great tutorial
Without sounding too jerky (because i'm really not, i promise), the best way to do a moody set in a white studio is to... cover up all the white with by adding dark backdrops to both the wall and floor and add some foamcore?
You're technically not shooting a moody set in a plain white studio, but completely removing all white and replacing it with dark tones, no? Yes, it's not obvious it was shot in a white studio, but that's because the white was all replaced, which is normally done using paper roll backdrops already set up in most studios. (Including mine, thanks charcoal grey seamless)
Was just curious, since assuming from the title, the article would show techniques for creating moody looks in a studio that's still white.
Grat video, nice photo.
Where did you get the motorized background stand?