
I can still remember the first time I saw the effects of bounce flash. The soft natural light looked unlike anything I had seen from my little point and shoot's direct flash, and the resulting image looked so natural. Soon afterward I was introduced to off camera flash and a variety of light modifiers. The results between all of these lighting techniques were not subtle and I became obsessed with finding my favorite tools to light people. In today's video, I explain how one single flash both on and off camera, and a few light modifiers can give you the perfect light quickly and easily.
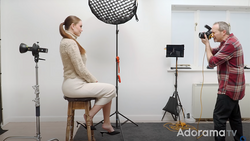
This article is primarily focused on those photographers who shoot events, nightlife, and weddings. In all of these genres of photography, you have to be quick on your feet and you rarely have a ton of time to craft out perfectly nuanced light. Generally, you simply need a reliable setup that can give you interesting and flattering images time and time again. However, having a few tricks up your sleeve isn't only reserved for those run and gun photographers trying to capture candid moments. If you are an editorial or portrait photographer, having a lean and mean single light setup that produces great results can be worth its weight in gold.
Today I want to share with you a few of my favorite light modifiers that can be used both on your on camera flash as well as off camera. As you will see in the video above, some of these lighting techniques produce super soft "forgiving" light that can be used in all situations while other lighting techniques will produce super contrasty and moody lighting that might be best suited for a portrait. Finding the best light modifier is much like trying to find the best guitar effect or shopping for the perfect car. No one technique here will become your single go to lighting method, but by understanding how each of these modifiers shapes highlights and shadows, you should be able to get just about any lighting style you want with minimal effort.
Direct Flash
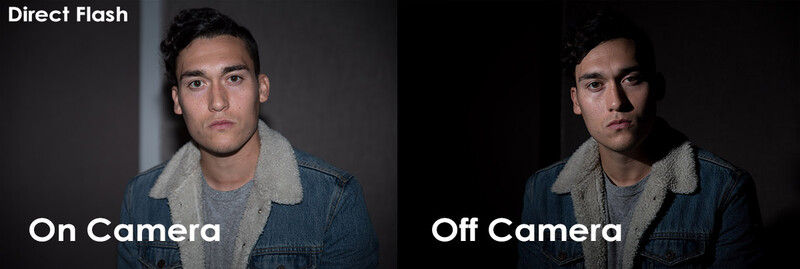
Direct flash is by far the most commonly used form of flash photography. Everything from those cheap disposable film cameras from the 90s to your iPhone uses this form of flash to illuminate your subject. Direct flash is generally categorized by a small, harsh light firing straight forward. Unlike off camera on-axis direct flash, direct flash for the purpose of this article will also mean that the flash is positioned somewhere very close to your camera's lens. If your camera has a built-in flash, this will be positioned literally inches away from your lens, but if you have an external speedlight, this on camera flash could be 6 to 8 inches away from your lens. In either case, direct flash is going to be the most powerful and efficient form of lighting your subject, but it is rarely the most flattering.
That being said, I do not want to dismiss the idea of using direct flash. Photographers like David Lachapelle and Terry Richardson have made entire careers out of using direct flash. Direct flash has a very flat yet contrasty look to it that makes it great for fashion and editorial work. This photography style is also subconsciously burned into the brains of anyone who has ever taken a photo so it looks kind of natural even though it's a very unnatural position for a light to ever be placed. Because of it's less than flattering effects on the human face, direct flash is most useful when your subject has great bone structure and has an above average level of attractiveness... and even then a good bit of retouching can help make the resulting image even more appealing. For event photography and weddings, I would recommend almost completely avoiding direct flash at all cost unless of course you find yourself in a bind and cannot use bounce flash or some sort of off-camera lighting.
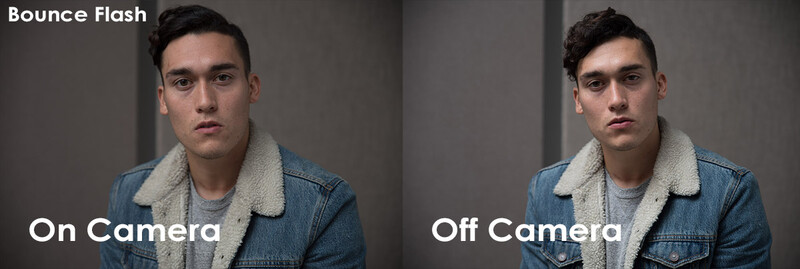
The Bounce Flash
I think it's really important to begin with the most basic lighting technique known to man: the bounce flash. Bounce flash is simply a way of taking your on camera flash and moving it's flash position from directly above your camera to anywhere in the room. This is achieved by rotating the flash head and firing your flash into another surface like a ceiling, a nearby wall, a scrim, or even the floor. Generally what this does is it takes the small, hard light coming directly forward from your camera and turns it into a much larger, soft light coming from another direction besides straightforward. The advantage here is that with one single "unmodified" flash, you can easily get soft light that looks super flattering in almost any situation. The disadvantage is that it consumes a lot of flash power and the photos can sometimes look a little too evenly lit.
Off-Camera Flash
Once a photographer masters the basics of bounce flash, the next step is to take the flash off the camera and point it back at your subject from a non on-axis direction. Of course, this technique requires either a long cable or radio triggers like Pocket Wizards so the camera can still fire the flash remotely. What off-camera lighting will offer over on-camera lighting is much more control in your shadows and highlights. These highlights and shadows are what give objects three-dimensionality and off-camera flash will give you the most control over these elements in your photos.
An unmodified flash that is placed off camera will still produce very harsh highlights and shadows much like we see in nature with our sun acting as a single light source. As you can see in the video and photos below, this harsh direct flash placed off camera can produce some very dramatic effects with no modification at all. However, if you want to soften this light in a way that resembles the soft light of bounce flash, you are going to have to add some sort of material to the flash to make it appear larger in size. It's always important to remember, the larger the light source appears to your subject, the softer the shadows and highlights will become. The best way to remember this concept is to compare the shadows and highlights you see on a bright and sunny day versus an overcast day. By modifying our single speedlight with a variety of different light modifiers, we can completely change the way shadows appear on someone's face as well as our backgrounds.
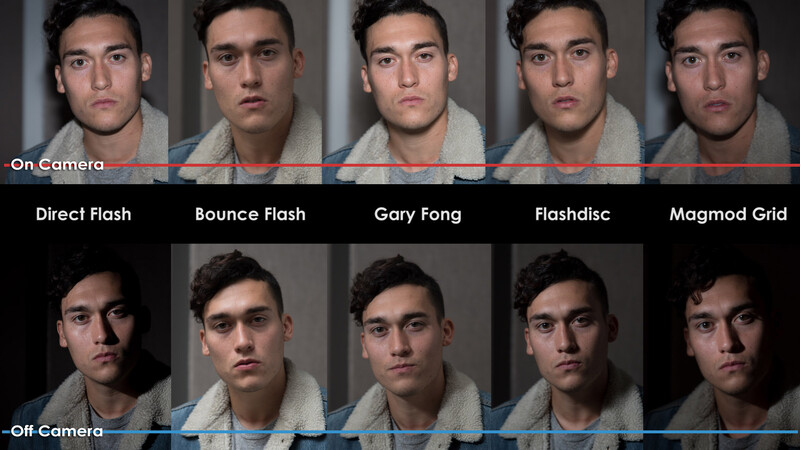
The Test Results
Below is a comparison image you can download to see exactly how each of these lighting techniques affected both Nico and the background. As you will see, sometimes the results are subtle and other times they are very drastic. Also, notice how sometimes one modifier will look very similar on the model's face as another modifier but the background will be completely different based on the shape of the modifier.
The Light Modifiers Used
Below are just a few light modifiers most photographers will be familiar with but they are some of my favorites for shooting weddings and events. You will notice I did not include any large softboxes or umbrellas because while those are super effective and useful, they can be very cumbersome when shooting live events, parties, and weddings. If you want to see how I use umbrellas and softboxes in my wedding photography, make sure you check out my video "4 Ways to Light Wedding Receptions." For this article though, I will only be focusing on small light modifiers that can easily fit in your pocket or camera bag.
Gary Fong Lightsphere
Gary Fong was one of the first mainstream manufacturers of light modifiers for small speedlights. Within wedding and event photography circles people joke that these light modifiers are simply Tupperware attached to the top of a flash, but I have to admit, Gary's lighting modifiers are some of the most widely used tools in the entire photography world. The reason these are so popular is that they offer super soft lighting and are relatively easy to carry in your bag. Basically, the way the Lightsphere works is it throws light in every direction which helps fill shadows that are caused by directional lighting. As you will see in my video and photos, this light has fewer shadows in general and produces a more flat lighting that diminishes wrinkles and distracting facial features.
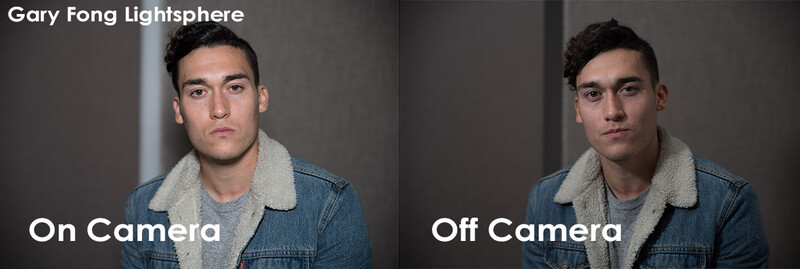
The main disadvantage I find with the Gary Fong Lighsphere is that because of its design, it still allows a lot of harsh flash to spill on to your subject from the on axis direction. Some people will claim that this forward facing light acts as a nice fill light but in my opinion, it can easily become too overwhelming and the resulting light looks very similar to direct flash. This problem is even more noticeable if you high have ceilings and the bounced portion of the light has less of an effect as the direct flash element. However, for many photographers, this is the first place they start with flash modification and as long as you have relatively low ceilings to bounce off of, the results are very clean, simple, and usable especially in environments where you need fast reliable lighting.
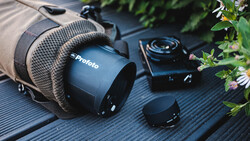
Fstoppers Flash Disc
The Flash Disc is a light modifier Lee Morris and I created about 10 years ago to help us achieve soft light at weddings. There are a few light modifiers that probably produce similar looking light to the Flash Disc but the biggest advantage to this design is that it collapses into a tiny 6-inch pouch that you can literally place in your back pocket. While the Flash Disc does produce soft light because it increases the size of the flash from a few inches to a full 12-inch sphere, it will never be as soft as a huge softbox, umbrella, or even bounce flash. However, unlike bounce flash or the Gary Fong Lightsphere, the Flash Disc does give you a lot of control over your spill because it does not light up the entire room.
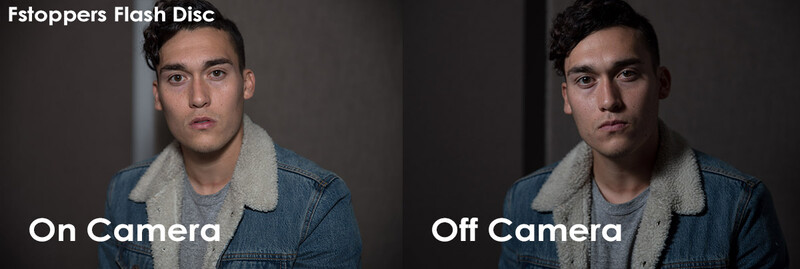
The biggest disadvantage of the Flash Disc is that you still need to place the flash and modifier fairly close to your subject to achieve the most flattering light. It works great super close for macro ring shots, shooting details like the cake, product shots, portraits of children, and headshots, but if you place the flash any further than about 6 feet from your subject, the softening effect becomes pretty diminished. As you can see in the video, the Flash Disc is not a very practical light modifier for a flash mounted directly on your camera (although many people do use it this way), but it is one of our go-to lighting setups for off-camera flash when we need something softer than a bare bulb flash. You can see a bunch of videos on how we use the Flash Disc on the Fstoppers page here.
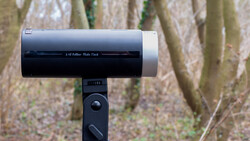
Magmod Grid
One of the most unique and powerful light modifiers for flash photography is the grid. Basically what this modifier does is it allows you to retain the hard contrasty look of direct flash while greatly controlling the overall spill of the light. In many ways, this is completely the opposite of bounce flash because you are only lighting up a very small part of your scene and this light is never soft. I absolutely love this look for portraits but it can also be extremely useful at weddings and events where you might want to fire a very precise backlight or hairlight onto the dance floor for a dramatic look.
The Magmod MagGrid is a pretty ingenious design because it uses magnets to attach the modifiers to your flash. Magmod makes a bunch of modifiers besides just the grids too, so if you invest in this system you can have a bunch of different tools that all work with their magnet mounting MagGrip. I've owned a bunch of small speedlight grids like the Honl Grids but I've found that they are kind of bulky and they don't mount very easily to my flash. I will say, I'm not a huge fan of how difficult the MagGrip can be to attach to the top of your flash and I wish they had something less tight and easier to use, but once it is mounted to the flash it makes adding gels, grids, and bounce cards super quick and easy.
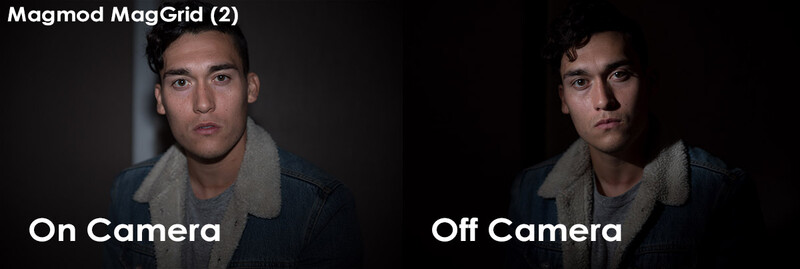
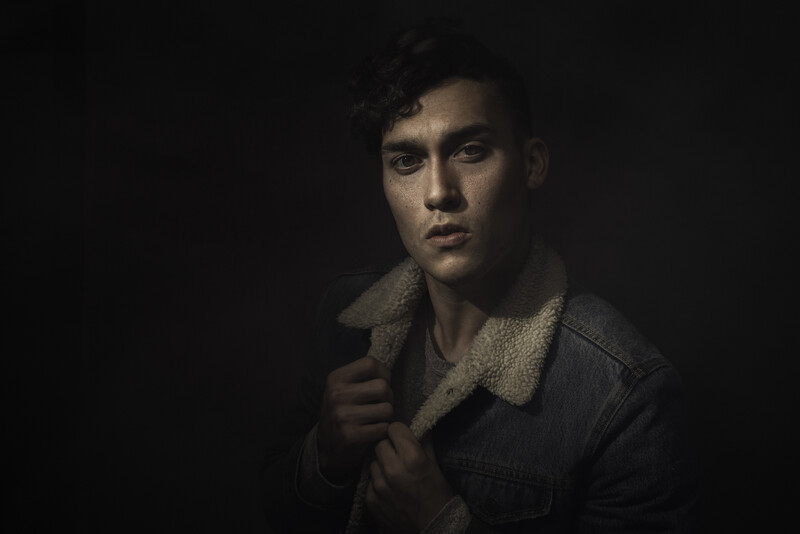
Just like the Flash Disc, the Magmod Grid isn't the most effective on camera but it does amazing things when your flash is placed off camera. After filming this video comparison video, I spent a few extra minutes with Nico to produce a cool portrait. The light modifier I actually kept on my flash for this portrait was the Magmod Grid with two grids for a super tight focused beam of light on his face. I added a little smoke behind Nico to add some subtle mood to the scene, did some basic skin clean up in post, and then applied one of my favorite plugins Alien Skin to the photo to give it a polished final look. As far as portraits go, this is about as simple of a lighting setup that you can get and the results are really cool.
Conclusion
The big take away I want you guys to take from this entire article and video is that both bounce flash and off-camera flash can be super powerful tools regardless of the situation you find yourself in. For events and weddings, the bounce flash is super effective but it can also brighten up your entire scene to the point of destroying some of the unique lighting found in the venue. However, by dragging your shutter and balancing your bounce flash exposure, you can produce very clean and flattering images of people as they move around in an unpredictable fashion. If you then take your flash off camera, you can use different light modifiers to craft even more interesting light that will make your portraits look super interesting. In many cases, you can even use these off-camera flashes at your weddings and live events to produce super dramatic candid photos as well.

Join the Fstoppers community for free
-
Post comments and join in the discussions
-
Browse the site ad-free
-
Share your work and get featured in the community
-
Compete in the photo contests for fun and prizes
11 Comments
Thats very nice but I believe it would be better to compare the results after a simple edit to taste, basic shadow recovery and exposure matching. For instance, it would be better to compare the gary phong shots which are clearly brighter than the others.
I can see how the Gary Fong image is a little brighter. I don't know that the images should be edited too much though.
Agreed. I think it's important to see what the modifiers do to the light.
The title of the article combined with the image preview was a little confusing. I thought you were using the mag grid to bounce off the ceiling. The words that came out of my mouth when I read the title of that article and saw that a Mag grid was used were... Why the hell is he bouncing with a grid? Happy to see that wasn't the case :-)
Yeah I can see how it's confusing. You actually made me think I should have used the grid to bounce light because that is super useful too. I normally set my flash's zoom setting to 105 when bouncing so that it produces a small bounce footprint on the ceiling which acts more like a directional softbox. If you bounce with a 24mm spread, the entire ceiling will light up and instead of a small softbox look, you will get a huge overcast sky look. The grid might not be efficient enough to use with bounce flash but I guarantee it will give a unique look that will be more similar to the 105 zoom setting.
It'll block so much of the light coming off the flash that you'll have to crank the power WAY up. Or your ISO. I'd just zoom the head in further if you want to really narrow the beam. I'm usually between 105-200, depending on the height of the ceiling.
Re: MagMod... Am I the only one who raises the white bounce card on the flash when shooting with the Mag Sphere? I figure, why waste the light to the back? Why not bounce it forward? I don't always do this - it just depends on the effect I want.
Nico is a modern day renaissance man.
Ha, yes!
Thank you Patrcik for this. Very good review.
I would have loved to see the output from mag sphere+ mag grid combo as well in this comparison.
I think a second way to run these tests would be to use just TTL control of the flash. How many times during an event are your adjusting your power output so precisely without missing a key shot? For the control in a studio, I get it, but during an event where you may have multiple remotes set up, how can you control the power like you've demonstrated in the video?
At the beginning of my career I actually used TTL a lot more than I do now. At least with the reception, once you dial in a good bounce flash exposure I've found I rarely need to change the flash power. With TTL sometimes it's hard to know if you are at 1/8th power or 1/2 power (you can hear the whine around 1/2 and 1/1) and in many cases I like getting it locked down and not having to worry that TTL could meter off the groom's black suit and then the exposure is too bright or vise versa.
With remotes, those are always set manually and I usually set them anywhere from 1/64 to 1/8 depending on my camera's ISO setting for that particular space. I've never used TTL for remote flashes (would need pocket wizard flex triggers or use Nikon's CLS which isn't reliable at all at events).