Knowing how to communicate with models and set up your lighting are crucial to shooting portraits, but what are some more practical tips for creating a striking body of work? This video lists 10 great ideas to get you inspired.
Irene Rudnyk is well known for her bokeh-laden portraits, often shooting with natural light to create beautiful fairy tale-esque images. While understanding posing and light are critical, she's put together a video that collates 10 ways for any photographer to shoot better portraits.
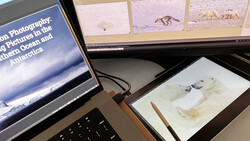
Rudnyk’s list includes two pieces of gear that stand out to me, the first of which I’ve been pondering but for various reasons, I’ve never gotten around to purchasing: a drawing tablet. Build quality, size, pressure sensitivity, and the overall feel will have a large bearing on the price, but remember that many of the more expensive models are built with graphic designers in mind rather than photographers. You might not need the same degree of sensitivity and programmable buttons, and the $79.95 you’d spend on the Wacom Intuos Pro Creative used by Rudnyk seems a solid choice for your first foray into the world of drawing tablets.
And of course, B&H stocks a vast array of step ladders, such as this Travel Smart by Conair TS35Q Ladderkart, which doubles as a handcart.
What tips would you add to the list? Let us know in the comments below.


13 Comments
Interesting about using native raw processor. Never heard that advice before but her examples were compelling... does anyone else do this?
She lost me at #2, I used DPP in the beginning then tried LR and CaptureOne. There's a reason DPP is free, I find that CaptureOne blows them all away.
I use DPP only for raw processing, once I've done the basic adjustments I then edit in Photoshop.
I did no insinuate that is it an editing software.
I used to do the same, but now I tether and process in CaptureOne then edit in Photoshop.
I really loved using C1 when i shot Sony, so I will definitely try it out with my CR3 files and see if it does as good of a job as DPP
I see the point regarding the native raw processor. However, since it's raw and I'm editing to taste, it doesn't really matter what my starting point is as long as it's a consistent baseline from which to begin. That's me, though.
One other thing that I found interesting is her take on shooting from an elevated position above the model. I completely understand why she's doing it; to avoid blown out skies when shooting wide open (and crinkly neck syndrome). And, to be honest, I've positioned myself to avoid the skies as well on outdoor location shoots for that very reason. But, personally, generally speaking, I prefer to shoot standing models from just slightly below eye level and lower for a couple of reasons: 1. I think it gives a power to the subject that is diminished when shooting down on them. 2. When shooting full length shots, shooting from a lower position tends to elongate the legs.
Of course, this is just my personal taste. Either way, good video, Irene.
Дякую!
Sorry, my wife is Ukrainian. Couldn't help it :)
My tip about the ladder is that you should have access to try different angles, definitely not saying that you should only shoot from above.
I want to get the best colors I can from the start, rather then trying to "fix" the colors.
Oh, I know you're not saying to exclusively shoot from a ladder :) I have that exact same step ladder you show in the video and bring it along on my remote shoots.
Vis a vis colors, I think it just comes down to what works best for one's particular workflow. And what the end result is that one has in mind. "Best" colors is subjective. Whatever path one chooses to achieve the colors they want is what is really the most important. For you it's the colors you start with when using a native processor. That's perfect. For me, I tend to use either LR or Capture One (if I'm tethering in the studio). No matter which processor I'm using, I typically end up with very similar end results. In other words, it doesn't really matter from where I start when using a raw file.
Cheers, and I do appreciate your videos.
I am glad you found a way that works for you. In that case you can simply skip that tip. But those who have trouble with the raws will find it useful. I for one would have loved if someone told me about DPP earlier, I only started using it few months and i wish i had used it from the start
I used to use a Wacom pad, but after using a Surface Pro to sketch diagrams for work, I decided to try a Dell XPS 9575 2-in-1 for C1/LR/PS. After getting used to the luxury of an active pen (pressure and angle sensitive) on a 4K screen, I can't go back to an external Wacom pad.
#9 - Shooting film is one big reason why I've stuck with EF glass. My newest and best glass works just the same on my Canon 35mm bodies as it does on digital. But also some of my oldest EF lenses have some interesting characteristics that make them fun to use.
i got so excited reading your comments, tried my Ef 85mm 1.2 on Canon AE-1 and it didn't fit :(
Got a plasticky EOS Rebel Ti and an EOS-1v here and that'd work perfectly on either one. The Rebel would at least be available fairly cheaply, and it's got decent AF. Or, there was also the EOS-3 which had a crazy 45 point AF system with something called "Eye Control" which did exactly what it sounds like. Just look at what you want to focus on, and the camera read your eyeballs and focused on it!