
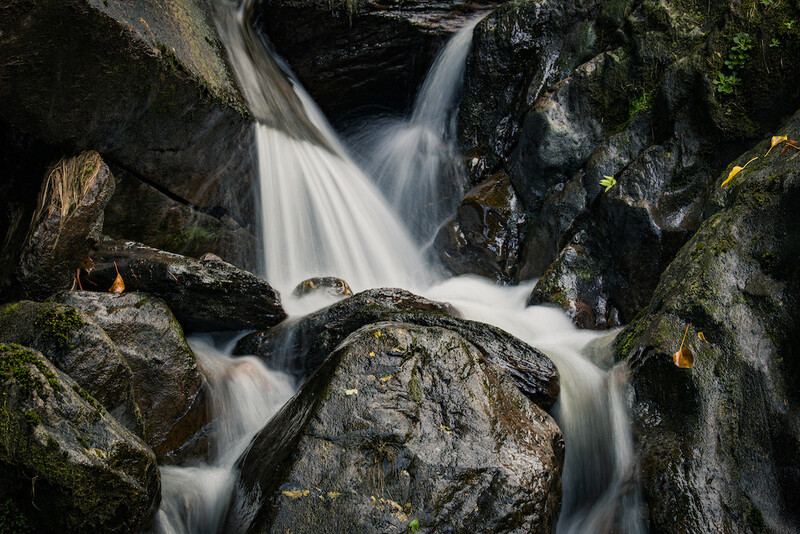
Photography is an art that allows us to capture moments, freeze time, and express our creativity. One fascinating subject that many photographers are drawn to is small waterfalls. These cascading wonders provide an incredible opportunity to capture the beauty of nature. While wide angle lenses are often popular for landscape photography, telephoto lenses have their own unique advantages. In this post, let's explore how using a telephoto lens can significantly enhance your photography skills when capturing small waterfalls. Specifically, we will discuss the benefits of long exposures at half a second, and explore the focal length range from 70 to 200mm.
The Power of Telephoto Lenses for Small Waterfalls
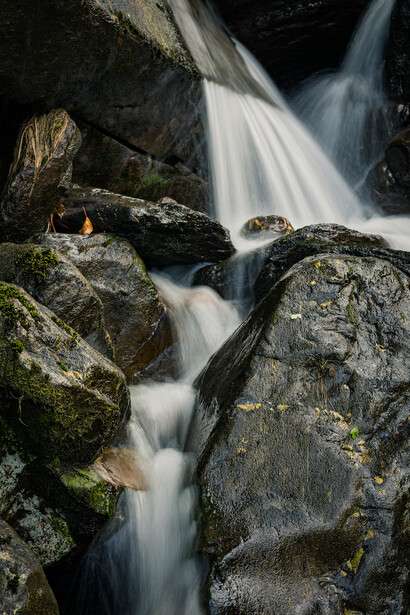
Telephoto lenses offer several advantages when photographing small waterfalls. Firstly, they allow you to isolate and emphasize specific elements of the scene, enabling you to focus on the intricate details of the waterfall itself. By zooming in, you can capture the dynamic flow of water, the cascading droplets, and the mesmerizing patterns they create.
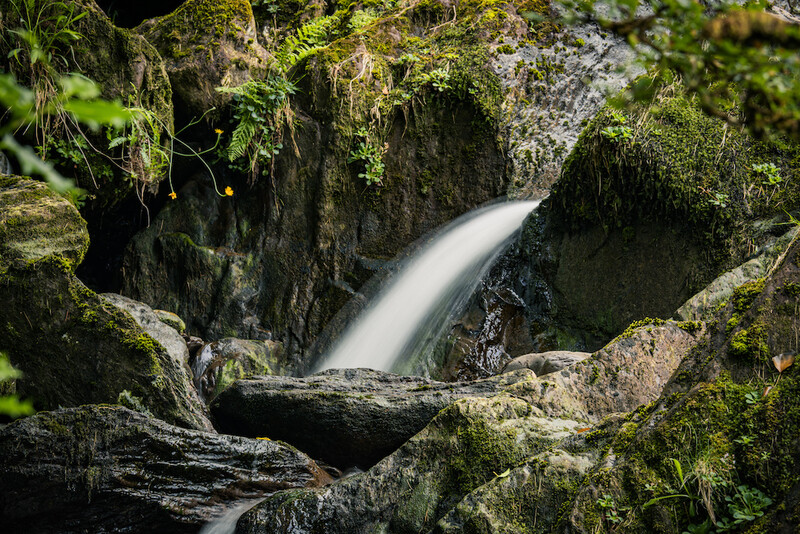
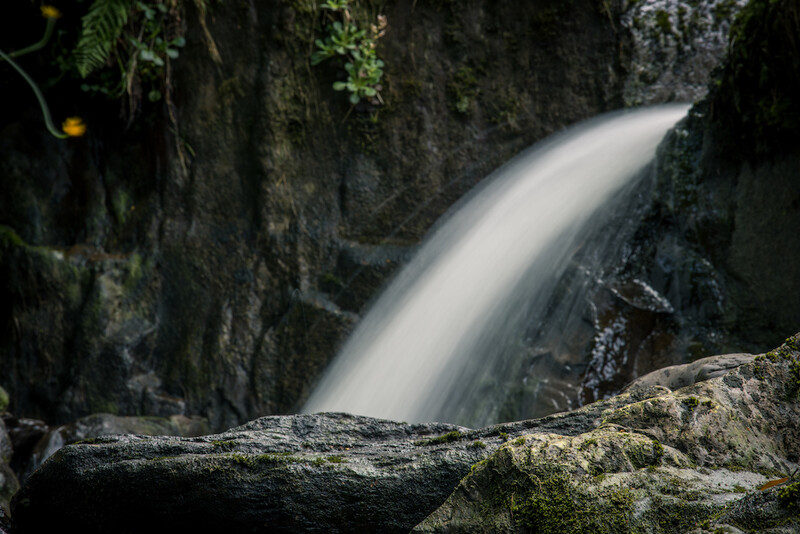
Secondly, a 70 to 200mm lens compresses the perspective, making the waterfall appear larger and more prominent in the frame. This compression effect creates a sense of depth and makes the waterfall the main focal point, drawing the viewer's attention to its natural beauty.
Mastering Long Exposures for Small Waterfalls
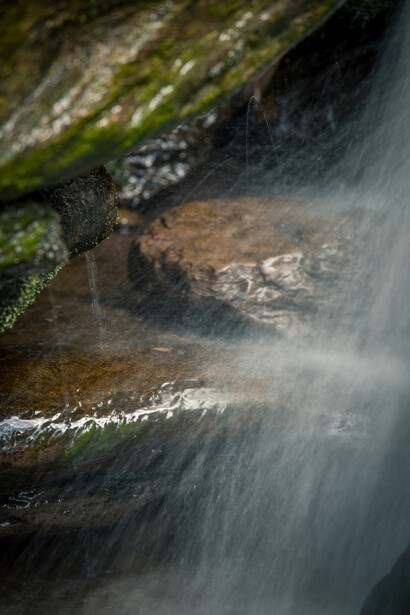
Long exposures are particularly effective when photographing small waterfalls. They create a sense of motion and fluidity, transforming the falling water into a graceful, ethereal spectacle. By utilizing a half-second exposure, you can achieve the perfect balance between capturing the movement of the water and retaining the essential details.
To capture a long exposure, it is crucial to stabilize your camera to avoid any unwanted camera shake. A tripod is an essential tool in this scenario. It provides a sturdy foundation and allows you to keep your composition steady throughout the exposure. Additionally, using a remote shutter release or the self-timer function on your camera can help minimize any vibrations caused by pressing the shutter button.
Experiment with different shutter speeds to achieve the desired effect. A half-second exposure is an excellent starting point, but you can adjust the duration based on the flow and speed of the water. Longer exposures, such as one or two seconds, can produce an even smoother and more flowing effect. Conversely, shorter exposures, like a quarter-second, can emphasize the turbulent and dynamic nature of the waterfall.
Keep in mind that longer exposures may require you to reduce the amount of light entering your camera. You can achieve this by using a narrow aperture (higher f-number) or by attaching a neutral density (ND) filter to your lens. ND filters are particularly useful in bright conditions, as they allow you to use longer exposures without overexposing the image.
During post-processing, you can further enhance the impact of long exposures by adjusting the contrast, saturation, and sharpness of the image. Experiment with different editing techniques to bring out the intricate details of the waterfall and create a visually captivating final result.
Remember that practice is key when working with long exposures. It may take a few attempts to find the perfect balance of shutter speed, aperture, and composition. With time and experience, you will develop a keen eye for capturing the mesmerizing beauty of small waterfalls through the magic of long exposures.
The Magic of Half-Second Exposures
When photographing small waterfalls, using a half-second exposure can produce stunning results. This shutter speed allows you to capture the silky smooth flow of water, creating a dreamy and ethereal effect. The long exposure blurs the motion of the water, transforming it into a graceful veil that enhances the overall mood and atmosphere of the image.
During a half-second exposure, it is important to stabilize your camera to prevent any unwanted camera shake. A tripod is essential for this purpose, ensuring your composition remains sharp and crisp. Additionally, using a remote shutter release or the self-timer function can further minimize any potential camera shake caused by pressing the shutter button.
Exploring the Focal Length Range
The focal length range from 70 to 200mm offers excellent versatility when photographing small waterfalls. At 70mm, you can capture wider compositions that incorporate the surrounding environment. This focal length allows you to include additional elements such as rocks, foliage, or a captivating foreground, which can enhance the overall composition and provide context to the waterfall.
As you increase the focal length towards 200mm, you can achieve a more intimate and detailed view of the waterfall. This zooming capability allows you to isolate specific sections or patterns within the waterfall, revealing intricate textures and mesmerizing details that might otherwise go unnoticed.
5 Tips for Successful Telephoto Lens Photography
-
Scout the Location: Before starting your photography session, explore the area around the small waterfall. Look for different angles, perspectives, and foreground elements that can add interest and depth to your images.
-
Optimize Your Settings: Set your camera to aperture priority mode to have control over the depth of field. An aperture setting between f/8 and f/16 is recommended to ensure the entire waterfall remains in sharp focus. Adjust your ISO to keep noise levels to a minimum.
-
Experiment With Composition: Play with different compositions to create visually appealing images. Consider the rule of thirds, leading lines, and foreground elements to guide the viewer's eye towards the waterfall.
-
Utilize Filters: Neutral density (ND) filters are useful when working with longer exposures, allowing you to achieve the desired effect even in bright lighting conditions. Graduated ND filters can help balance the exposure between the sky and the waterfall.
-
Patience and Persistence: Nature is unpredictable, and capturing the perfect shot may require multiple attempts. Be patient and persistent, waiting for the right lighting conditions and adjusting your settings accordingly.
Using a telephoto lens to photograph small waterfalls offers a unique perspective that can elevate your photography skills. By isolating the subject, employing half-second exposures, and exploring different focal lengths, you can capture the intricate details and enchanting flow of waterfalls in a way that captivates viewers.
Remember, improving your photography skills is an ongoing process that requires practice and experimentation. Take the time to explore various locations, compositions, and settings to find your own creative style. With patience and dedication, your telephoto lens will become a powerful tool in your photographic journey, unlocking a world of stunning imagery waiting to be captured.
What are your thoughts on this topic? Let's continue the conversation in the comments below.


Join the Fstoppers community for free
-
Post comments and join in the discussions
-
Browse the site ad-free
-
Share your work and get featured in the community
-
Compete in the photo contests for fun and prizes
6 Comments
Generally, I find using a polarizing filter when shooting moving water will improve the image and is a "must have" in your bag to attach when appropriate.
100%! The essential filter to have in your bag for many reasons! Used with rock pools by the sea recently and it revealed their hidden worlds
I can't tell when a circular polerizer is light or dark, I see no difference on the camera looking through the view finder or on the screen. Any tips? I only have a M50 so the large screen ones are not something I can use and can't afford them anyway. I was thinking of trying to get a friend to tell me when one is at it's lightest and then using a silver metallic pen to mark that spot.
Ideally you want your polariser 90 degrees to your shooting direction
Try brightening the screen display by over exposing and turn the filter then
Alternatively perhaps you have the polisher on backwards as a long shot ?
"polisher on backwards as a long shot" Not sure what you mean here guy. It can only be screwed on the one way or am I not understanding something? Thanks for the reply by the way.
no problem, it would depend on the system you are using as not all are screwed on, it was a long shot :) hope you manage to resolve it