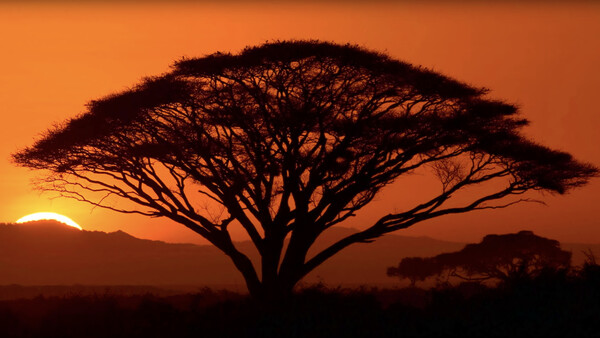
Sunsets can provide some of the most beautiful images in a photographer’s portfolio, but the dramatic light and vibrant colors can be challenging to capture. Here are ten tips to improve your sunset photography.
Sunsets have always been a favorite of photographers. The last few minutes before the sun goes down provide a look that is unique and beautiful. But while the scene is stunning to the eye, it can be difficult to capture in a camera. Several factors arise, such as what part of the image to expose for, what aperture to use, and where to place the horizon line in the scene. All these questions and more are answered in this video from KelbyOne’s Rick Sammon.
While Sammon shares many helpful tips for capturing a sunset, I have two additional suggestions. The most obvious error I see in a beginner’s sunset photos is a crooked horizon line. When the sunset and sky are meant to be the focus of your picture, it is essential that your image is straight, so that the horizon line doesn't distract from the shot. Second, Sammon mentions using flash when taking sunset photos that include people. This can make for amazing images, but it is often overdone. If you use a flash in these situations, do so in a subtle way where the light from the flash doesn’t take over the image.
To find out how to improve your sunset photos, take a look at the rest of Sammon’s tips in the video above.


Join the Fstoppers community for free
-
Post comments and join in the discussions
-
Browse the site ad-free
-
Share your work and get featured in the community
-
Compete in the photo contests for fun and prizes
4 Comments
A tip I learned when I finally got serious about photography 5 years or so ago expounds just a bit on exposing for the highlights. I set up on a tripod, set the camera on Aperture Priority at f8, ISO 100, and take a test shot to see what the camera believes is the correct shutter speed. For the sake of this post, let's say the camera chose 1/500.
I reset the camera to Manual, f8, ISO100, and 1/1000 doubling the camera's choice of 1/500. Take the next shot and check the histogram. This usually gets you very close.
Also, use a remote release or the camera's timer. And take a LOT of shots. Sunsets change personality quite quickly.
On windy days, use an ND filter to get those flowing clouds and stretched colors. I use a Hoya ND400 (9 stop) and it works very well. I hope you don't mind, but I attached a photo that was taken with this ND filter. It's the north shore of Lake Pontchartrain just north of New Orleans:
Why don't you use your light meter to set the initial exposure? An AV test shot seem like a redundant and clumsy method to get the meter to read 0EV or -1EV.
Mostly because this works for me. Yea...that AV test shot takes about, oh, 5 seconds to perform. I realize that in that 5 seconds that the Sunset will more than likely disappear and had I used the light meter, it would have only taken 2 seconds and I would have captured the Sunset in all its glory.
Redundant and clumsy....right.
If there's lens flare ruining your shot, take a photo at all apertures (whilst adjusting the exposure) and the flares will change with each aperture. If you have the skills you can then use techniques in photoshop to create an image without the unwanted flare. Hope that makes sense!