
There's a good chance you've heard of the "Ring of Fire," a technique popularized by wedding and portrait photographer Sam Hurd. The Ring of Fire is a special effects technique that uses a piece of copper tube to reflect light and create a highlight flare in the shape of a ring. This technique has been widely adopted, and to create this effect for yourself is pretty easy. Today, I'll be walking through the steps to transform your portraits using the famous Ring of Fire technique.
This is a sneak peek into SLR Lounge Premium's upcoming course on special effects photography. Be sure to check out the entire premium library and stay tuned! Let's jump straight in with what we'll need for the Ring of Fire.
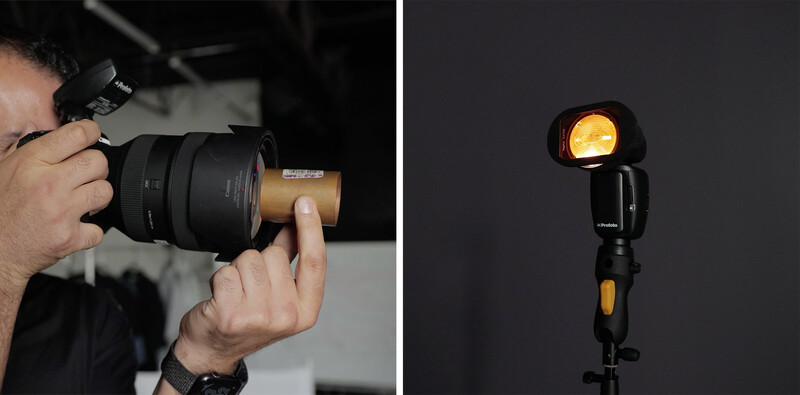
- Bronze tube, available at any hardware store. The ideal size is 2" in length and 1-1.5" in diameter.
- Flashes. I recommend two for best results.
- A wide angle lens.
For our tutorial today, I'll be using the Canon EOS R5 with the RF 28-70mm f/2.
Step #1: Position Your Subjects

The first step is to place your subjects where you'll be taking the photo. I had my subjects in front of a plain wall and lit by a large window just off-camera.
Step #2: Set Your Exposure Settings
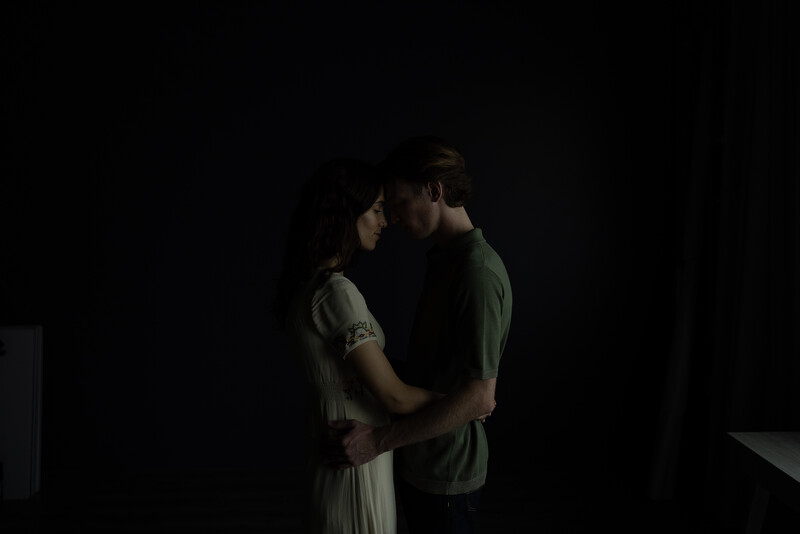
I set the exposure based on how I want my shadows to look in the final image. The final settings were 1/200 second, f/2, ISO 200.
Step #3: Place Your Flashes
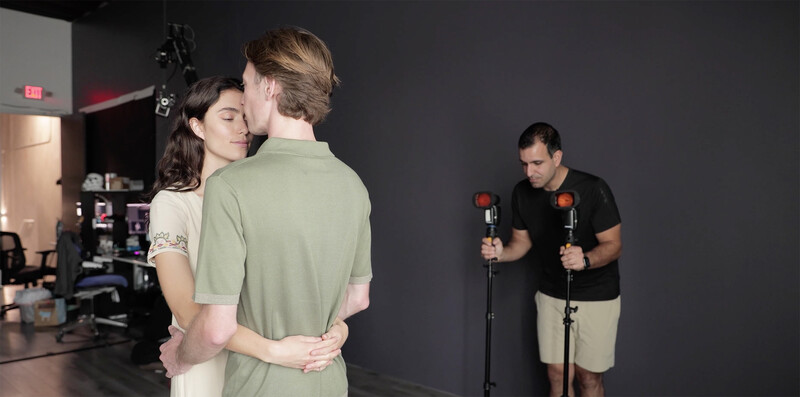
Position your flashes about four feet behind each subject. Keep the height of the flashes below their shoulders and angle the lights inwards to light the opposite person. I used two Profoto A10s with MagMod CTO gels for warmth.
Step #4: Fine-Tune Your Flash Power
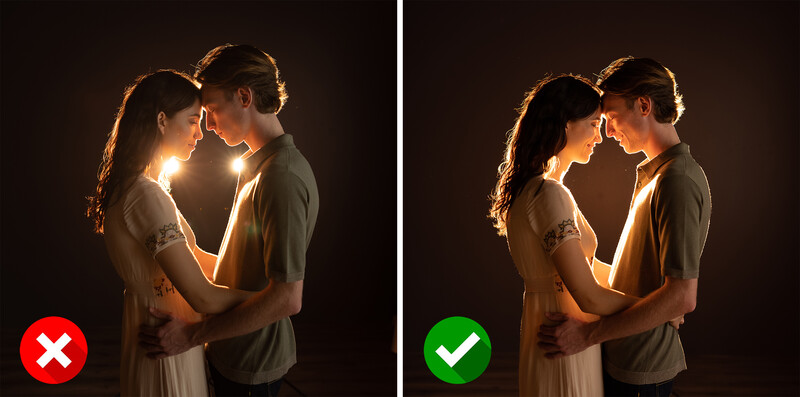
I recommend starting at a low power and working your way up to your ideal brightness. Also, be sure to keep the lights fully behind the subjects to prevent flares like these.
Step #5: Photographing the Ring of Fire
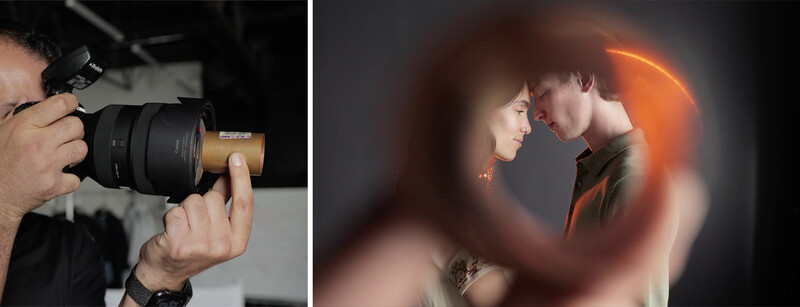
Now, let's bring in the bronze tube. Simply hold it in front of the camera and move it around to pick up different reflections. What creates this effect is the light from the flashes reflecting off the inside of the tube. This creates the iconic ring-shaped flare that we see. You can use your flash's modeling light to help guide you as you shoot.
Be sure to shoot this at your widest aperture. Not only does it help with the flare and depth, but since you're holding the tube in front of the lens, you're going to want to make sure that your hands are fully out of focus.
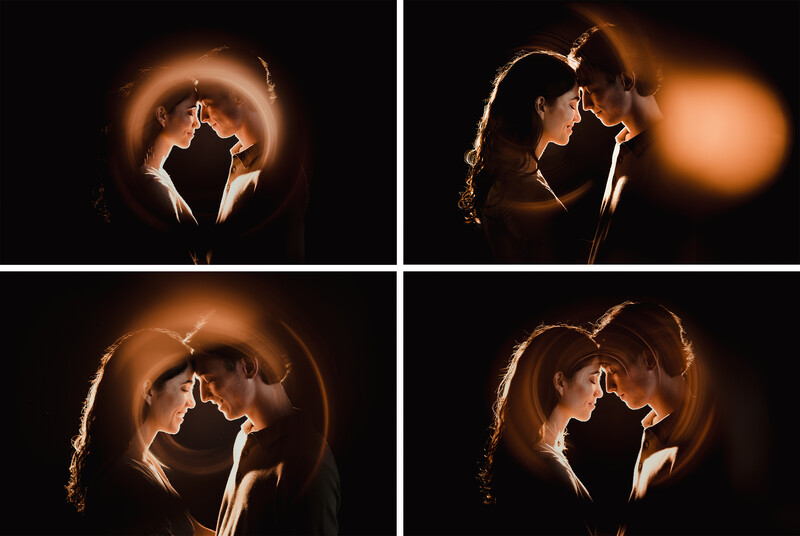
Images by Lin and Jirsa
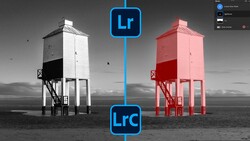
From there, you can have fun with this easy and incredible effect! Here are some of our final images, edited with Visual Flow's Mood preset pack.
Conclusion
I hope you enjoyed this article/video. This technique is a fantastic way to completely transform your portraits. Be sure to check out Sam Hurd, the photographer who popularized this incredible effect. For more A-Z education like this, be sure to check out our SLR Lounge Premium Library. Here, you can stay tuned for our upcoming course on special effects photography! Thanks for reading!


Join the Fstoppers community for free
-
Post comments and join in the discussions
-
Browse the site ad-free
-
Share your work and get featured in the community
-
Compete in the photo contests for fun and prizes
5 Comments
WTF? This reminds me of those unspeakable coloured glass balls that so-called photographers put out of focus in their pictures so that there is such a "great mood". Oh God, it's tacky. It's hardly bearable. Next thing you know, the tube will be in the shape of a heart, which will make it even cheesier. Sam Hurd? Never heard of him. I know photographers who used methods like this over 20 years ago. I remember a time in the late eighties when it was also "state of the art", not!
Don't use it then.
This is a very cool technique and add's a tremendous affect.
And even though you meant it as a negative thing, a heart shaped one would actually be an incredible affect!
This kinda stuff sets your work from others. And gets you customers who like it.
It creates nothing but a distraction. You don't have to agree with my opinion, of course:) The technique has been around for years.
This is a killer technique! Thank you for sharing this.