
Let’s explore the often-overlooked significance of editing in photography and how it transforms raw images into compelling visual stories. We will break down the two stages of editing and provide examples that highlight the creative process involved in crafting mood and atmosphere.
There is a phase every beginner photographer goes through. I went through it, and you likely are right now if you are in the early stages of your journey. We place immense weight on tangible variables: the exposure triangle, lens choices, camera body, tripods, and various filters. We look at a stunning image from a photographer we admire and ask, “What were your settings?” Or, “What aperture was this?” Yet, we rarely ask the question that matters the most: “How did you edit this?” I have yet to come across this question from a beginner student.
It is often only later that we realize something important: the camera is merely a data-gathering tool. The shutter click is not the end of the creative process. It is just the halfway point. Editing, or post-processing, is where data becomes a photograph. It is just as important as the settings you chose in the field.
The Two Stages of Editing
When we sit down to edit, we usually have specific goals. I like to break them down into two categories.
First comes the technical fix, which includes:
-
Quality control, such as lens profile corrections, reducing noise, and increasing sharpness.
-
Technical corrections, like adjusting exposure, recovering shadows, managing highlights, and cropping.
These are technical skills that can be learned by rote. Many photographers may stop here and not move on to the second phase, where the magic happens: the implementation of mood and atmosphere. This part includes:
-
Focusing on visual hierarchy and guiding the viewer’s eye by darkening unimportant areas and brightening the subject.
-
Treating each element of the scene individually for white balance, color, and contrast. This creates mood and atmosphere, meaning infusing the image with a specific feeling.
Creating mood is where the artistry lies. It is the difference between a snapshot and a story.
The Secret Ingredient: Patience
To achieve excellence in editing, you must be patient and resist the urge to share your photos immediately. If you can do that, you overcome a significant hurdle.
Let’s explore how we can turn a flat raw file into a story.
A Dog Walk in Venice
The image below is a raw file of a man and his dog. Straight out of the camera, it has a warm color palette. This is due to the street lighting and my White Balance setting of 5,550 Kelvin.
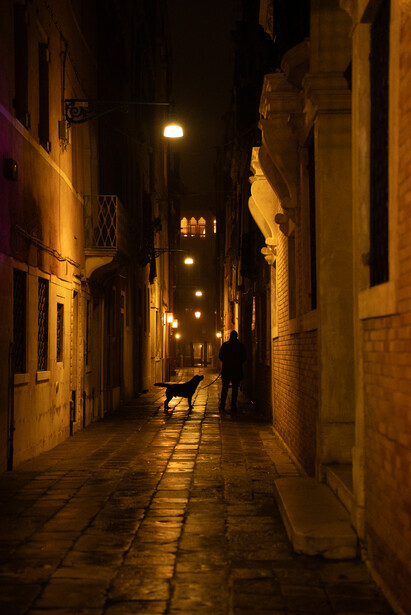
First Attempt: We can call the following image a “First Edit” trap that produced a nostalgic image. I achieved a common initial step: recovering shadows, controlling highlights, and applying a uniform warm yellow-sepia tone. This, however, led to too many competing elements, such as the distracting foreground walls, and failed to elevate the image beyond mere documentation. Furthermore, distracting overhead wires and infrastructure were not addressed, making this version less artistic than intended. The image lacked focus, causing the eyes to wander.
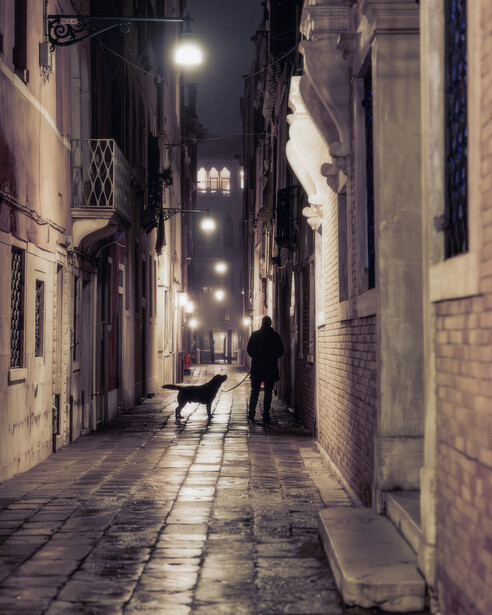
The "Cinematic Edit": My second attempt focused on creating a cinematic experience by embracing darkness. I made choices about what to hide and what to reveal.
Here are the steps I took:
-
Cleanup: Removed the wires and clutter to make it timeless.
-
Lighting: Crushed the blacks and darkened the walls on each side in the foreground. This created a tunnel effect, which forces the eye directly to the silhouettes of the man and his dog, and that is the first thing I wanted the viewer to see.
-
Color: Created color separation instead of a yellow wash. The overhead lights have a cooler temperature and a glow, and the shadows are deep and rich. The actual color of each element prevails.
Here is how a visual hierarchy was created for the viewer's eye in the final edit:
-
Look here first: The shining cobblestones leading to the silhouettes of the man and his dog.
-
Look here second: The alley in the background with the lights.
-
Don’t look here: The dark walls in the foreground.
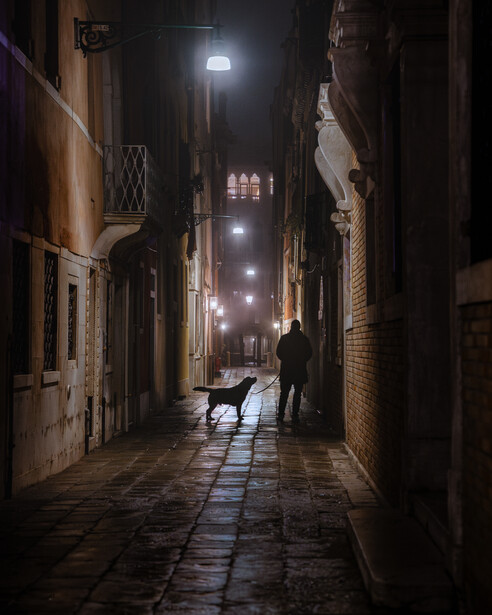
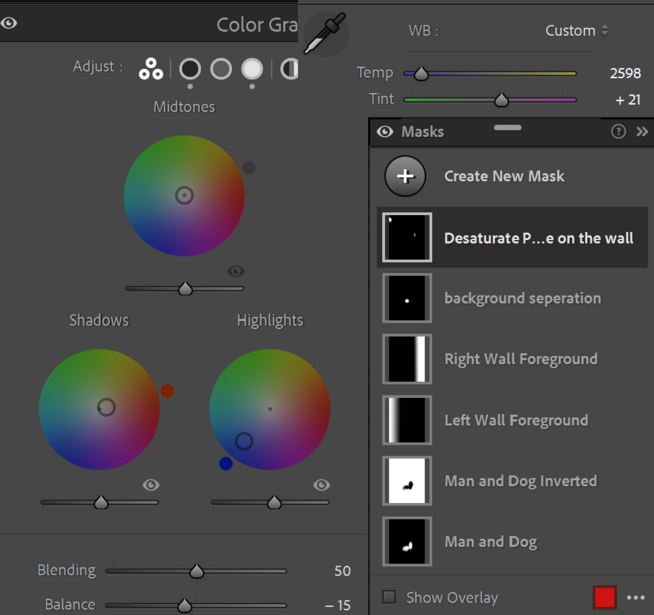
To achieve the desired mood and atmosphere, the edit involved several key adjustments, as shown in the screenshot below. The white balance was significantly cooled to 2,598 Kelvin, and the image was given a subtle pink tint. Color grading was applied to both the shadows and highlights. Furthermore, the workflow created multiple masks to treat every element within the scene individually.
I prefer this final edit. It has more visual interest and better color separation.
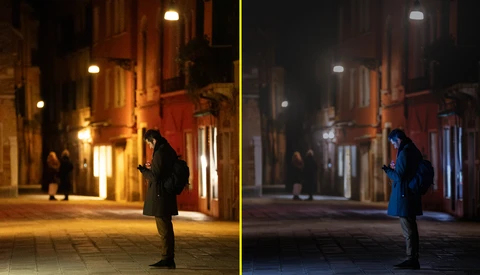
A Man on a Venetian Bridge
Here is another example of a night scene. Similar editing techniques used for the man and his dog image were applied to edit this one as well.
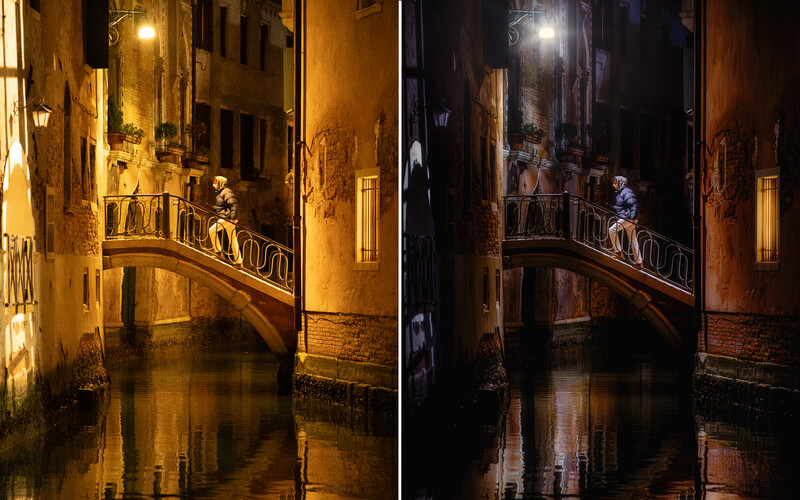
I also used a bit of the Orton effect and treated the lamp and window light, giving them a glow. The mood created is not nostalgic, but cinematic. It offers a romantic, timeless view of the street. This allows the eye to appreciate the original colors.
Conclusion
You might disagree with my specific choices above because editing is personal and subjective. But the underlying principle matters: each image deserves time and thought in the editing process. To do that, understanding the tools in software like Adobe Lightroom and developing a vision before the edit are paramount. By spending more time in the edit, we can not only elevate the look and feel of our images to create an immersive experience for the viewer but also learn from the compositional and camera-setting mistakes we might have made during the photoshoot.
No comments yet