
When I first looked at placing my camera into the water I noticed that there was a lot of different options. The most practical and safe method was the big and very expensive dive housings that are used for scuba diving. The cheapest, most dangerous option was the little plastic zip lock bag-type housings that can be found on eBay for $100. I wanted something that would not break the bank, but would also be safe enough that I could put in an expensive DSLR plus a lens, and trust it would be safe. These stipulations are what brought me to the Outex underwater housing.
The Outex underwater housing is a middle of the line underwater housing. It’s definitely better than the zip lock bag styled housings, but it won't keep up with the expensive housings used for scuba diving. In fact, this cannot be used for scuba diving at all. The Outex housing is IP08 tested, which means it can be submerged to depths of 10 meters. That makes this housing perfect for pretty much any water sport, other than scuba diving. It is also used for other events such as color runs, mud runs, and other types of activities where your camera may get dirty or wet. For this review, I will be talking strictly about using this housing in the water.
Installing the Outex
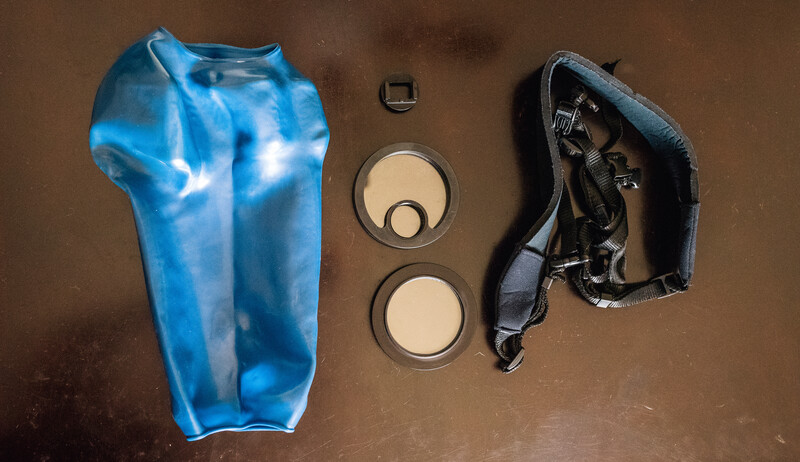
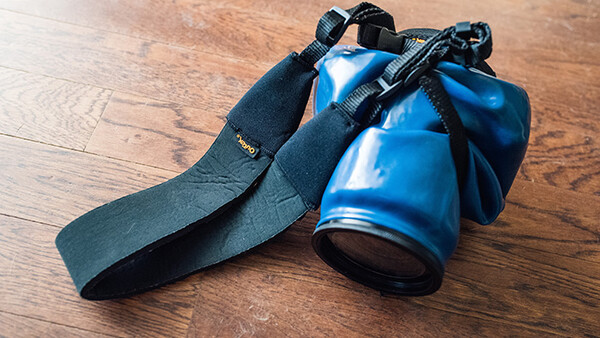
The Outex housing consists of five parts. The main blue rubber cover, optical lens, LCD viewfinder, viewfinder adaptor, and the LCD strap holder.
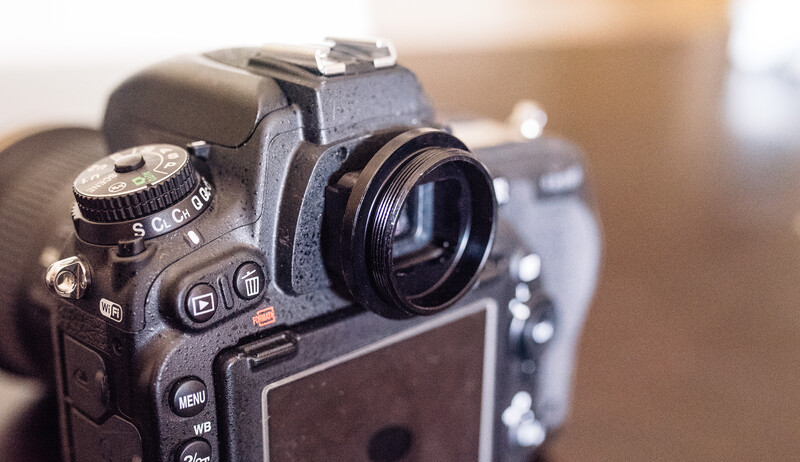
The LCD adaptor is what’s used to attach the LCD viewfinder to the camera. For my Nikon D750, I simply popped off the rubber eye cup and then this adaptor slides in to take its place.
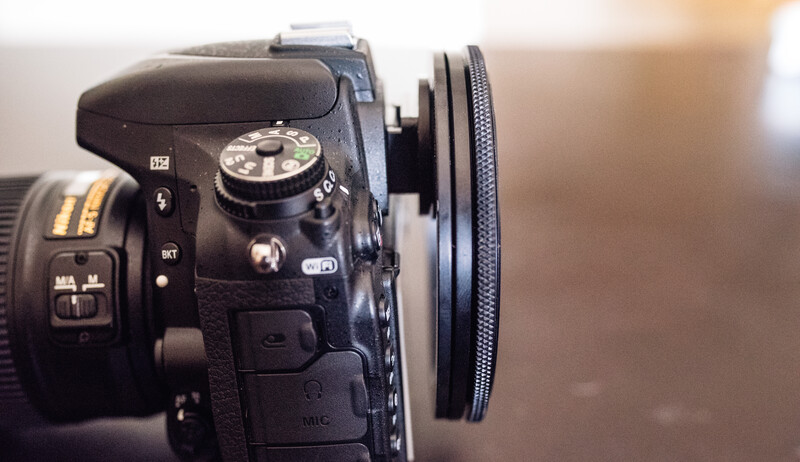
The VF adaptor loosely threads into the LCD viewfinder. I say loosely, because the viewfinder needs to be able to rotate around the VF adaptor so that it can move in order to reach certain buttons. This is where the first problem arises. The LCD viewfinder needs to constantly be moved around in order to press certain buttons, but the VF adaptor just sits in its place. It does not lock into place like your standard eyecup does. The movement to reach buttons, plus the normal movement from bouncing around in water, means that the VF adaptor is constantly falling off. Once it falls off it’s nearly impossible to see through the viewfinder and it’s also nearly impossible to put back on while in the water.
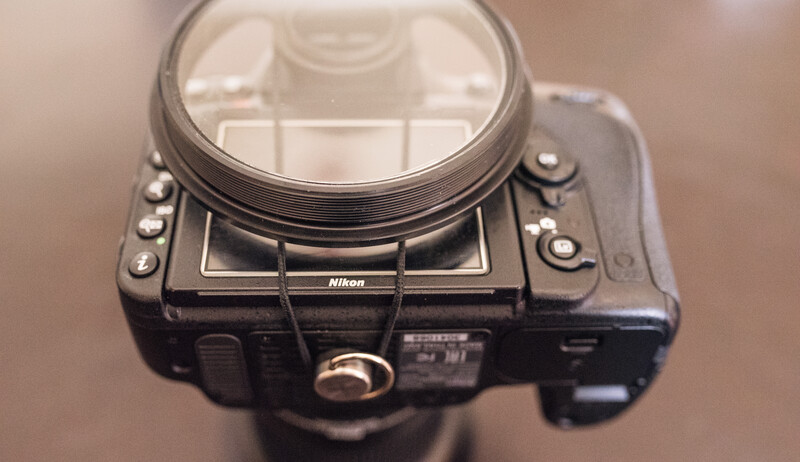
In order to fix this, I wrapped one of my wife's hair ties around the VF adaptor and then stretched it down to be hooked onto a tripod mount. This little fix allows the VF adaptor to be locked down into place while still allowing the LCD viewfinder the ability to rotate as needed.
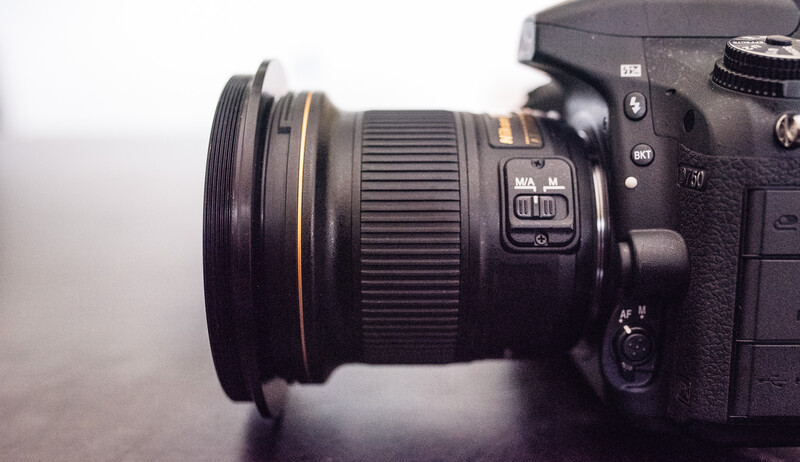
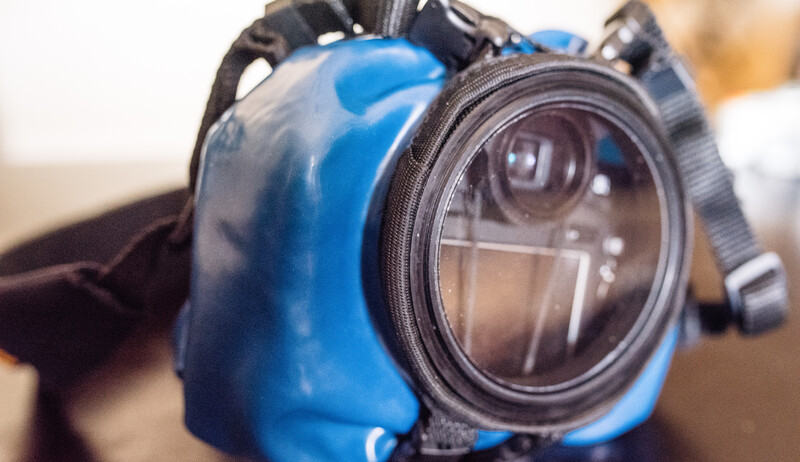
In order to install the optical lens, all that needs to be done is to thread this piece into the filter threads of your lens. The trick here is to buy the optical lens that fits your largest filter thread size. In order to adapt the optical lens to a smaller thread size you just need to install a step down ring. For example, I bought an optical lens at 77mm for my 20mm lens and then bought a step down ring of 77mm to 67mm so that I could use the same lens on my Sigma 35mm ART.
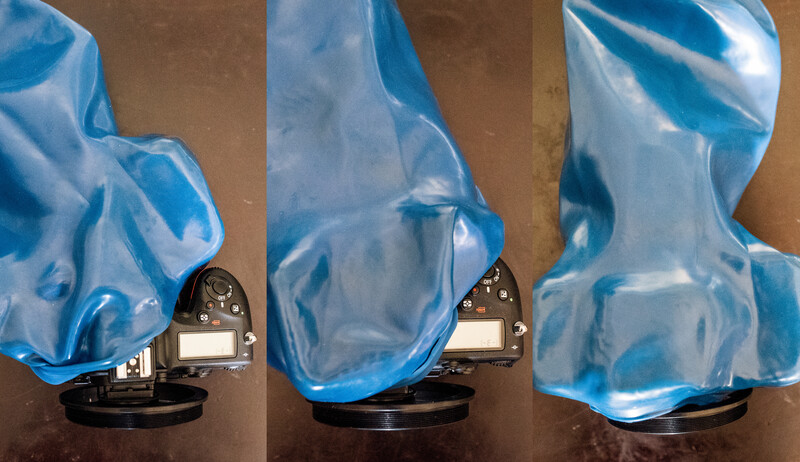
Now for the hardest part. Once the optical lens and LCD viewfinder are attached, we need to install the cover. This is done by pulling and stretching the cover around the camera. Since the opening at either end of the cover is smaller than the LCD viewfinder and optical lens, there is a decent amount of work in order to get the cover stretched over the camera.
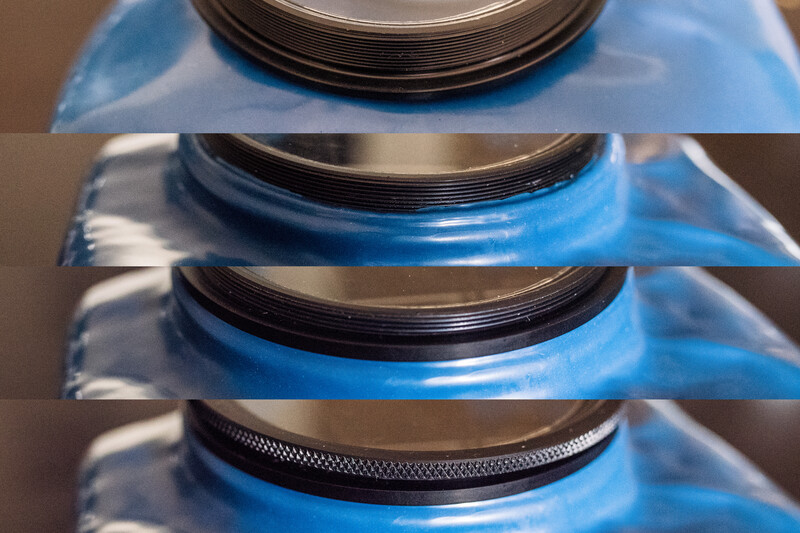
To attach the cover to the optical lens and the LCD viewfinder, the same steps are followed. You pull the cover over the lip of the lens and press it down to the bottom in order to reveal the threads on the lens. Then, you attach the L shaped O-ring with the L facing down. Next, attach the threaded O-ring; this threaded O-ring is what seals everything up and makes everything waterproof.
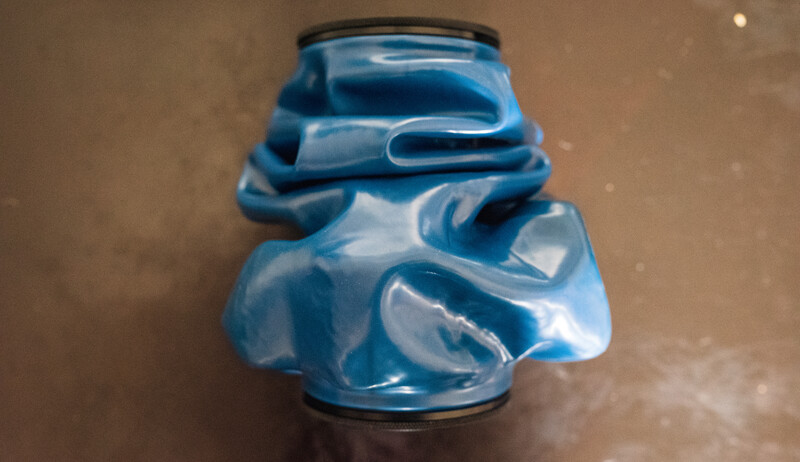
Once both sides are sealed up you have this bunched up mess of rubber. The longer the lens you use, the less rubber you will have that is bunched up.
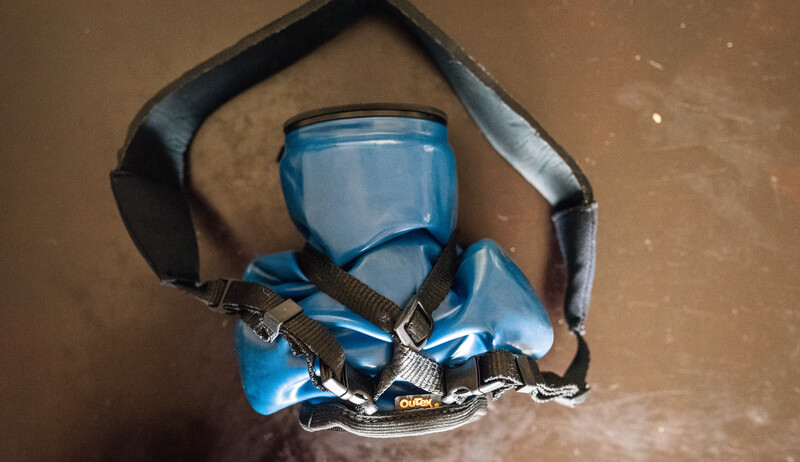
The last step is installing the strap. There is a piece that wraps around the LCD viewfinder and then little straps that wrap around the camera. The little straps tighten and are used to keep the LCD viewfinder in place and also keep the bunched up rubber from moving around. The neck strap then attaches to the straps that go around the camera. The camera straps are useful for attaching the neck strap, as well as keeping the extra rubber from the housing in place, but it is completely useless in keeping the LCD viewfinder in place.
Before you take everything into the water, you must test the seal around the lens and viewfinder. To do this, I just lightly squeeze the rubber cover to compress the air that is trapped inside and then I slowly put everything into the water while looking for streams of bubbles coming from the lens or the viewfinder. If I see any bubbles, I remove it from the water, tighten down the threaded O-ring some more, and try again till the bubbles stop. I have only had bubbles show up twice and each time was because I had not tightened things up enough.
Using the Outex
As you can see from the above process, installation can take a decent amount of time. My first time getting everything set up took me a good 30 plus minutes. Now that I have done it a few times I can probably do this in 10 minutes.
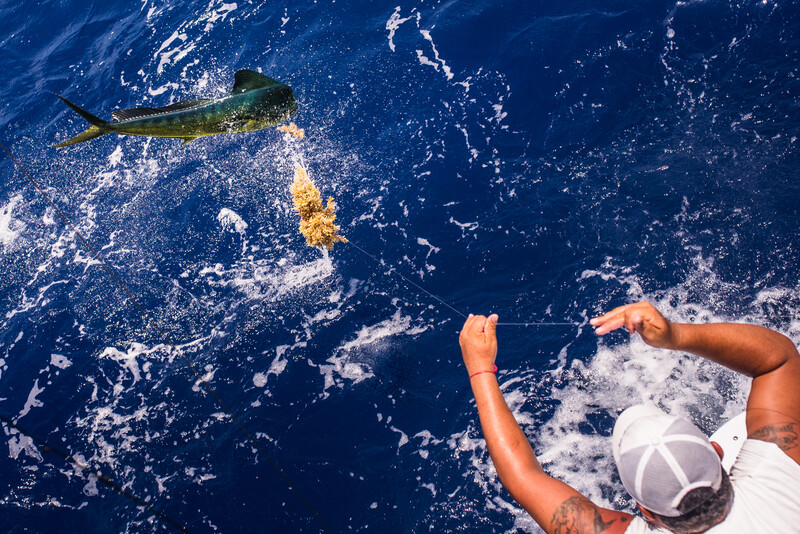
My first time taking the Outex out was for a deep sea fishing trip. For this trip I probably would have been fine without the housing, but there were a few times I got a large amount of water splashed on me and this made me glad I had it. I was also able to get a feel for how everything handled while not having to worry about staying above the water. The first thing I realized is that I still don't have all the buttons on my camera memorized. The Nikon D750 is still pretty new to me, but I have a general idea where everything is so that I just need a quick glance. Once the camera is in the housing though, you completely lose the ability to see where buttons are. A few times I had to hunt around for the ISO button and the biggest problem was that I could not reach my back-button focus. Even with the LCD viewfinder pushed to the side as much as possible, I was still not able to get my thumb on that button. I was left having to blindly switch my settings to relink the focus button the shutter button.
Thankfully, all the buttons were easy to press once I found the right ones. The most difficult part about changing settings within the case is when dealing with the dials. It was a royal pain to adjust the aperture and shutter dial as well as the MASP dial. Because the rubber of the casing is so slick and the rubber of the dials are slick, when I try to make an adjustment, the rubber on the case slides across the dial without changing anything. In order to get a dial to turn, I have to press my fingernail into the groove of the camera dial and use that to make an adjustment. The rubber of the housing is thick enough where this wouldn't cause any seal issues, but it’s still not easy.
When I got into the water, the dial issue became even worse because now my wet fingers were sliding on the rubber case as well. I eventually just gave up and got things set to one spot and left everything alone except for my focus point.
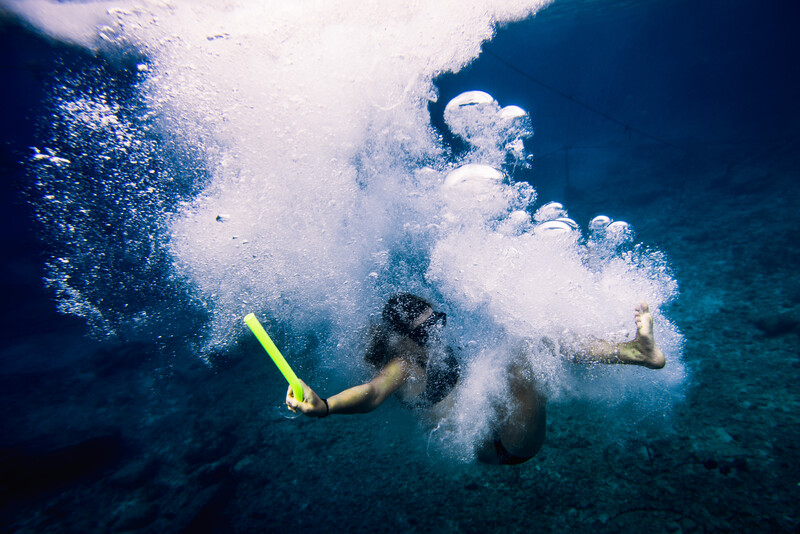
The most difficult part of using the housing in the water is actually seeing what you are shooting. When I was shooting on the fishing boat it was a little hard to see through the viewfinder but nothing really to take note about. Once I got into the water and added a pair of goggles to the equation it became an entirely different story. The first 10 minutes or so I didn't have a snorkel so I would have to hold my breath in order to get my head low enough to even see. As you could probably guess, a lot of the time I ran out of breath before I could even find something I wanted to shoot.
Once I started using a snorkel, the process got a little easier now that I could breathe and shoot at the same time. It was still difficult to see through the goggles and viewfinder but I was able to spend more time finding my shot.
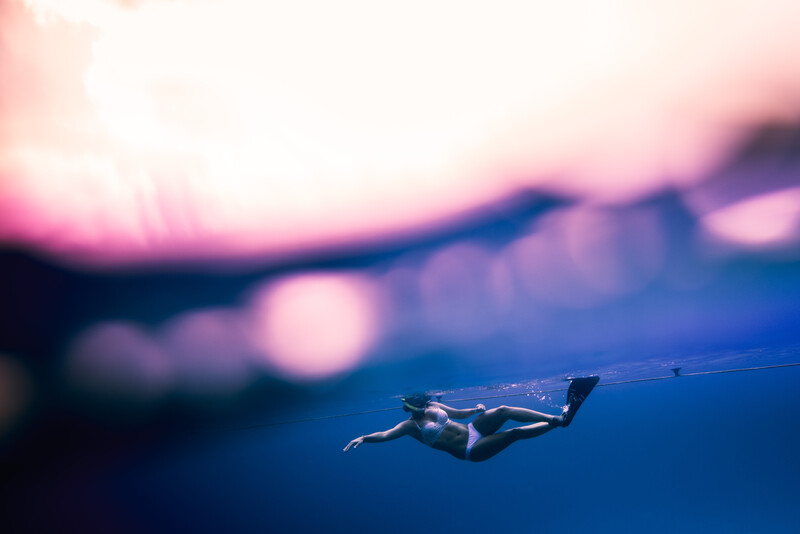
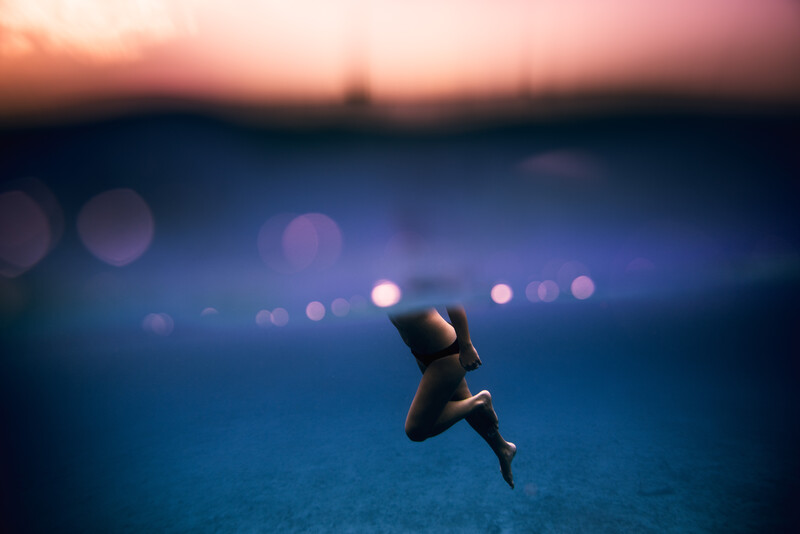
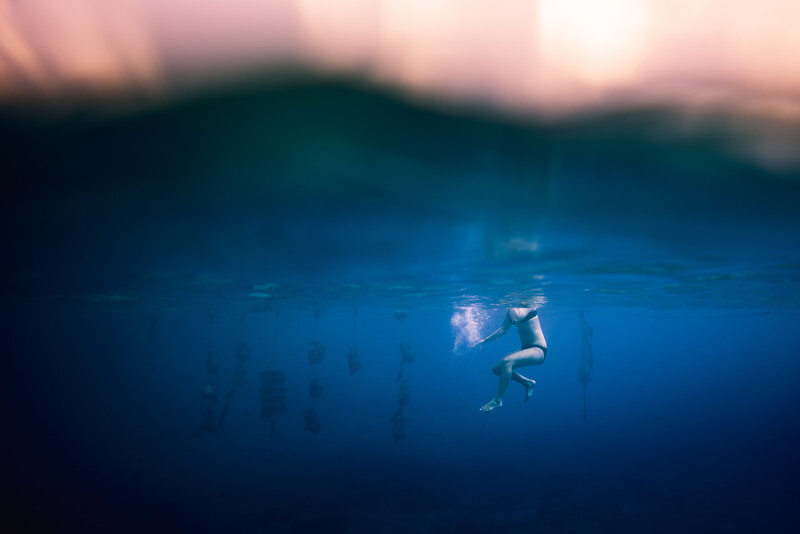
I spent most of my time along the surface because I wanted those split-level shots that are half above the water and half below the water. What I later found out is that I needed a domed lens port to do this and the one I ordered at the last minute didn’t arrive in time for this underwater adventure. It was like threading a needle to get a split level shot. Almost every time I was able to get one, the top was blurred out by the water still shedding off the lens.
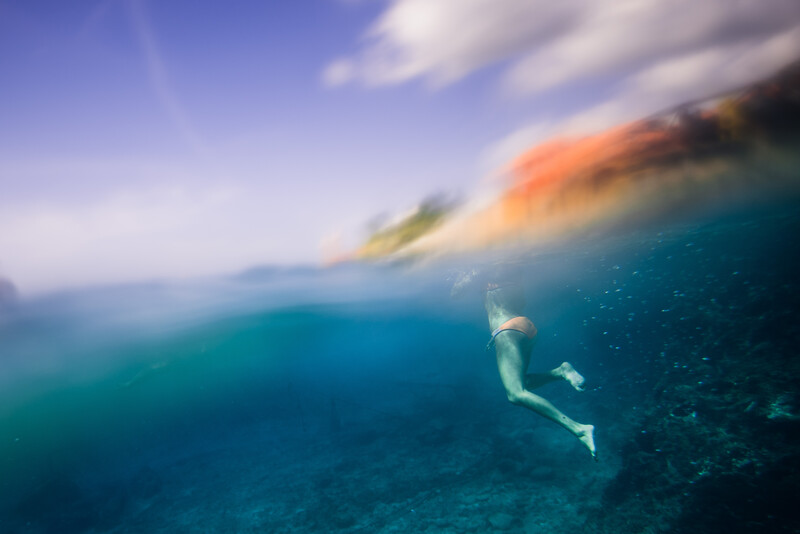
Once I figured this out, I was able to use this to my advantage to get some shots I really like. It’s not exactly what I was aiming for, but I’m still really happy with some of the stuff I got for my first time in the water.
What I Liked:
- It’s cheap, but still reliable.
- Most of the settings are completely usable while still in the case.
- It’s easy to use multiple lenses without having to buy additional parts.
- Since there is air in the case, it floats, making it so it won't sink.
What I Didn’t Like:
- The VF adaptor will not stay on without coming up with a DIY solution.
- The dials are hard to turn, and sometimes impossible to turn.
- It’s hard to see through the viewfinder.
- Some buttons are blocked by the LCD viewfinder.
- Since there is air in the case, it floats, making it hard to dive with.
- Split-level shots require a different optical lens.
Final Thoughts
The Outex housing is a perfect way to get started with underwater photography. It’s not crazy expensive and it’s a lot more reliable than most (if not all?) cheaper options. It has its little quirks that can be hard to deal with, but for what you are getting and the price you are getting it for, it's well worth it.
What questions do you have about the Outex? Have you ever used one before? What did you think and what did you use it for? Share your thoughts and images below.
27 Comments
I think it's a great option! Dunking your gear is terrifying lol.
Spending a substantial amount of time in a kayak in the rivers and springs of Florida, this would be amazing. Unfortunately for me, I'm migrating to a mirrorless system and the bag cost more than the body of my camera.
for mirrorless they make some pretty decent all plastic dive housings that are affordable. Check out Meikon housings. not sure what camera you have, but they have a pretty good selection.
Thank you! Yes, these would definitely work.
That's really good info to know about the domed lens port too. I would have done the same thing as you and had no idea what I'm doing wrong.
I just bought a waterproof case for my iPhone 6+, to placate my urge to stick my D750 underwater .... you're not helping reenforce my decision, Jason! ;-)
DO IT!!
Aaaah the Outex gathering traction across the interwebs! Good to see a nice affordable option out there. The frustration of wrestling with the rubber and settings is a deal breaker for me though. Having to struggle with settings could mean missing the timing for the shot (when shooting manual), especially in tricky ever-changing oceanic conditions. They could design a larger back plate with hard engineered buttons for easier button pushing (although probably difficult to keep the buttons on a back plate centered over the actual camera buttons when in use, but there is probably some easy clip solution possible to keep it in place for different types of cameras).
I found that aperture priority is the way to go. Manual is great when conditions are constant, but like you said, the condition when in the water are ever changing. It's hard enough as it is framing and shooting. i would rather get concentrate on getting a good shot then having to worry about my settings.
I think I'd go with Manual Exposure, set AutoISO with a minimum shutter speed of 1/200s or more depending on the focal length of the lens, f/8 and be done with it :p
I shoot auto ISO when I shoot aperture priority and I can set the minimum shutter speed when doing this. So pretty much the same thing you suggest but my shutter speed can ramp up when needed instead of being stuck in one spot.
Gotcha ;)
The name of this brand is terribly similar to a certain condom brand in my country... Always use protection when you go diving kids!
Are you Guys ever heard about http://www.ewa-marine.de/ ?
It's a German supplier but the solutions are well made and also a kind of cheap.
But still big enough to handle bigger cams like Canon 1DX or Nikon D4.
I was going to say, Ewa Marine is the best option for this type of shooting in my opinion. The bags are fairly cheap at $300 and unlike this Outex bag, the Ewa Marine can fit a pocket wizard, on camera flash, or other triggers for strobing on and in water which is really helpful.
Here is an old Fstoppers video we did featuring the Ewa-Marine bag: https://fstoppers.com/commercial/fstoppers-original-wakeboard-studio-sh…
One last thing I've discovered for shooting underwater photography is that DSLRs really aren't that great for underwater stuff (at least not as great as you would think). Everytime I go diving I talk to the professional dive photographer at the company and usually the settings they use underwater are not what you would expect being a mere terrestrial photographer :)
In most cases they are shooting at f/5.6 - 8, ISO 100-200, and here is the kicker....they are shooting very close to the surface of the water down to about 10 feet max. This allows the natural light from above to still light their subjects and often times they supplement that natural light with underwater strobes. My initial thought was always that you should shoot at 2.8 and ISO 1600 so you can get as much light into the camera but what happens is your depth of field is so shallow that nothing turns out in focus. Also because of the Bokah, every little piece of debris in the water becomes a huge distracting blurred sphere towards and away from the point in focus. It was pretty shocking to me to realize almost every great underwater photo I've seen was actually shoot close the the surface with unfiltered natural light (water depth will destroy your red tones).
What Lee and I have found for underwater photography is that it's actually way easier and cheaper to just use a decent waterproof/underwater camera like the Canon G10 series because you really don't need awesome glass that can go to 2.8 when you need to be shooting at f/5.6 anyways. Plus high ISO isn't that useful underwater because of the lack of red frequencies. We have had much better luck getting great underwater images with a cheaper underwater "point and shoot" camera than we ever have with a D700 and expensive Ikelite housing. Plus the point and shoot cameras seem to autofocus better for some reason which is probably 90 percent of the battle when shooting in and around water.
Just my thoughts since I've struggled with underwater photography for far too long now ha.
That's really interesting. All my shots where at f1.8 so next time i go out ill have to try your suggestion. i figured i was going to be bouncing around a lot so i wanted some faster shutter speeds.
In your use with flash have you ever tried off camera lighting? I have been thinking of trying something but was not sure the signal from the radio trigger would travel through water?
Yeah the main reason I have the Ewa Marine bag is to have a pocket wizard. I do more shooting slightly above water or in shallow water (camera still above the water) so off camera lighting is def something preferred if I can use it. Radio definitely doesn't work underwater at least Pocket Wizards but I bet the short 2.4ghz remotes would be even worse. Optical slave works okay if you have a flash underwater (dedicated underwater flash connected to your housing) but if you put some flashes in a sealed back and try to fire them by having a flash above water they usually do not work well. Flash underwater can be really really tricky.
If you are doing slightly submerged stuff, remember that the water line is going to be super blurry anyways because it is touching the lens. In most water situations the horizon is so far away that there really isn't a huge advantage to shooting at f/1.4 vs f/8. I would opt to have a larger DOF and a higher ISO than risk most of my shot being blurry or out of focus because I shot at f/2.8. The other big enemy will be water droplets on your housing....the rate of success even with slight spray is like 20% of what you are normally used to getting with no housing.
For both my dive trips at Australia's Great Barrier Reef, I used a $300 P&S film camera that had a dedicated housing. There was a switch to go from very close to just close for the focus. And the flash was good for maybe a foot or two, depending on the depth. I could have borrowed a Nikonos, but wanted to travel as light as possible. My photos came out better than expected, but I never pursued underwater photography after that.
This looks like something I would consider for really bad weather, not just underwater.
The Outex does have cases that allow the use of flash. Those Ewa kits looks nice but they look pretty bulky.
https://shop.outex.com/en/cover-100lf-3#.VbJkLPmLW6U
Plastic bags are scary compared to hard casings however....they do work if you look after them. I recently purchased an Ewa Marine bag for my RED Epic and it works absolutely amazing !
I was wondering how you got that awesome shot I saw on instagram yesterday.
Thanks for the article, man!
Would like to see the setup with the domed port when it arrives, and how the extra blue rubber is handled in that configuration... although at $500 for just the dome, ouch!
Ya I have the dome now. But really wanted it for a destination wedding that I just got back from so i didn't get to use it. I'm still deciding if I should keep it or send it back... If I keep it, I'll definitely share the results.
Holy free holy moly, this review just made my day. I literally was just saying the other day, that I hope someone reviews the outex underwater housing, and does portraits with it. You win the InInternet today.
Thank you so much for your in depth review on this, I was curious about an actual user perspective who knew what the hell they were talking about when using it, and this hit it right on the head. It was holding me back from actually buying it, but after your review, I'm definitely going to snatch it up.
Nice review Jason. I found the button access and viewfinder slippage a bit fiddly on first try too. I thought maybe it was because I didn't attach the strap holder - but sounds like that didn't help you either! About to try it all out properly on a Fiji trip in a couple of days so will try your hair tie trick maybe!
One comment on your install process - the way Outex recommend is roll down the lens opening, put the camera in grip end first, THEN attach adapters/filters. I think that way might be easier, and easier on your camera too!
Ya I saw that imstall stuff after the fact so would say go with their way. But that's another frustration. You need Internet access to their install videos. No install paperwork at all came with the housing. But layer on I tried the roll method and it was harder to get the camera inside since there is more rubber that need to stretch, but I can see how it would be less strain on the housing.
Definitely try the hair tie method! It was a world of difference!
Yeah I'm watching the videos a few times now before I hit island data speeds!
I bought this a year ago and used it last summer with my Canon 5DM2 and 7D. It was fun to be able to have the camera on the beach and in the pool but it was hard to use. Then, when I got it out to use this summer the blue plastic bag had deteriorated and had holes in it. If you buy an Outex, realize that the blue plastic part of the system will not last.
Outex offered me $20 off a new cover, but it was hard to spend any money on something that hadn't worked well for me and then didn't last. The website does say that the plastic part should last 12-24months depending on use.