
As many of you know, I earn my living as a wedding photographer, It’s a job that I wouldn’t trade for the world, but occasionally I get the opportunity to do something a little different. In this case, it's about as far removed from wedding photography as you can get. If you remember at the end of last year I showed you how to photograph a World War Two machine gun, this time though, we’re going after something just a little bit bigger.
Once again, I have to send a huge thank you to the South Carolina Military Museum for allowing us to have access to these beautiful machines. Mike Lott and his staff gave my team and I full reign of the museum’s largest space and were more than generous with their time. If you get a chance, please check out their website and if you have the opportunity to stop by, please do. It really is a cool place.
That being said, on to the job at hand.
The Job:
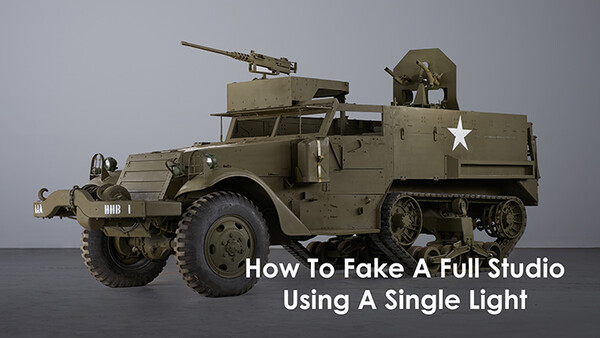
The job at hand was fairly straightforward, we needed to photograph four Jeeps, a Dodge Command Car, and a gigantic Half Track, and we only had access to them for about 5 hours. These images were going to be a part of their marketing campaign, as well as made into massive posters. This may sound like a challenging task, but using this technique we were able to get in and out with plenty of time to spare.
The room where we were to photograph them was a large warehouse that had been converted to house the Military Museum’s vehicle fleet. It was windowless and the interior lights could be controlled with ease. This meant that I had the option to turn off all of the lights and use a long exposure instead of a single short exposure and still remain completely free of ambient light. This gave me the freedom to fire my strobe multiple times to highlight individual sections of the vehicle over the course of 30 seconds.
The Technique:
To begin with, I wanted to do a quick comparison shot and see what the vehicle would look like if I shot it using only the lights in the room. The results weren't spectacular. In fact, I'd have to say that the hideous magenta tinged fluorescents made everything look terrible.

So from there I turned off the lights and went about trying to create a dynamic image using multiple flash pops. Since the image was created almost entirely in camera (with the exception of the background) I broke down my process for light positioning into several steps. Keep in mind that in the actual image, all of these positions were combined into one 30 second run, creating the perfectly lit car in camera using only one strobe light in a single exposure. The key to figuring out how you want to shoot an object using this method is to consider each time you fire the flash that it is taking the place of a strobe in an imaginary studio. So if I fire the flash 5 times, I'm thinking in terms of a 5 light set up in a regular studio.

I always fired the flash from behind and towards the camera to create a rim light that would separate the vehicle from the background. This shot also includes a flash fired directly to the left of the vehicle .

The from the right side at around 45 Degrees.

From the left side, angled on to the wall to create a smooth background. 
From the front left in order to create more fill. 
And finally from directly to the right of the subject.
All of these positions combine to give you a final image that looks like this:

So there we have it. After a little bit of photoshop magic to clean up the background and the floor, we have a completed image that only requires a single light, not an entire studio full of lights and equipment. I had a team of 4 helping me out, but that was only because we weren't allowed to actually start the cars, so we had to push them into position which took a surprising amount of muscle. You could very easily do this by yourself, it just might take a self timer to allow yourself to get into position fast enough.
The Gear:
So now that we've looked at the technique and looked at how the lights were placed, let's take a look at the gear that I used to make it happen.

All of the images were photographed using a Nikon D800, locked off on a Manfrotto 055xproB Tripod and tethered to my aging Macbook Pro. I almost never shoot tethered, but in this case it was almost a requirement as it is nearly impossible to judge color and tone correctly (at least to the degree that was needed here) on the back of the camera. Colors, especially when shooting RAW, tend to be much duller and less contrasty than on the back of the camera so it was important to take this into consideration and make sure that the proper exposure was achieved.
In addition to this, the strobe that I used was an Alien Bee AB-1600 paired with an Alien Bee Medium Softbox, which I mounted on to a monopod, allowing me maximum control of the direction and intensity of the light throughout the exposure time.
Finally after everything had been photographed, the RAW files were processed in Capture One Pro 7 (which is absolutely amazing if you haven't tried it) and finalized in Photoshop CS6.
Conclusion:
So for those of you of a TL;DR disposition here's what you need to know on how to fake a full studio using only a single light.
Location:
- You're going to need a dark place, either an outdoor space with no light pollution or an indoor space with no windows. I know this can be tough in some areas, but ask around and I'm sure you can find somewhere.
Gear:
- Lock off the camera on a tripod that isn't likely to be bumped or moved. (Even a tiny move will make combining images in post impossible)
- Tethered, Tethered, Tethered. I can't say this enough. You'll regret it if you rely solely on the back of your camera.
- Use a lens that stops down sufficiently far enough. (I used the Nikon 60mm Macro which stops down to f/32)
Technique:
- Stop down your camera until you can achieve a sufficiently long exposure for you to make the move that you need to make while still remaining free from ambient light.
- Plan your lighting set up, imagine that each position you move to is a flash that you have placed there
- Press the shutter, move to each position firing your strobe at the preplanned intervals and locations
- Examine your shot and make adjustments accordingly
This really isn't rocket science, the key is to just think of each position you hold your light in as another strobe in an imaginary studio.
If you're looking for more information on a light painting variant of this technique, take a look at how Fstoppers visited Blair Bunting and watched him shoot the Aventador!
I really hope that you enjoyed learning about this technique and I'd love it if you would check out my photography site as well as like me on Facebook! Take a look at the final images below!


Join the Fstoppers community for free
-
Post comments and join in the discussions
-
Browse the site ad-free
-
Share your work and get featured in the community
-
Compete in the photo contests for fun and prizes
21 Comments
Seems to me you left out the most important steps. How did you edit in Photoshop and CaptureOne?? From this article, I still have no idea how you went from multiple exposures to final image. Not helpful. :(
It sounded to me that it was only one actual exposure in the final images... the flash went off manually 4 times during a 30 second exposure. It's basically light painting during a long exposure.
The 5 separate images are there to demonstrate the different positions that I held the light in. In the post it says that all three of these were combined within one exposure to form the final image almost completely in camera.
Sorry if that confused you. But it's not a matter of blending the pictures together in post, I shot everything in one frame.
Though this was done all in one exposure, I do a similar procedure with multiples. I edit all of the exposures in lightroom, copying settings so they all look the same, then open them all in photoshop. I have PS layer them into a stack, and set all of the layers to "lighten" layer style. I then go in and delete specular highlights and other ugliness (as well as micro-align if my tripod drifted) layer-by-layer. I end up with images like this image of two motorcycles. Each side was 10-15 exposures with the flash in a small soft box.
Being a wedding photographer, how do you end up with gigs like this? :)
Also am I the only one who thinks the final images look like CGI?:D
Mostly just luck really. A friend of mine who collects World War II rifles and runs the blog C&Rsenal is good friends with Mike the guy who runs the museum and he asked if he knew anyone who could do something like this and my name came up.
Just a matter of meeting the right people I guess.
It does look slightly like CGI (ominously perfect lighting) but I really like this effect, looks like a fine art project. Definitely one of the tutorials from this site that I actually want to get off my arse and try.
Love the finals, they look awesome. Gotta try this out!
I recently wrote a blog post about this technique (for fashion/concept photography). The key in Photoshop is to either use masks or "lighten" blending modes to combine the images. http://obsoquasi.ch/zone-lighting-tutorial/
The car was completely lit in a single frame using a long exposure and multiple pops of the flash, so really there was no need to blend several images together.
oh I see. Yeah why not. I prefered shooting separate exposures - it gave me more control during the shoot and in post. Still your shots look great, you pulled it off beautifully!
Thanks John! I chose to do it all in one exposure for a couple of reasons, but the first and foremost being that I wouldn't have to spend 100 hours in post blending 10 different shots together. Plus it's much easier to "see" what you're doing if you're getting it all in one shot.
In addition to that, sometimes light interacts in weird ways when it's all shot at once and that can be very difficult to replicate in photoshop.
You forgot the picture of you on the mounted .50.
http://i.imgur.com/yHpRBsV.jpg
Flat matte paint is very different than a high gloss paint on most vehicles. But good technique for this circumstance.
I completely agree, with high gloss paint you would have to be exceptionally careful about managing your reflections. It's still a good technique for high gloss cars, but it would take considerably more planning.
Love military vehicles! Great job! Did a similar type of shoot for fun a few weeks ago. Differences were I used a single speed light (580EXII) and a remote shutter trigger. Crew was my father and myself. I used bulb mode which allowed as much time as needed for me to run around the car. Discovered early that each "position" of the flash required multiple pops to generate enough light. I think it took about 30 pops over 45 seconds to make the image below. Once again, single exposure. I did post in NIK and cleaned up a few errant reflections. This was just for fun to try the technique.
http://yipdog.smugmug.com/Other/NY-Trip/i-sD85GdS/0/X2/427-Vette-Front-…
Ahh grass. The natural environment of the Corvette.
LOL! Just didn't want to get run over by traffic!
That's CRAZY good Robert! I've always done night-time car shoots by light painting with flashlights and such, never thought about just popping the flash unit. Btw, is that a firework going off in the background on the left? Good capture if it is!
Thanks! I had flashlights but wanted to try the speed light after reading a few forum posts on the technique.
It was near July 4th so yup...fireworks in the BG! I didn't even see them til post. Otherwise I would have timed the shot a bit better.
Cool! I actually did this the other day to photograph some of my cameras. Flashed a white sheet from behind, with a softbox at about 70 degrees about a 4 feet above and a foot to the left and right with a 430exii. thanks for the neat post, I think this is a very cost effect way to do a studio shoot with stationary objects!