
Ever wonder how Google manages to render everything from bushes and boulders to bridge trusses and skyscrapers in amazing three-dimensional detail? In this article, we’ll find out how. It involves a high-tech lawnmower, a lot of computing power, and thousands of terabytes of data.
Excuse Me, How Much Data?
Both Google Earth and Google Maps have incorporated basic two-dimensional imagery since they first launched in 2005. These top-down photographs come almost exclusively from satellites. Over the last 15 years, our interaction with this stunning perspective of the Earth has become so routine that it might not seem so impressive. We’ve become accustomed to being able to zoom in to meter-scale resolution just about anywhere on the planet from our phones.
Still, what’s going on beneath the hood and the sheer size of the numbers involved is jaw-dropping. Even the distant “pretty view” of the earth we see when zoomed all the way out is stitched together from something like 700,000 separate Landsat images totaling about 800 billion pixels (check out this great overview video). And that’s at the lowest zoom level.
There are 20 additional zoom levels beyond that capturing ever-increasing levels of detail across the globe. Zoomed in all the way, the full picture of the earth is more than 500 million pixels on a side and, even when compressed, corresponds to more than 25,000 terabytes of data (and you thought the Sony A7R IV’s piddly 61MP, 9,504 x 6,336 resolution was impressive). And that’s just for one zoom level. That's “big data.”
Additionally, they try to update the imagery for major cities more than once a year and for other areas every couple of years. This both keeps the imagery up to date and retains an interactive historical record of how the Earth is changing over time. The end result is that they’re adding that much data to the repository again every year or two.
Creating Fantastical 3D Worlds
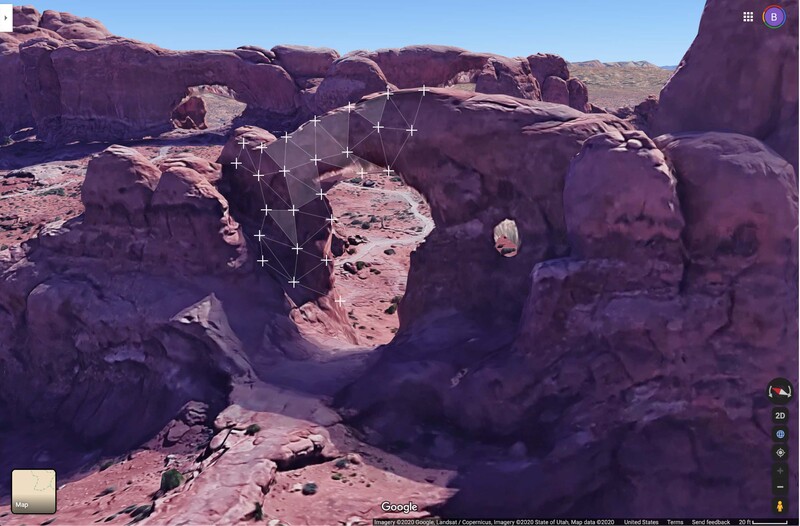
In recent years, you may have run across areas where far more detailed three-dimensional data and imagery are available. A map of these enhanced areas can be found here.
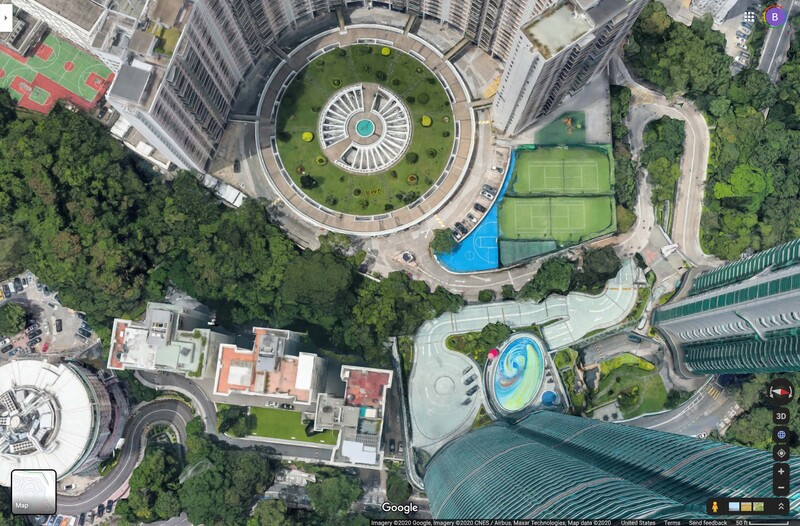
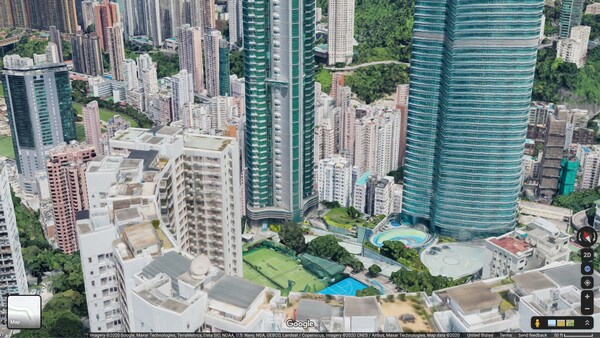
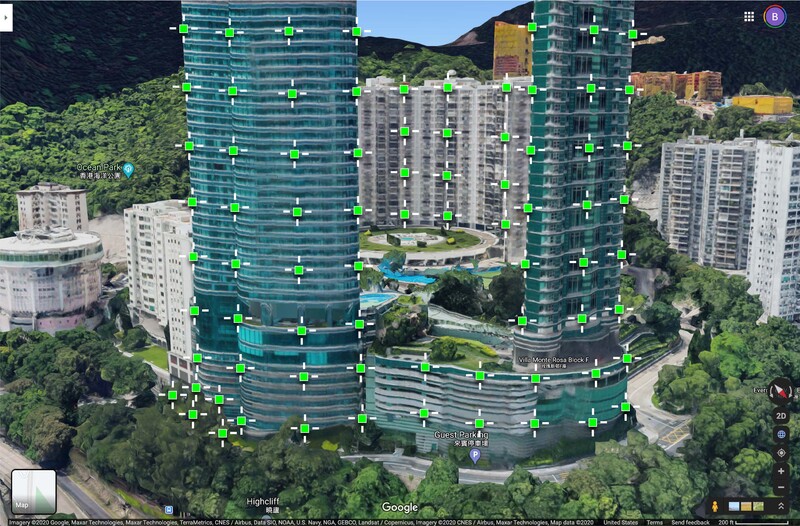
I’ve personally lost more than a few hours exploring these virtual worlds from the comfort of my home office. Eventually, you start to wonder, though, how they do that. How do they create such finely detailed 3D models, down to the individual air conditioning vents and lawn chairs on the roofs of what must be thousands of skyscrapers in Hong Kong alone? It turns out that it’s all done from photographs and closely duplicates the way our own brains extract three-dimensional information about the world around us from our stereoscopic vision. So, not only do the textures come from imagery, but the 3D structure of a scene is extracted from images as well.
The process begins with a flight. Really, a whole bunch of them. A plane is taken up for a few hours at a time and flies a pattern that looks a lot like mowing a lawn, down and back, down and back. The plane has five different cameras mounted to it that snap pictures to the front, sides, back, and bottom throughout the flight, with each image referenced to a precise GPS location and camera angle.
The first step, then, is to run the images through a series of processing algorithms to remove haze, do basic color correction, and remove (most of the) cars and other transient items. But, how do you actually turn a bunch of pictures taken in different places and at different angles into a three-dimensional representation of the world? Let’s take a look.
Feature Extraction
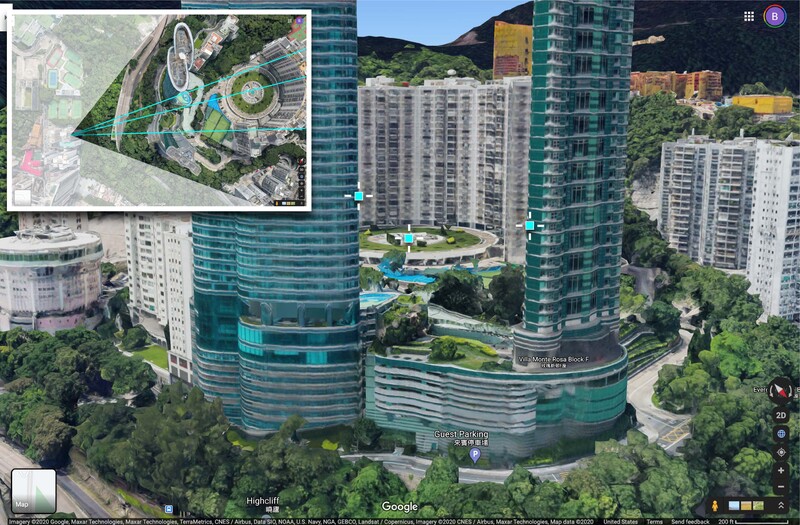
The next step is to identify correlated features in each of the overlapping images. As an example, let’s assume we’ve taken pictures of an urban environment from three different viewpoints. The camera locations are shown at the lower left of the figure below as three colored circles.
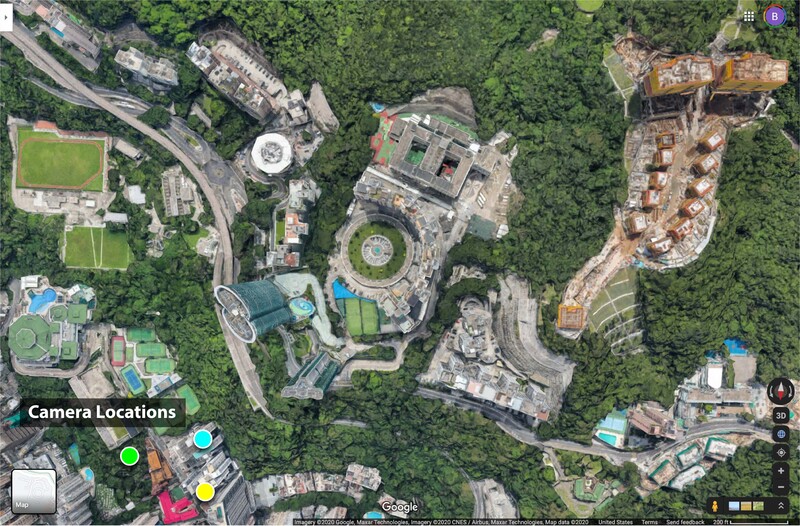
Let’s pick out two points on the interior edges of the nearest skyscrapers as well as the fountain in the courtyard of the more distant building as features of interest. The three points are indicated by crosshairs in the image below, captured from the blue camera location.
In the inset at upper left, the camera position and effective field of view of the image are shown, as are rays extending from the location of the camera, through the image plane, and out to the features we’ve identified (the image plane is indicated by the surface of the small, darkened triangle at the camera origin). We know that the features marked by the crosshairs must lie along with those rays, but because we have only a 2D image, we don’t know how far from the camera the features are located. They could technically lie anywhere along the corresponding ray.
The same exercise can be repeated for the other two camera positions, one taken from a little to left of the first (in green below) and the other taken from a little to the right (in yellow). The same features can be identified in each of the images and rays traced from the camera position out in the corresponding direction of each. Use the slider to see how the views and light paths differ.

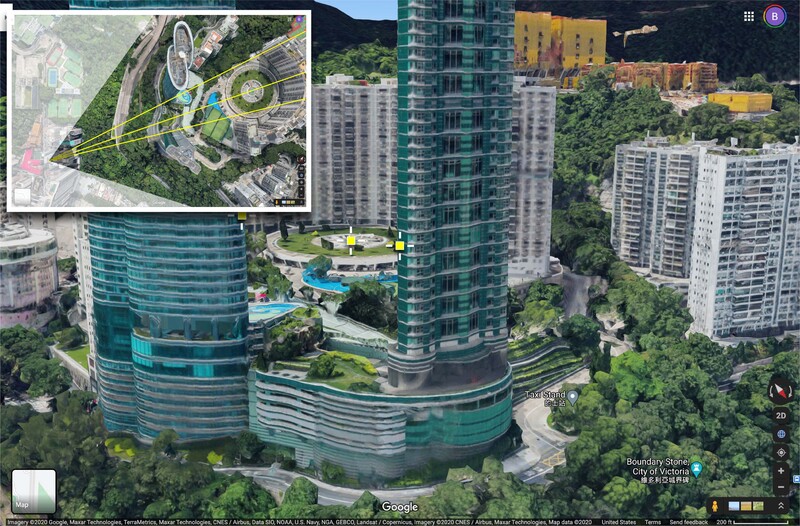
Note that feature extraction and mapping between images isn’t trivial. It’s made easier if two images are taken from relatively similar positions since the location of a feature in one image provides a head start as to where to look for that feature in the other. The fact that the positions of many features are correlated and will tend to move together from one image to the next can also help. Still, there are places where a feature may be occluded in one image and not in another that can present challenges (are we just not finding it, or is it really not there?). Our brains have evolved to be extremely good at this task of identifying visual features within our field of view and matching them up between the different signals received by our left and right eyes. It’s one of the most fundamental purposes of our visual system. But developing computer algorithms to duplicate even a rudimentary version of the capability isn’t trivial.
3D Location Extraction
The next step is to use the three-dimensional rays computed in the previous section to determine the position of each feature in three-space. In principle, only two rays are needed to compute the location of a point in three dimensions, as the intersection of the two rays should indicate the location of the feature. In reality, it’s common to find that two rays don’t actually intersect at all in three dimensions as a result of measurement uncertainty or error. Instead, the point of closest approach on each ray may be used to compute the likely feature location. The use of more than two rays, and the use of rays computed from significantly different locations, can help reduce the expected error in computed feature locations.
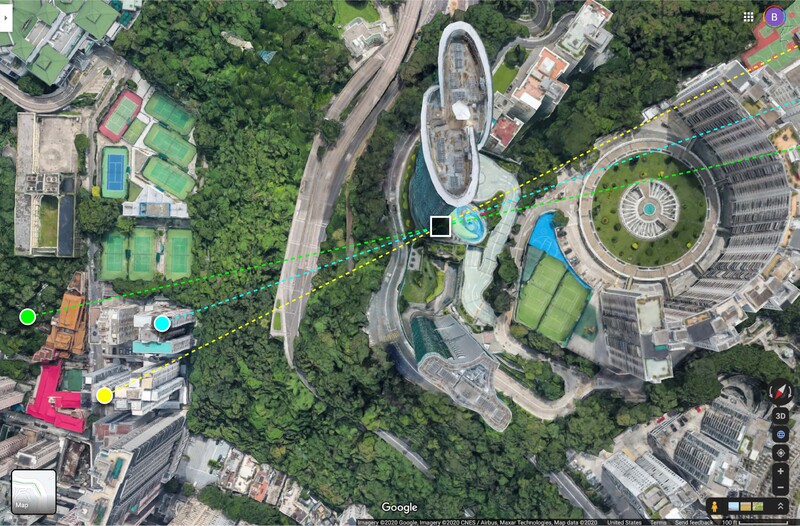
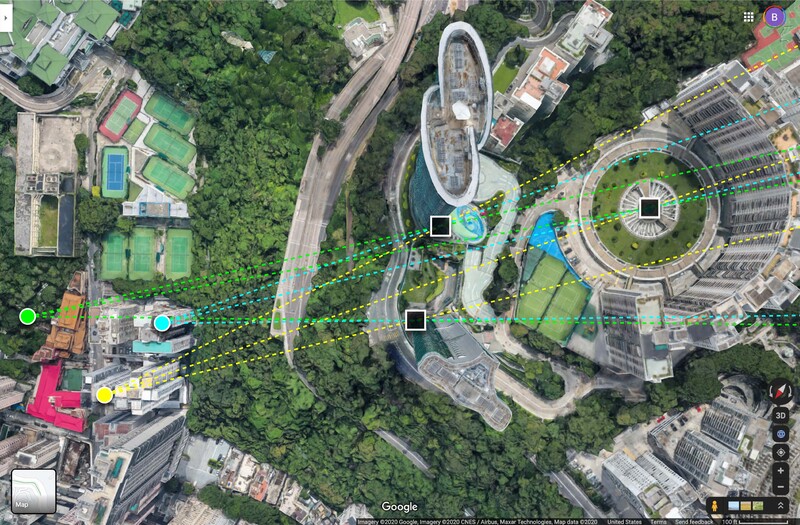
The three rays corresponding to the feature at the edge of the left skyscraper are shown in the image pair below (left panel) along with the estimated feature location (right panel).

By matching up the rays from the three images that correspond to each feature, the locations of other scene elements can be estimated as well.
This provides a way to determine the locations of individual elements. But, how do we, then, recreate entire buildings, trees, or rock formations?
Depth Mapping and Mesh Generation
The first thing we need to do is extract the positions of more features. A lot more features. We’ll use just a small number for illustrative purposes, but in reality, nearly every pixel would likely be used. Let’s identify some feature locations on a couple of the buildings as well as on some nearby trees (left panel in the figure below).
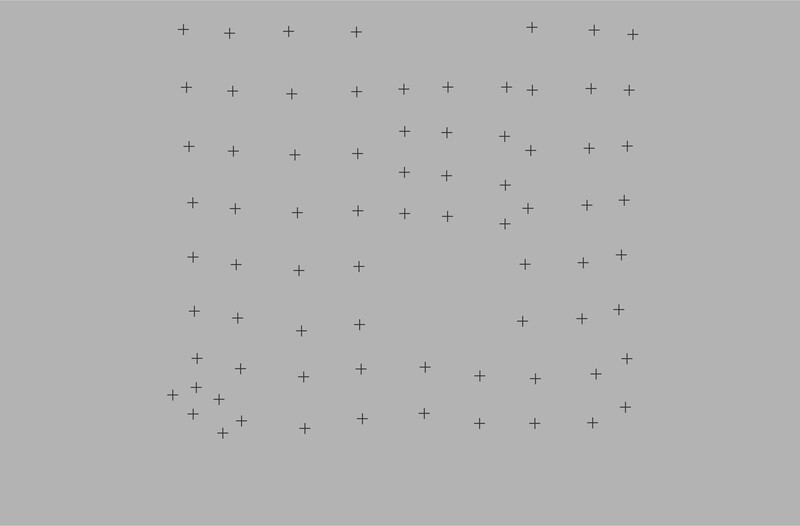
Let’s then go through the process above and use the three separate images to extract three-dimensional positions for each of the identified features (right panel above). The result is actually a bit underwhelming. It’s nothing more than a collection of independent points in three-space. Not what we might’ve hoped for.
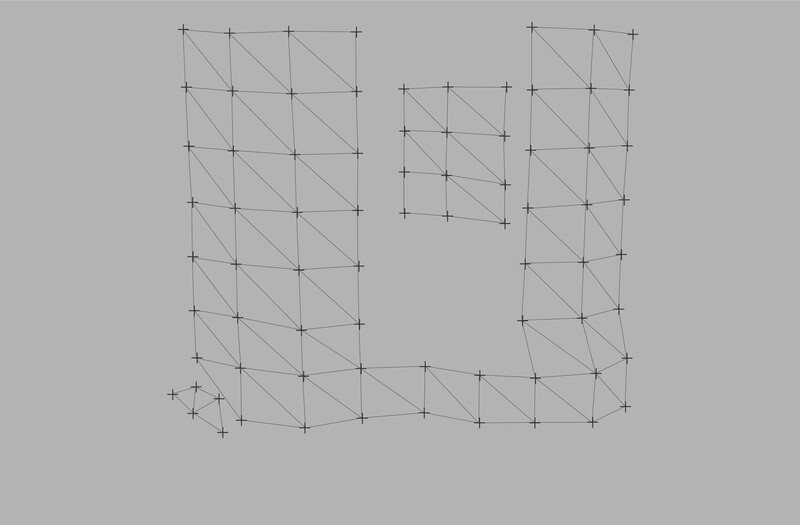
To actually begin to extract the structural features underlying buildings and vegetation from those points, another step is needed. Loose collection(s) of independent points must be combined into surfaces by embedding them within a mesh. The edges of the mesh define the relationships between the individual points on a surface (left panel of the figure below). There can be an incredible amount of ambiguity in terms of how different points on a surface are related and which points in three-space actually belong to the same surface. There are entire software packages that do nothing but assist in defining surface meshes from collections of 3D points.
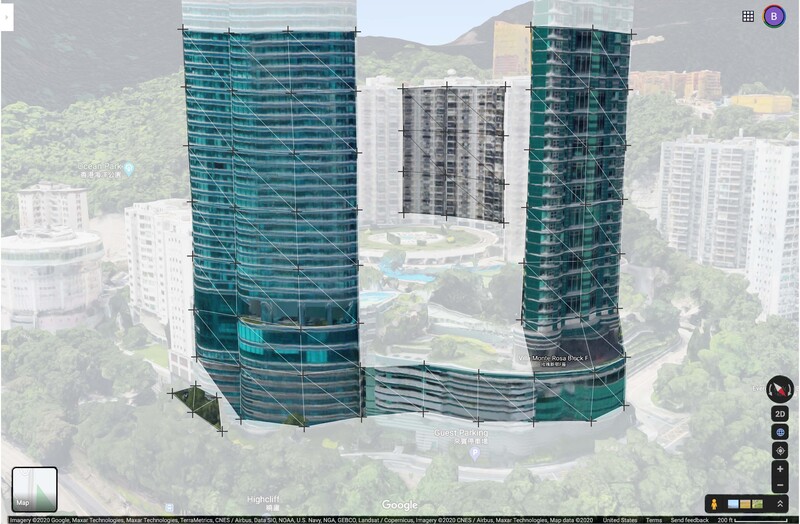
Once those surfaces are constructed, however, the real fun begins. Now, we can go back to the original imagery and use it to apply a texture to the surface. We can, in effect, drape the imagery we collected over the corresponding three-dimensional structures with the added benefit that we have multiple images of each point on every surface to choose from. If there’s a specular highlight or reflection from one vantage point, the color can be extracted from another image that’s more representative of the actual surface color.
The basic techniques described here are used in many fields beyond creating virtual reproductions of the far-flung corners of the earth. For some of my postdoctoral research, we used the approach to track interacting particles in three-dimensional turbulent fluid flows from videos taken at 1,000 frames a second. The technique has been used by media outlets to calculate the 3D position of the tennis ball during matches and yield some cool replays. And soccer (sorry... football) fans in Europe can now step onto the field and watch replays of a game in 3D from any perspective. I’m not much of a soccer fan, though, so I’ll stick with exploring the crazy rock formations of the Desert Southwest from my office until the pandemic abates and we can head back for real.
If you want to give the 3D thing a try yourself, just do a quick search for "photogrammetry software." There are even some free options to get your feet wet with.


Join the Fstoppers community for free
-
Post comments and join in the discussions
-
Browse the site ad-free
-
Share your work and get featured in the community
-
Compete in the photo contests for fun and prizes
2 Comments
Now this is interesting. Always wondered if we could get full 3d models from well known sights that have been photographed from every angle a million times.
Enjoys these views of Hong Kong.
They will be gone soon.
Even Bing have started to apply the same treatment they are doing to China map.