

Flowers can be a wonderful opportunity for photographers to practice their camera skills. Whether receiving a bunch as a gift, or wanting to record the flowers in your own garden, there are a few things you can do to improve your flowery shots.
When I first got into photography I found photographing flowers was a great way of honing my knowledge of the camera. They're beautiful stationary subjects, so it's easy to set up your camera and experiment with different apertures, shutter speeds, and ISO values to see what each setting does. By working with these settings it can quickly boost your confidence to move from auto mode, to manual.
I'd wanted to photograph a wild Bee Orchid here in the U.K. for quite some time, so when I heard of one growing in my friends garden, I grabbed my kit and hastily ran over. At this point I didn't have a macro lens, nor any plant-specific accessories like a Wimberley Plamp used for holding the orchid still, so I decided to write a short tutorial on how to get the best flower photos with your regular kit.
Hold the Camera Steady
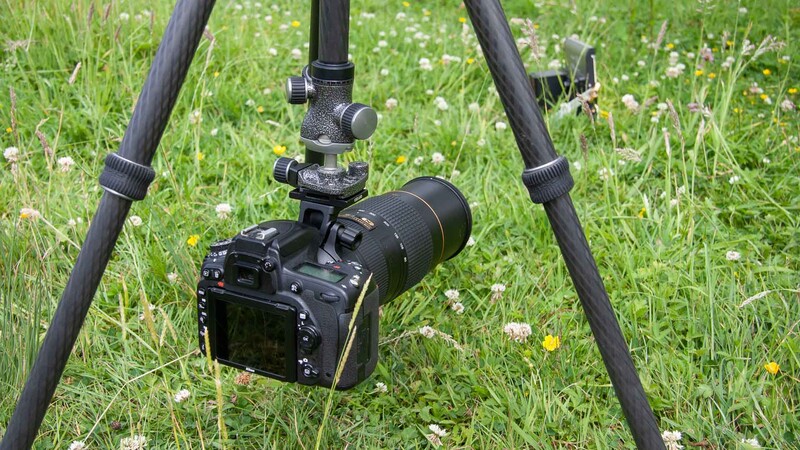
I used a tripod (a Gitzo Traveler) to keep my Nikon D750 steady whilst I shot. The benefit of using a tripod is that I could recompose my shot with relative ease, and fine-tune my composition carefully. Shooting handheld is still an option with flower photos, but it's more difficult to get into position and make small adjustments accurately between shots.
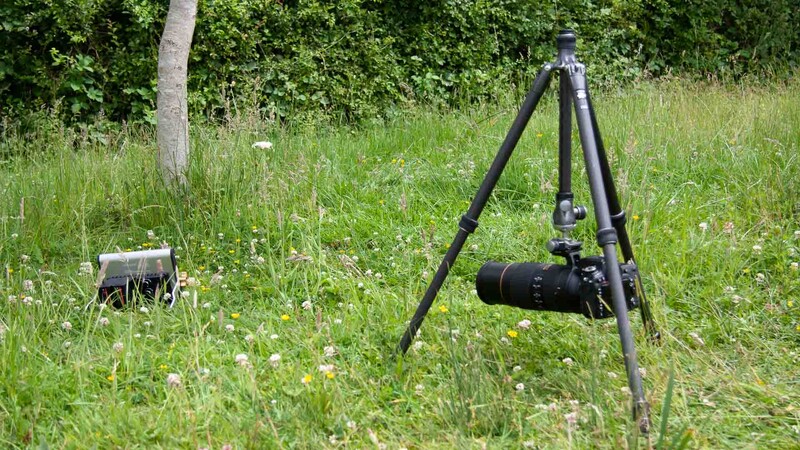
Shoot From a Low Angle
There's two benefits and one drawback from shooting level with a flower. By getting level with the flower you're providing a natural view that shows the stem, petals, sepal, and other parts of the plant in full view. It also helps to create better subject separation from the background when shooting with a wide aperture. That's because the distance between the foreground and the flower, or the background and the plant, is greater than shooting directly down upon it.
The only downside, really only for photographers capturing images outside on location, is that you have to lay down on the ground to compose and shoot which sometimes means getting muddy. That, and if your tripod doesn't sit low enough to the ground, you might find your shooting angle looking down at the flower, rather than level with it.
With my Gitzo Traveler I'm able to take out the center column and flip it to mount the camera upside down, nearer the ground, which would otherwise be impossible up the other way as the column would stick into the ground.
Use a Shallow Depth of Field
On an 80-400mm lens I shot at an aperture of f/5.6. Normally, on a mid focal length lens such as a 50mm this would be too narrow, making a longer depth of field, meaning the foreground and background elements would be too clear. But because I'm shooting at 400mm on the lens, the perspective compression is great enough to negate that effect. Use the slider on the images below to see how the photo looks when shot at f/5.6, compared with f/9.
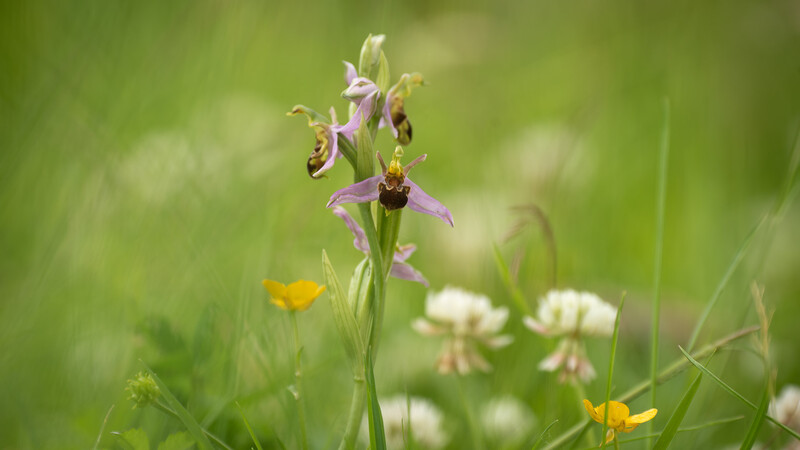
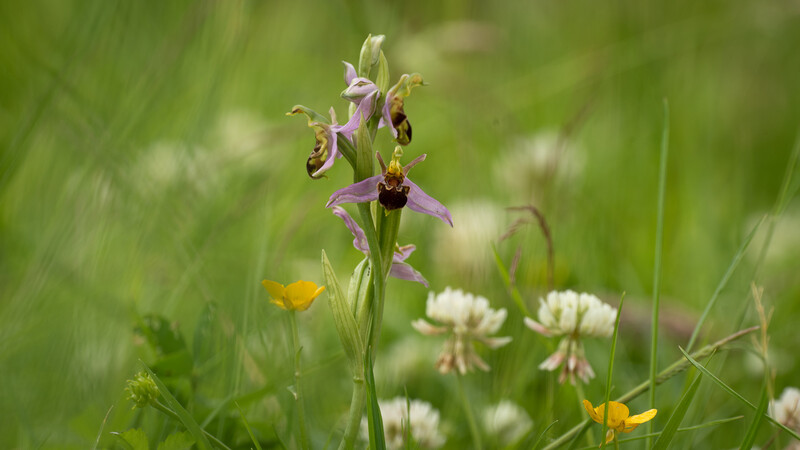
By using a wide aperture, or a longer focal length, the depth of field becomes smaller and so allows the flower to stand out. This is a great method for isolating a subject from its surrounding environment if you don't have any additional light sources or other light modifiers to make them stand out in the scene.
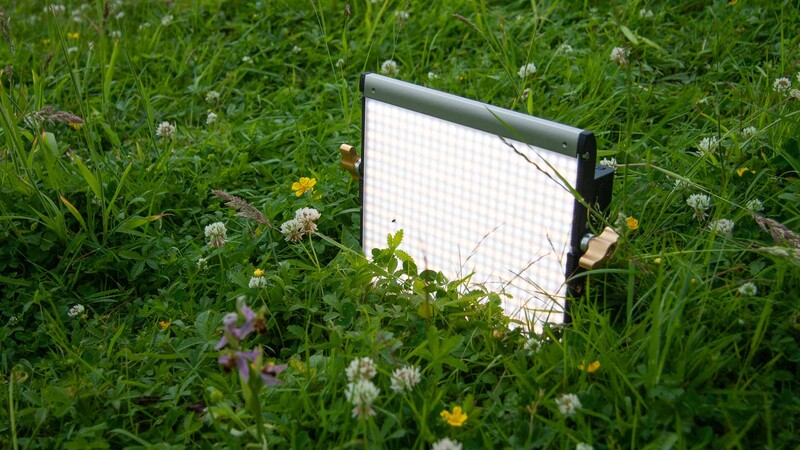
Add an Additional Light Source
Reflectors are a great way of popping a little light into the scene, especially on a flower, when you feel the subject needs a little brightness boost. However, reflectors aren't always helpful, especially if shooting in a dark location inside, or capturing subjects outside where they can't be moved — as is the case here.
The sun was behind my as I shot this orchid, and I couldn't find an angle to bounce the light in against the flower to fill in the shadows. So I used a Neewer LED panel to light it up, instead. It's dimmable and has a white balance option, which meant I could balance it against the bright backdrop to ensure a good exposure.
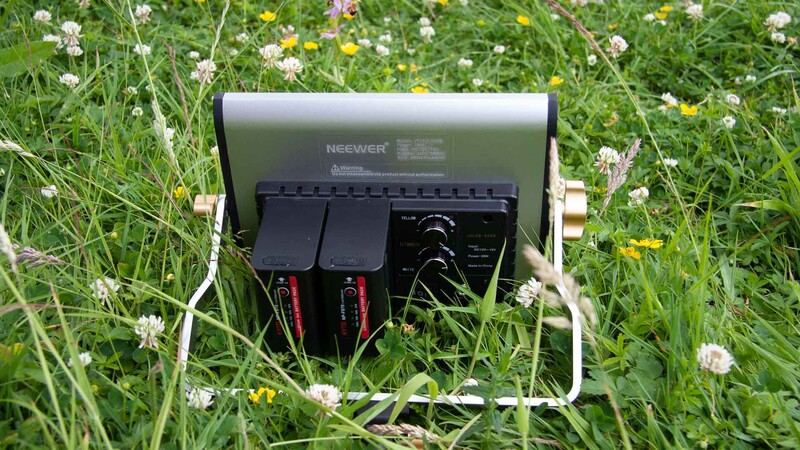
Keep Your Batteries Charged
It sounds obvious, but keeping all your batteries charged before shooting is essential to getting the most out of your flower shoot. I was using the rear LCD screen to compose my image because looking through the viewfinder on my belly and adjusting the tripod head proved a little tricky (maybe that says more about my dexterity than anything else). But the screen drains the battery much faster than using the viewfinder.
That includes any additional lighting. My LED panel is capable of being plugged into the mains electricity, but I decided to use the two batteries on the rear for this setup because I wasn't anywhere near a power source.
How I Shot My Flower Photo
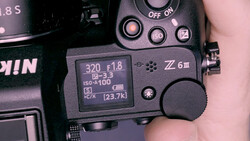
Using the aforementioned kit I chose the widest aperture I could when zoomed into 400mm on the Nikon AF-S NIKKOR 80-400mm f/4.5-5.6G ED VR Lens, which gave me f/5.6. It was quite windy outside so I decided to keep my shutter speed fast to avoid blurring when the flower bobbed back and forth.
However, I relied on the vibration reduction in the lens to keep things steady so that I could use a low ISO, so my shutter speed ended up at 1/250 sec at ISO 100. I'd normally avoid going slower than the focal length of the lens, (i.e. going slower than 1/400 sec in this case) but I ended up with a good, sharp image.

There's a lot more to photographing flowers than just this, such as keeping your shutter speed fast when it's windy outside to avoid subject movement blur. You may want to experiment with shooting angles, and focal lengths to see which combination suits your style. For example, a wide-angle lens, and a low angle shooting up towards the flowers can give a bugs eye view not normally seen by the naked eye. But you can apply the tips above to almost any shooting condition, whether outside or inside, when photographing flowers, and hopefully it can help boost your already good photos to a whole new level.


Join the Fstoppers community for free
-
Post comments and join in the discussions
-
Browse the site ad-free
-
Share your work and get featured in the community
-
Compete in the photo contests for fun and prizes
9 Comments
As any photographer knows, controlled lighting under natural conditions is a real challenge. This photo was taken at sundown with the background in the shade.
I'd also recommend shooting through leaves of grass or flowers to have a nice foreground blur when needed. Makes focusing more challenging, but adds perfectly to the soft mood.
(following with the first tip) Tip #6:
Bring camera with you to take fotos.
Part of me wants to say, please, no more flower photos.... except I like to take photos of flowers sometimes!
That's because you love photography and get caught-up in composition, lighting, shading, texture, colors, background, foreground, depth-of-field and everything else. Put that flower in the hair of a beautiful woman and wow... what a shot! But yea, it's still a flower.
Um, I was trying to politely say that there are too many mediocre/unoriginal flower shots out there.
I got a good effect using an old Helios 44-2 lens adapted to my X-T2, the background blur looks loads different to my normal lenses. I don’t want to call it swirly as such but it’s definitely got character. I also agree on the 2nd light source tip, those cheap reflectors are awesome for that.
I'm actually a photojournalist and sports is my favorite subject but by day I run a website called Plants Map and I see plant photos all day long. Trying to be a little different, (actually bored one late winter night) I went out and light painted everything that was blooming and got interesting results. I should practice more to get better at it but it was a learning experience anyway. Here are a few images: https://www.plantsmap.com/collections/32519
I also love photographing plants and flowers. Sometimes, when they are not at hand, I just order them online, for example, here: https://instaflora.net/en-gb/delivery-flowers-ukraine. They always deliver beautiful fresh bouquets and I can take many beautiful photos. There are always fresh, showy spring tulips, beautiful roses, luxurious chrysanthemums, delicate lilies, flower baskets or flowers in a box in this store.