
Packing for a shoot in your town can be a pain, but packing for an extended shoot in another country brings a whole new set of complications into consideration. Recently, I’ve been doing a lot of extended trips for my personal project “Tattoos of Asia.” Over the few trips that I’ve done, I’ve managed to pare down my kit to what I absolutely need. It has been a long process, but I’ve learned quite a bit, and I’d like to share that with you as I prepare my kit for my upcoming India trip.
Of course, my project is significantly more extensive and demanding than some others, but I will make these tips as universal as I can while giving examples from my own kit. We’ll take a look at what to pack, then choose a bag and get everything in it. Finally, we’ll look at getting through airports and taking smaller flights in remote areas. I've also put together a video running you through all the gear I will take, including flash and charging gear that I take with me.
What You Need Versus What You Might Need
The first consideration is what you’ll take with you. This can be a really tough process for some people. Picking which body and lenses to take on your journey means making creative decisions before you have even arrived. Although an all-in-one lens like an 18-200mm might solve your focal length issues, it may not solve your need for light or image quality because of the narrow aperture and compromises made in designing it as an all-in-one lens. So, we’re assuming here that you’re looking to take some quality lenses with you.
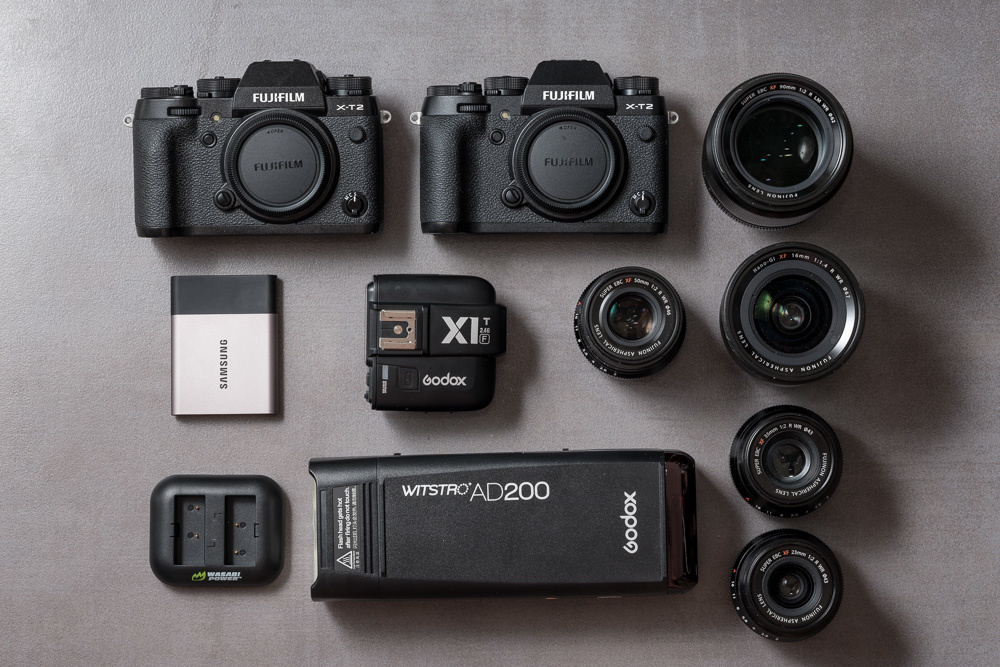
As someone who has recently been traveling for a very specific purpose, I have a slightly easier time when it comes to choosing gear. I am able to take exactly what I need. I know that I will use my Fujifilm X-T2 and 90mm f/2 for portraiture. This will also require a flash and diffuser. Then I know that I’ll likely shoot a few closeups and a couple of environmental portraits, so this means I’ll likely take my 23mm, 35mm, and 50mm lenses as well. From there, I’ll think about the things I may want to shoot, perhaps a wide shot of the village where I’m staying, or some macro shots of cultural items. These are peripheral to what I’m actually headed out to get, and so I will leave that specific equipment at home. I can make do with the closeup ability of my 50mm lens, and stitch a panorama of the village if I really need the shot.
However, if I’m traveling just for fun, it’s likely to be a very different story. The 90mm then becomes an optional lens (which is great for the weight of my bag), and I’m likely to take my 10-24mm as my wide angle and the three f/2 primes for everything else. Although I might come across something I wish I had a flash and umbrella for, it’s not going to be a priority for me and I’ll make something else work.
Remember that all lithium-ion batteries have to go in your carry-on luggage. If you can, cover the terminals and put them all in bags to make them easy to take out for inspection. This will satisfy all the requirements for air travel and you’ll have no problems getting through security.
All of these choices come from experience and a little planning. If I know I will definitely want a certain type of image, I’ll take the necessary gear. If it feels optional, I’ll leave it at home. You have to be strong in this, because if you plan for every eventuality, your bag will never stop growing. So, if the thought “Oh, but I might…” goes through your head, expel it!
A great way to see how you shoot most is to bring up your Lightroom catalog and filter by lens. This will give you an indication of which lenses you use most. You can also filter by aperture or ISO, or any of the other factors recorded in your metadata. If you would like to see these factors displayed visually, you can use Analytics Dashboard for Lightroom. This is a great site that I use every time I’m considering a new piece of equipment or looking at trends in my shooting.
Choosing a Bag
There is never a perfect bag, everyone will tell you that. There’s always some form of compromise. Personally, I use F-Stop Gear bags. The contention around the company itself is a whole different story and everyone has their feelings, but I love the bags. I haven’t found anything that suits my purpose better. I will say one thing, though. If you’re going to buy one, call first to make sure it’s in stock and in the warehouse closest to you. Backorders can take forever with F-Stop (not to be confused with Fstoppers, which many seem to do!).
For me, having two different sized backpacks, a rolling case, a shoulder bag, and three different ICUs (effectively your camera bag within the shell) means that I can always match the best possible solution for each trip. These all get used for my day to day work in Seoul as well, so they’ve been a great investment. They’re well made and very customizable.
The key to choosing bags for things like this is that it fits your style of travel. If you’re carrying your birding kit, it’s probably not a great idea to put it in a shoulder bag. You’ll not be able to carry it around long. Likewise, if you’re carrying a small kit of primes you’ll be changing all day, a backpack is probably not a good solution. It will get annoying pretty quickly.
Personally, I prefer a lightweight bag that is durable and weather resistant. This is important to me, as I’m usually in tropical environments that are either extremely dry and dusty, or muggy and pouring rain from time to time. I need to know that my gear will stay dry and dust free, and that I won’t get tired carrying it around.

Pack and Repack
Especially if you’re taking a larger kit, this is essential. I usually try several different configurations to make sure I’m packing everything in tight and making sure I can access it all easily. I want to be able to find everything when I need it and make sure there’s no damage to anything.
This is another time when you might be able to take something out that you may not need. If it doesn’t fit well, you might be able to take something non-essential out. Once everything is in and I’m happy with the kit, I make a checklist in Dropbox Paper (you could use Evernote or your favorite list-making app, as well). I check each piece as I put it in the bag to make sure I have everything as I pack. When moving locations, I double check this list to make sure I haven’t left anything behind.
Abiding by Airline Limits
Weight is always an issue. With many airlines having reduced their cabin luggage weight to 7 kilograms, we’re often faced with a dilemma. Our gear weighs a lot. Sure, my Fujifilm cameras and small prime lenses are extremely lightweight. Two bodies and five lenses comes in at under 3 kilograms, but by the time you add my bag, laptop, and flashes to that, you’re quickly approaching, if not exceeding, that 7 kilogram limit.
To minimize this weight, I’ll take my laptop out and hold it as I check in and pass security. I also take my camera and heaviest lens out and dangle them from my shoulder. This may seem sneaky, but if you check the restrictions, you will find that, for most airlines, you’re allowed to carry a 7 kilogram bag, plus a laptop, plus a camera, and a book. This will get you through the checks where you can put things back in your bag for comfort and safety as you move about the airport. I’ve also found that unbuckling your waist-straps and making the bag seem like it weighs nothing will mean that it very rarely gets checked for weight anyway. As long as it’s not a huge backpack that is stuffed to the gills, you’ll typically not be stopped. Even if you are, stay calm and explain that this is all fragile equipment and lithium-ion batteries, none of which can be checked in.
These things are usually only an issue in international airports when you’re flying larger aircraft. I fly a lot of smaller planes to the destinations I visit, and these present a different set of problems. For example, on an ATR-72, the baggage is actually stored at the back of the plane, not underneath. The overhead bins on an aircraft like this are tiny, and even my F-Stop Gear bags don’t fit up there and have to go with the check-in bags. The last thing you want is the crew tossing your bag at the bottom of the pile with all of your cameras in it. The solution that I have found is to let them know you have the bag, and ask what the safest way to store it is. Typically, I’ve been asked to carry the bag to the plane and pass it to the staff when I get on board. They’ll carefully place it on top or in front of the loaded baggage. If there’s a spare seat, sometimes they’ll even let you strap the bag in like a passenger.
For those traveling in the United States, a whole set of other restrictions and checks apply and it may be worth reading this post on Fstoppers if you're traveling there.
The Check-In Bag
On these longer trips, I usually take a check-in bag as well. This enables me to put anything heavy and non-fragile into the hold while I fly. Most airlines won’t let me take my tripod or lightstand into the cabin either. These are often considered weapons and need to be checked in. On top of that, non-essentials are also packed into this bag. Clothing, toothbrush, a backup flash unit, extra USB cables, and other miscellaneous items all go in this bag. If it gets lost, many of these things are replaceable in most places and the rest I can live without.
In Conclusion
Packing is a very important part of photography related travel. You need to make sure everything gets there and gets there in one piece. Of course, exactly what you’re packing will determine where it goes, but these are a few overall tips to get you started. Remember to minimize your kit, pack it several times, put unneeded items into a checked bag, and make those bags look light. If you are asked to weigh your bags or shuffle things around, do your best to comply with everything you are asked to do and explain why you have certain equipment and why it needs to be packed this way. Of course, on large commercial shoots, like those in Mike Kelley's tutorial, it's a whole different game and will require a different set of considerations. However, for individual travel, I'd recommend you start with my tips here.
If you have any tips of your own, or region-specific considerations, please share them below in the comments so we can start a resource for traveling photographers.


Great read! I've been trying to pair down my gear for a 3 month photographic journey I'll be taking from my home in Wisconsin, to New York City, by foot, in the upcoming spring/summer next year. Of course seeing how I shoot medium format film, it's not exactly a simple task, but I'm certain it will bd well worth it!
Interesting read. I have traveled between Europe and Asia on numerous occasion and it appears the 7k weight restriction only applies to carry on luggage, but not camera bags. Dylan is right...just have to be creative in distributing weight allowance until check in, after that, all of them goes straight into the carry on.
Can you provide some more info on what you pack in the different size ICU's? I'm shooting fuji gear (xt10, xt2, and a few zooms) and looking for some help on which size I need.
Hi Chris,
It really depends on your lens kit. With thr big zooms, I'd go for a medium. I use the small when I pack my primes. This time around I've got the large with me because Fujifilm lent me a GFX and lenses for my trip. There's plenty of sample images on their site that show packed gear to give you an idea.
Since the airlines did not specify the weight of my camera bag, I carried a Canon 1EG packed with photographic equipment.
Can you comment on which bags you have? I wasn't aware that f-stop had a roller bag. Also which UL bag is it?
The roller is no longer in production, but you might find a second hand one. The UL I have is the Loka. It's a great size.
Just google f-shot website. All the information and contact by email is there.