
When it comes to photography and storing photos on your personal computer, most of us experienced the pain and heartache when you lose some or in worst cases, all the images you've ever taken. It's undoubtedly one of the most unpleasant things we've all had to deal with in our career as photographers and probably the number one cause of heart failure for photographers. While it's easy to fall into the trap of just buying more hard drives as we fill them up, it's probably one of the worst decisions you can make as a photographer. So what exactly is the perfect solution to backing up your images?
I'm sure there are a lot of IT professionals out there thinking there is no such thing as a perfect solution, but you can get close to one by ensuring you have multiple copies of all your images stored away in safe locations off-site. As one of my lecturers back in the days of college told the class, he copies his backups on two drives and locks it away in a safety deposit box at the bank vault. Sure you can go that route, but it's quite tedious to have to drive to the bank every time you finished a shoot, isn't it?
The ideal alternative is to invest in a server as well as off-site backups. After Fstoppers announced they upgraded their office servers to new 10 Gbps Synology servers a while back, I knew I had to look into it as well. Servers are great because most of them allow you to store data while being able to work on them simultaneously and with the advances of technology these days, it's easy to monitor hard drives and be warned well in advance when one of them becomes faulty. At least we can give our blood pressure a break.
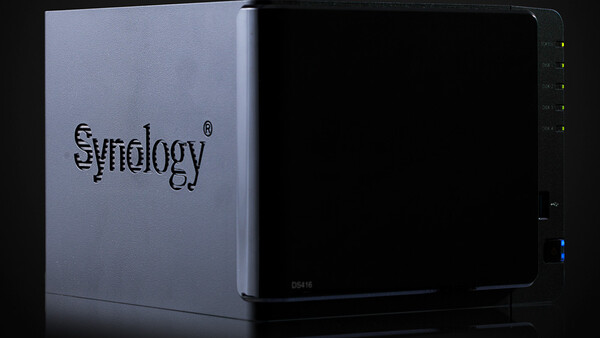
I've made the mistake of buying additional hard drives for way too long, and only after a decade did I finally make the switch of investing in a small sized server. While there are many options available on the market today, I chose the Synology Diskstation DS416. A compact, light-weight four bay Network-Attached-Storage (NAS) server. The DS416 is fitted with a 1.4 GHz, 32-bit processor, and 1 GB DDR3 and connects via dual Gigabyte Ethernet ports to your computer or router. It's capable of speeds up to 220 MB/s (read) and 140 MB/s (write). Furthermore, you have the option of connecting two external devices via USB 3.0 on the front and back of the Diskstation. Perhaps not a bad idea to keep my card reader permanently plugged into the front USB port. On a side note, the new 10 Gbps servers from Synology were not yet available in my country, so I had to opt in for a smaller server, and the DS416 seemed like a good fit.
On the software side, the DS416 uses the Synology DSM (Disk Station Manager) operating system, intuitive enough for people to start learning their way around the OS rather quickly and perform all the necessary tasks, such as RAID configurations needed to set up the server. There are also an array of apps available, such as anti-virus software, media server apps (such as Plex) and various other media apps one can easily download off Synology's website. Once I loaded up the web interface, I noticed the Diskstation automatically started setting up the drives in Synology's Hybrid RAID (Redundant Array of Independent Disks) setup. SHR (Synology Hybrid Raid) acts like RAID 5. However, I was quite unsure of how this worked at the time of setting it up, and I opted to use the more common RAID 5 option instead. I later found out Synology has a handy tool on their website for those unfamiliar with RAID setups.
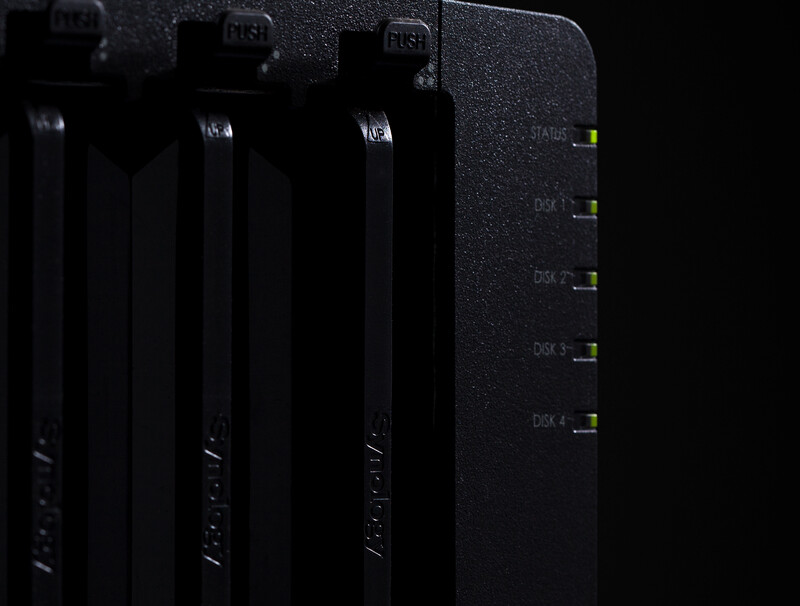
The design is sleek and lightweight and small enough to fit on my desk. The matte black box is contrasted with a glossy front cover, shielding the four hard drive bays and can easily be removed to insert or remove hard drives. The drive bays are tool-less and merely slides out by pressing a quick-release button above each bay.
I love all the features mentioned above. However, I've come to find the one thing I find lacking on this Diskstation is the ability to expand storage. Although I have enough space on the server now, having fitted it with three 3 TB Western Digital Drives and one 4 TB drive giving me a total of 8 TBs worth of storage. Unfortunately, the shop only had three hard drives, and I had to resort to using a spare 4 TB Western Digital black while I wait for stock. I'm sure I'll have to upgrade the storage capacity in the future, especially if I ever decide to switch over to film in 4K as the 8 TB worth of storage won't get me far. One solution would be to backup and replace all the hard drives with higher capacity drives, transfer over all my work and perhaps use the old hard drives for a new, smaller server. But that's a headache I'm willing to hold off on to for as long as possible.
All in all, I'm overly impressed with this Diskstation. I've been able to setup my Capture One catalog and edit rather large PSB files in Photoshop, as well as using Adobe Premiere to cut footage in full HD with no issues whatsoever. The $400 price tag is well worth the peace of mind. Just to be extra safe, I plugged the NAS into my UPS (in case the power dips or a thunderstorm knocks out my electronics and fries all the drives). These days one can also easily subscribe to a cloud storage service for as little as $5 a month. Services like Backblaze or iDrive makes it ideal to save your images in the cloud, just be sure to encrypt them if you're dealing with sensitive material. Cloud storage is great in case you want off-site backups stored in the cloud, and you're too lazy to drive to the bank to store another drive in your safety deposit box. However, with all the hacks and exploits these days, one should exercise caution and just keep a hard copy somewhere off-site in case of emergency.
If you'd like to see the Synology Diskstation in action, check out the video I created below detailing everything from the file system to operation.
The Synology Diskstation DS416 is available on B&H for $399.99. Western Digital RED drives are also available at B&H.


Join the Fstoppers community for free
-
Post comments and join in the discussions
-
Browse the site ad-free
-
Share your work and get featured in the community
-
Compete in the photo contests for fun and prizes
15 Comments
Hold it - there is most likely no need to backup the entire storage array and replace all the drives.
Usually Synology storage arrays allow you to replace the drives one by one and let the RAID include the new drive in the array and duplicate the data to it. Once replication is finished, you can swap the next drive and let the RAID controller software do its magic again, until all drives have been replaced with new drives with higher capacity.
Finally you expand the data volume to fill the new array and you are done - now your array is ready for use with increased free space.
Rather than having a cloud service handle the off-site backup, you could opt for an additional Synology in a different location (e.g. at your home) and let the two storage arrays sync data via the internet - that way you have complete control over your data.
A word of caution, though: Even though all Synology arrays can do this, the smaller ones have pretty low limits for, how many files you can expect them to sync. I thought that the problem would be a pretty slow sync but at some point the system is using so many resources on keeping tabs on which files are synced and which are not, that the control system essentially uses up all CPU resources and leave no headroom for doing real work.
This is correct. I started with the synology DS207 and now have had the DS411+ for the past 7 years. It still works great and we've expanded the storage at least 6 times, though we are about to max out now that it will not accept the newer 8GB+ drives.
We use the SHR (hybrid raid) and simply take out the old disk and pop in the new one. In DSM Storage Manager you simply tell it to expand the volume, and voila. it does the rest. Be aware that it takes about a full day for it to rebuild the volume for the new drive, but really.... It is about as easy a process as you could imagine.
Pro tip when using a synology disk station. I own the DiskStation DS1517+. You can setup amazon cloud to backup your photos for free if you have prime. Well mostly free. I pay 12$ a year to have the 100 gb plan just so all my lightroom catalogs etc that take up roughly 17gb of space get synced without having to worry.
So basically I have a 20 TB NAS that I backup everything to and I have my Amazon Cloud app on DSM setup to monitor my photo's folder. If anything changes in that folder it will sync to my Amazon Cloud, with unlimited photo storage.
It should be noted that I don't use my NAS to live edit. I only use it for archive/backup.
Something is wrong, here.
Four drives, minimum capacity, 3TB each, RAID5. That ought to give you 9TB of storage.
Formula: (Number_of_drives - 1) × Minimum_capacity = Available_storage
(4-1) × 3 = 9TB
Is your limit of 8TB being set by your OS, your file system, or by Synology? You need to figure that out.
It's not actually. Because the way HD conversions are from Manufacturers, 9TB worth of HD space is actually 8.18 TB of actual usable space.
Copied from another thread to save me typing
"Hard drive manufacturers define 1 gigabyte as exactly 1,000,000,000 bytes.
By their definition, a 45GB hard drive is exactly 45,000,000,000 bytes.
The true definition of 1 gigabyte is actually 1,073,741,824 bytes:
1024 bytes = 1 kilobyte
1024 kilobytes = 1 megabyte
1024 megabytes = 1 gigabyte"
Ah, you are confusing terabyte (TB) with Tebibyte (TiB).
Yes, years ago, the computer industry has always used 1024 as the measurement of increment from a byte, to a kilobyte, to a megabyte, to a gigabyte, to a terabyte, etc., but the HDD industry decided to be deceptive. Every byte of storage costs more money', and, although it was easier to make HDDs in 1024 multiples, (64 sectorss per cylinder, 512 bytes per sector), they realised that by using the SI prefixes as defined, they can legally claim that they have a 1gigabyte drive, when, in terms of computer science standards, they did not.
When this deception by one manufacturer was first discovered, other manufacturers, instead of putting a stop to this deceit, jumped on the bandwagon. This lead to great confusion, as most everything else in the computer world, still measured a kilo- as ×1024, a mega as ×1024K, a giga as ×1024M, etc.
The computer industry tried to get the storage industry to comply with the binary standard, through ISO, but the storage industry got ISO to admit that, until the computer industry came along, and large storage became a thing, (in the 80's), the prefixes were always a 10³ multiple, and not a 2¹⁰ multiple.
So ISO came up with new terms, the binary prefixes, kibi (Ki), mebi (Mi), gibi (Gi), tebi (Ti), pebi (Pi), etc., to be used in the computer industry. This made almost everyone happy, and it has been adopted by almost everyone. Almost? Apparently, Microsoft (or Apple or Synology, which ever is reporting 8.18TB), still uses the base ten prefixes when they mean to use the base 2 prefixes.
Four 3TB drives in a RAID5 array, gives 9TB, or 8.18TiB. You still have 9TB of actual usable space, which is precisely the same as 8.18545TiB of usable space. This is how my Linux box reports my drive sizes; with mebibytes, gibibytes, and tebibytes:
Unfortunately, RAM suppliers still use the SI prefixes to refer to multiples of 2¹⁰, thus a 32GB RAM stick is actually 32GiB of RAM. If you tell Windows to create a 32GB swap file, one will not be able to hibernate, as 32GiB of data cannot fit into a 32GB swap space. However, my Linux swap partition is 32GiB large, and can precisely fit 32GiB of RAM data when needed to hibernate.
I did some research.
Let us say you have a 640,000,000,000 byte SSD.
Apparently, Mac OSX now reports storage space (on HDD, anyway) “correctly” as, 640 GB.
They actually mean 640×10⁹=640,000,000,000 bytes.
Linux, on the other hand, would have just said, 596.046 GiB, meaning precisely the same thing, 640,000,000,000 bytes.
Windows, on the third hand, would report it as 596 GB, which is in error and quite confusing.
So Mac OSX reports the correct amount in GB, Linux reports the correct amount in GiB, but Windows reports an incorrect amount, showing actual GiB but claims GB.
I'm aware of all of this. And drive size reporting is completely dependent on the OS you are using. All of the drives in my windows machine report like I mentioned above. ie a 2TB HD is reporting 1.81TB in the OS.
However you want to look at it, why Fred reported 8TB is likely because of this. Pretty sure the NAS runs off a linux distribution and likely reports the sizes correctly in it's manager. But when Connected/Network drived to Windows, it's likely saying a lesser amount.
Yes, but the article said they used four 3TB (okay, 3×3TB and one 4TB) drives and got an 8TB RAID5. Then you said that 9TB is actually 8TB of usable space. Both you, and the article are wrong.
The four drives produce a 9TB RAID5 with 9TB of usable space, which is precisely the same as an 8.18TiB RAID5 with 8.18TiB of usable space.
My other point is that Mac OSX would have correctly said it was a 9TB RAID5, and Linux would have correctly said it was an 8.18TiB RAID5, but Windows INCORRECTLY said it was an 8.18TB RAID5. Microsoft is in error, and the article repeated this error.
To clarify, the units used to measure drive size is OS dependent, but MS Windows uses the incorrect numbers, or the right numbers with the incorrect units. Either way, it is wrong.
I think we are on the same page.
Synology has a calculator telling you how much space you'll get when you create your RAID system:
https://www.synology.com/en-global/support/RAID_calculator
Note the host OS will likely tell you a different story, as Windows and macOS use different methods to tell you your free space.
A supercomputer on the Internet is not needed to figure it out. The calculator will tell you that the answer is 9TB. (I gave the formula above). The issue is not that the host OS calculates the free space by different methods, it is that Linux and OSX uses different units, the former uses tebibytes, the latter uses terabytes, while Windows just uses the wrong units.
It is like Linux says it is 20°C, and OSX says it is 68°F, then Windows says it is 20°F. Two answers are correct, one is wrong. One can argue all they want that 20° is correct, and prove it with a thermometer, but 20°F is still wrong, no matter how you convert between the two, and what the thermometer says.
You mention in passing "make sure to encrypt them". Do you have a specific suggestion for which service/program to use for encryption?
Synology has encryption built in to the OS.
https://www.synology.com/en-global/knowledgebase/DSM/tutorial/File_Shar…