

The chaotic nature in which photographers send their final galleries to a client is something I've often noticed. Galleries will jump around between scenes and cameras without any flow or organization. I am a wedding photographer, and maybe this means more to me than it would to other genres of photography. However, taking a few minutes to put everything in an order that flows well for your clients can create a tremendous difference in how your brand is perceived and in how you tell the story of their photoshoot.
I can understand why this happens. You’ve worked hard editing a session and are finally ready to send it off. The last thing you want to do is to go through and organize everything before delivering to a client. However, I have honestly seen clients upset because the way in which a photographer arranged a session was so chaotic that it was difficult to enjoy the photos as the gallery portrayed it. Little things like this can be the difference between a client having a good experience with your business or not. Here are three things that are simple changes, but will make a significant difference to your clients.
Capture Time
I know that this won’t apply to everyone, but if you are shooting with two cameras, you have got to be able to adjust the capture time of your photos. The easiest way, of course, is to make sure all cameras involved in a shoot have their times synced before the session starts. If that doesn’t happen, there are still simple enough ways to correct the issue. I will show you how to do this in Adobe Lightroom Classic CC.
The first thing you’ll want to do is to find a photo that can be an anchor point regarding time for all of the cameras. An excellent example of this would be the kiss on a wedding day. I will usually locate a common moment like this on my primary camera, and then write down the exact time that this moment happened. In Lightroom, you can find the capture time in the bottom right of the Library module under the metadata section. Next, you will want to locate the same moment on a different camera. Pushing the backslash key (/) will bring up a filter menu at the top of the screen. Under the metadata column, you can select the option to only show the photos from a specific camera. After choosing one of the other cameras, locate the same moment that you picked before. Select all the images from that camera, but make sure that the specific moment you decided on is the main photo selected. You can now choose “Edit Capture Time” from the metadata menu at the top of the screen. You will want to select “Adjust to a specified date and time” and enter the new time in the “Corrected Time” box. You can then select the “Change All” option, and all photos should sync around the time that you designated for the anchor point shot.

Organize the Timeline
When a couple is going through my wedding photos, I want them to see a story. One way that I emphasize this is by reorganizing the images in a way that tells one story at a time. For example, depending on the layout of a couple’s day, I will usually start by grouping together all of the venue and detail shots and start the gallery with those. From there I will move on to grouping together the bride’s getting ready shots, then the groom’s, the ceremony, couple’s photos, and finally the reception. The last thing I want is for a gallery to bounce around between the wife getting ready and my second shooter’s shots of decorations in the venue. A gallery honestly takes away from the story if it isn't transitioning smoothly between the different parts of a shoot.
Before I reorganize anything, I first need to make sure that everything is edited and ready to be delivered. I’ll then use the grid mode in Lightroom to drag groups of photos to the correct place in the gallery. My mindset while doing this is to find a way to organize everything in a way that flows well and sticks to one point of focus at a time.
On a side note, I’ve seen people have trouble rearranging photos in Lightroom. You have to make sure that you have the most direct subfolder selected before you try to drag a photo. If you don’t, then Lightroom won’t let you reorder the images. If you’ve had problems with being unable to rearrange your photos in the past, this is likely the issue.
Rename Your Photos
Now that you've arranged everything in Lightroom, you'll want to ensure that it stays that way for your client. Changing the file name will guarantee that everything is ordered correctly for them if they arrange their photos by name, and will also eliminate the problems of having the obscure file names on their pictures that the camera assigned it.
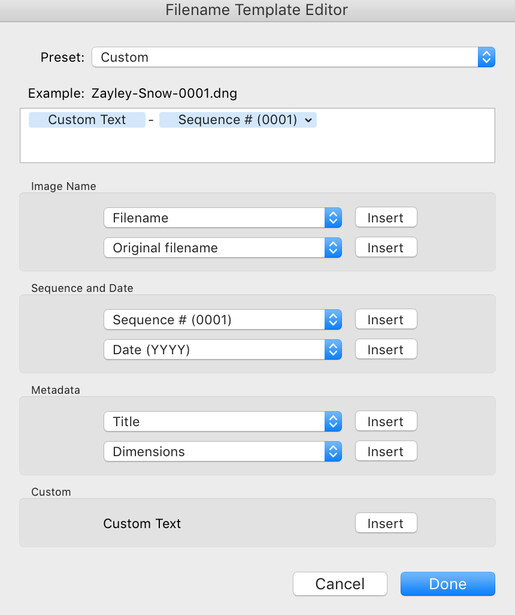
This step is also the easiest of the three. Just select all photos in the Library module, and select “Rename Photos” under the library drop down menu at the top. There are several options when renaming an image. I do a custom setting where I enter the text I want, followed by a sequence of four digits. I put the client’s name first, followed by the type of shoot, and the last section is the image number. For example, a wedding file for me would be named “JillJack-Wedding-0001.” This makes sense to both the client and myself. The four digits are essential for me as a wedding photographer. If I were to use a single number without the zeros, some platforms would order the photos incorrectly. The additional zeros resolve this issue.
These small steps do not take long and are beneficial to both your client as well as yourself. Organizing your photos and naming them well will allow your clients to enjoy their pictures without being distracted by trying to sort them out. This will help represent your brand as one that is organized and will leave your clients with a positive final experience with you.


Join the Fstoppers community for free
-
Post comments and join in the discussions
-
Browse the site ad-free
-
Share your work and get featured in the community
-
Compete in the photo contests for fun and prizes
1 Comment
I organized 200.000 of my photos using Artificial Intelligence. Photos where on 20 external HDD or memory sticks that I filled up during years and years of making photos. I wrote an app to
- Navigate,
- Intelligent Upload (keep track of each photo id and URL for future apps),
- Share,
- Sell,
- Create movies,
- Include in apps
- Find faces,
- Detect landmarks, labels
- Time Travel
see details and movies of my work on this google document
https://docs.google.com/document/d/11RCEtgULcKosyjLu5bb7K-QNx-TzJ7hmjnW…
Enjoy !