
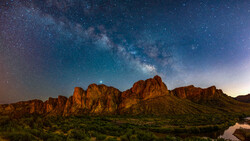
We have all been there: you see an image online that gives you the best perspective of a location but you have no idea exactly where it is located. Sometimes the photographer lists the location on social media, but more often they leave you wondering where exactly they were standing. Last week I set out to film a time-lapse of one of the most photographed skylines in the world. However, finding the exact location I wanted required me to use multiple resources. Welcome to project "New York Harbor."
Fstoppers is currently producing a few projects based in New York, and with these projects we always need more and more B roll of the city. We could just license a lot of the footage from micro stock sites like ShutterStock, Fotolia, or Alamy, but it's often cheaper and more rewarding to film your own unique footage yourself. In between trips to Manhattan, I began wondering what the most iconic view of the city would be. I've shot all throughout New York including on top of Rockefeller Center, the Empire State Building, from the shores of Brooklyn, and from a helicopter high above the waterways and central park. Since I wanted to shoot some time-lapse footage, I knew I would need a stable location which ruled out shooting from a boat or a helicopter. I also only had a limited amount of time to schedule a sunset shooting session which meant I needed to be as flexible as possible with my time.
Scouting From Home
As I began to brainstorm a few ideas, the most obvious idea hit me. What if I could shoot the skyline of New York City with the Statue of Liberty in the foreground? That would clearly represent the Big Apple in the most iconic way possible. As I've learned working with many landscape photographer including Elia Locardi, the best resource to use in scouting these ideas is to use Google image. Unfortunately if you type in "Statue of Liberty New York Skyline" into Google, you get a lot of cheese composite images that would obviously not work for time-lapse video. A few of the images, as highlighted in red below, are shot from a boat which again would make video and time-lapse near impossible. I began to wonder if there was a reason no one had a great shot of the statue directly in front of Manhattan skyline; maybe there is simply not a great location that lines them both up in a single frame.
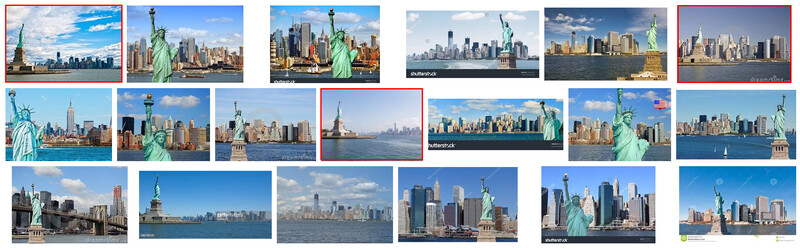
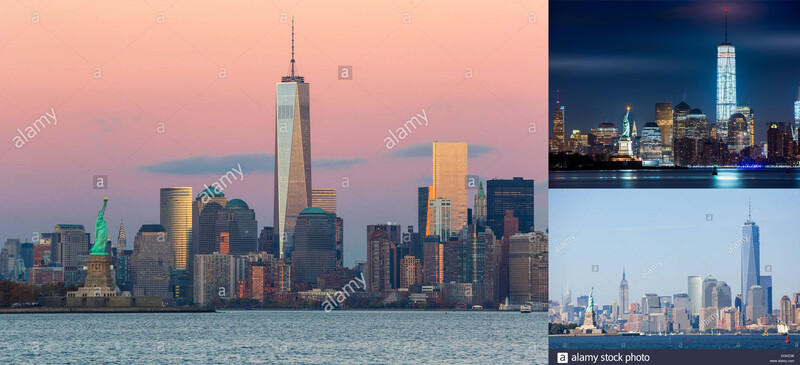
As I scrolled down Google images, I finally found a few specific photos that looked promising. I could tell from the stock images I found that the statue and the city were extremely far away but the perspective lined up perfectly. In one reoccurring image, the Statue of Liberty lined up next to the Empire State Building and from some of the others the statue was lined up more towards the Freedom Tower. Because these few images were framed up perfectly among different photographers I knew that there must be a solid location to capture the shot without involving a boat or ferry.
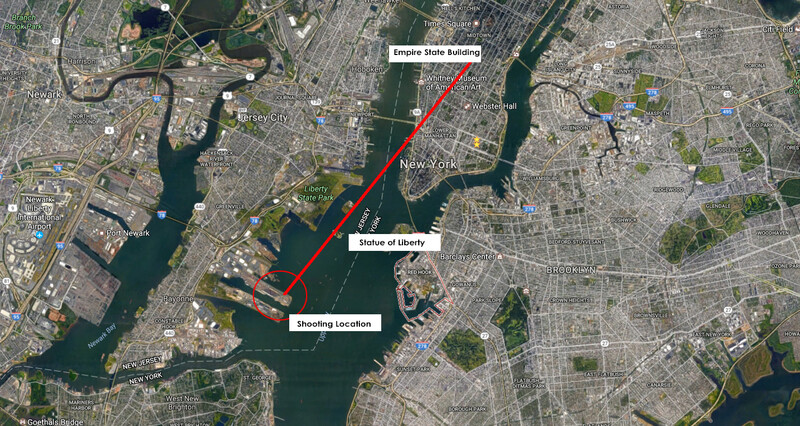
Once I found a few images that were close to the composition I desired, I figured the most accurate way to determine the location I need to setup my tripod was to use Google Maps. By zooming out and getting an aerial view of Manhattan peninsula area, I was able to draw a line that ran through the Empire State Building and the Statue of Liberty. I then extended this line of sight straight down into New Jersey and found that there were a few piers that should give me the perspective I wanted. The pier with the least obstruction was located at the very end of Port Jersey Blvd. As I zoomed into this road from Google maps, it appeared to be a public road but it definitely serviced a the private port located along the entirety of the pier. The second location was located on the pier just below the first one off of Port Terminal Blvd. The nice thing about this pier is that at the very end, near where I think the photograph needs to be taken, is a public 911 memorial called The Tear Drop Memorial. So while this location is probably the easier one to get access to, the best location at Port Jersey Blvd might actually block the view of the city if any buildings or cranes are located on that pier.
Since I was only going to have one shot at driving over to the Jersey side during my trip, I needed to find out more information about these two locations. As I scoured the internet even more for similar images, I was led to a few of the photographers' websites who had taken the stock images I found through Google. I emailed about four photographers directly and asked them about their experience with these two locations. A few of them responded back including Robert Engelbart and Raúl Cruz who were both very familiar with the locations. Each photographer had a difference of opinion on which location was better but both of them said I was on the right track and they were both easily accessible from the public roads. One photographer, Mihai Andritoiu, responded and warned me that the Port Jersey Blvd location was considered private property and he almost got fined by the police when he went. From research, it seemed that one of the locations would place the Statue of Liberty just to the left of the Empire State Building while the other one would place it between Empire and One World Trade. Personally I preferred having the Empire State Building in the shot more than the more modern Freedom tower but I was having trouble getting a clear answer on which location produced which shot.
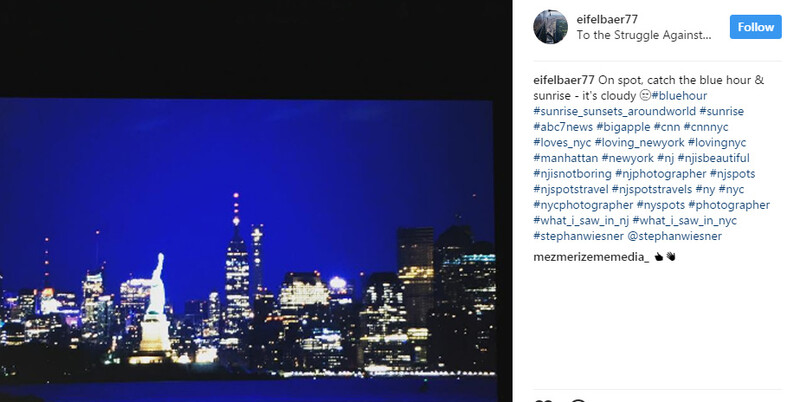
Days before I was to head back up to New York City, I was finally able to find out which location produced which specific framing. Through Instagram I was able to locate photographer Peter Praum who had the exact shot I was looking to capture on his feed. He had been to both locations and also warned me that he had trouble with the cops on Port Jersey Blvd but that the shot I really wanted was near the Tear Drop Memorial. That same night, Fstoppers reader Mahesh Ratnam Rajan told me he was actually standing at the end of Port Jersey Blvd shooting the city. He texted me an image that confirmed the information Peter had shared with me, yet Mahesh did not encounter any police while he was out there. It was great having someone on the ground reaffirming the photo was possible, and as it would turn out, Mahesh would meet up with me a few days later as we captured the sunset together.
The Day of The Shoot
The weather the entire week I was in New York was much like it was the previous week I was there: overcast with a heavy chance of rain. The best forecast for partial cloudy skies, the best time to shoot landscapes in my opinion, was only predicted for one day out of the six I was visiting. As the sun began to set during the late afternoon my shoot was scheduled, it became pretty obvious I was going to have to photograph a pretty dull and lifeless sky. It was such a bummer to have planned so extensively only to have the weather not cooperate, but it also meant the city should be super crisp and sharp because of the lack of weather.
Ultimately I decided to head to the Tear Drop Memorial location with the possibility of sending one of my friends to the Port Jersey Blvd location as a backup. The biggest issue with this location is simply getting to it from Manhattan. I wound up booking an Uber from Chinatown which took about 50 minutes start to finish with the late afternoon traffic. For the trip back home, Mahesh recommended I take the PATH train which connects from Exchange Place directly to World Trade Center. Ultimately this route can save you a lot of time compared to driving across the Holland Tunnel, but you will still have to get an Uber once you are on the Jersey side. Also, your Uber driver will probably question your final destination because the ports themselves are pretty far off the beaten path. All in all, be prepared to spend $50 - $100 total in cab fares and train tickets if you attempt this shot yourself and are staying in the city. If you've never used Uber before, download their app and use our code ADEWO to save $5 off your first four rides.
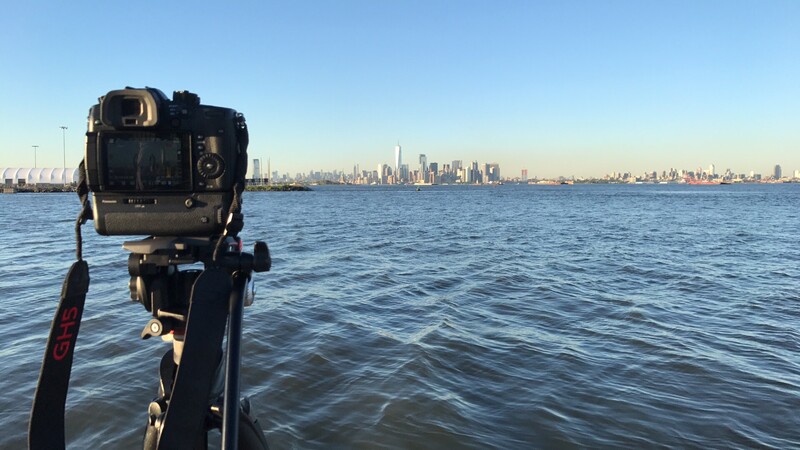
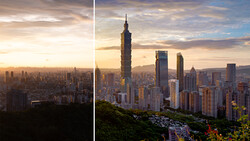
In terms of gear, you will definitely need a 200 - 300mm lens minimum if you want to frame up a similar shot. Fstoppers has switched over to the Panasonic GH5 system, and we highly recommend their 14 - 140mm lens which equates to about a 28 - 280mm lens in full frame. I was also shooting in 4k resolution which allowed me to crop in significantly more for a final 1080 resolution output. You can see a few different crops below with the equivalent focal lengths to get an idea of just how far away this shot is from the city itself.
I also highly recommend using a neutral density filter so that you can increase your shutter long enough to smooth out the water. The filter I wound up having in my bag was the K&F Variable Neutral Density 58mm Filter, and while it is a great, inexpensive filter for general use, for whatever reason it would not allow my lens to focus correctly when zoomed at the full 280mm. It's pretty easy to get silky smooth looking water with a general neutral density filter when shooting stills but I've still had trouble getting natural looking water movement with time-lapse no matter how long of a shutter I can squeeze out of my camera. You can definitely see the glittery water effect in the final time-lapses at the top of this article so I would recommend frame up more sky than water if you attempt something similar.
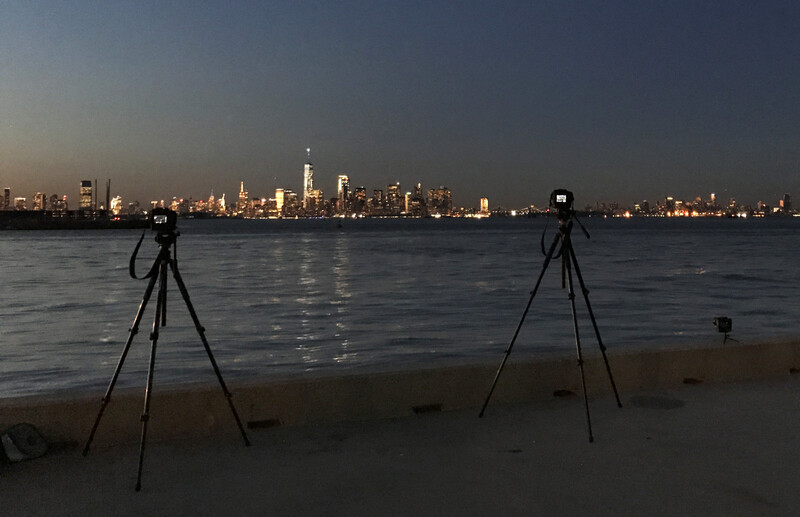
Finally, for tripods we are currently using our favorite portable fluid head, the Manfrotto MHXPRO-2W, and legs that are the equivalent of the Manfrotto 755XB (although we are soon replacing these all with our favorite tripod legs, the Benro TMA37AL). As you can see in the photo below, we also recently bought a few of the Manfrotto 709 Digi Table Top Tripod which works really well with the small GH5 Micro 4/3rds cameras. These tripods have been a lifesaver when you want to casually walk around a city but don't want to carry a big tripod.
Conclusion
Tracking down shooting locations these days is easier than ever before. With social media sites like Instagram and Facebook, mapping tools like Google Maps, and sun location apps like The Photographers Ephemeris, you should be able to accurately scout the best location for your photograph without even leaving your house. There are still those photographers who like to hide their locations but through this entire experience I was shocked at how helpful other photographers were to me in pin pointing exactly where the location was for the time-lapse I was trying to capture. Unfortunately for me, the only day that was not completely overcast in New York also turned out to be a day with absolutely zero clouds in the sky. I hope to go back to this location at some point and capture an even stronger time-lapse or even still photographs with a more interesting sky.
In a time when so many landscape photographers simply stand in the exact same location as the thousands of photographers who have come before them, I urge you to try to think outside the box and come up with a composition entirely your own. I can be honest with myself and say that I wasn't the first person to ever shoot from this location, but for me finding the exact location was preceded by the concept itself. Part of the fun of photography is coming up with an idea, solving the potential problems you might have, and then executing that vision as perfectly as possible. Hopefully this little exercise will inspire you to take whatever means necessary to capture the exact vision in your head regardless of how many uncertainties it might present. Finally, be kind to your fellow photographers, and if someone reaches out to you for help, point them in the right direction as opposed to keeping everything you have learned a secret.


15 Comments
Welcome to the nightmare that is finding original locations - while it can be super rewarding, it's also really difficult! This was basically the story of my life when working on my Airportraits series- I bet the NY Port Authority is just as tricky as airport security all over the world.
I'm curious if you have ever had issues of parking on the side of a public street only to be hounded by authorities? If the street is public but the adjacent properties are private, is there an argument to make so that you can stand your ground and get the shot?
Love this article - most of all this line: Finally, be kind to your fellow photographers, and if someone reaches out to you for help, point them in the right direction as opposed to keeping everything you have learned a secret.
I always try to share, have been stymied before by unwilling photographers, but am always grateful for those who do share.
Nice artice about location research which is indeed easier than ever. Patricks conclusion contains the gist of it. We all see the same iconic spots on Instagram, Facebook and so on. Patricks advice to "think outside the box and come up with a composition entirely your own" is prefectly correct. But I think it will mostly be ignored. Hunting locations seems to become a new sport rewarded by the likes and shares "trophies".
Thanks Jens. I think hunting for new locations is the most rewarding part of landscape photography and shooting the same overly done locations can be so boring.
It will be interesting to see how popular this location now becomes not because I was the first to do it, but because very few have captured this location at it's best and now I have promoted it in front of such a large audience. I hope to go back and get the image/timelapse I really want with better weather but from all my research this location is still pretty unused by the plethora of landscape photographers out there.
How do you put the time-lapse together? Do you let the camera do all the work or you use software like LRTimelapse? I ask you regarding the water silk effect, I never tried myself but I think LRTimelapse smoothing effect could solve your problem. Anyway great article and great tips, I'm not a professional but I found myself doing this kind of works before every trip in which I planned to take pictures/time-lapses. I can also suggest to use google earth to know if there's obstacles on your view from a certain location, it's a bit tricky and I don't trust it 100% but it can give you an idea, specially in locations like New York.
This was actually produced almost entirely in camera. The GH5 has a great timelapse feature where you can take photos (or video) and it will turn it into a timelapse. To prevent shutter flicker that happens with most cameras due to inaccurate aperture blades between shots, I made these timelapses using Panasonic's Variable Frame Rate option and picked 2 which means it is shooting 2 frames per second. The advantage of this is the shutter opens for the entirety of the shoot which prevents aperture flicker. The disadvantage to this is the exposure time can only be 1/2 a second per frame.
Ideally I would have set the camera wide open at f2.8 and used a dark neutral density filter to make the exposure say 2 seconds or longer. The reason I couldn't do this was because the ND filter I had would not allow my camera to focus further towards infinity for some reason. I guess the extra glass on that lens changed the optics although I've never had that issue with another setup before.
From experience shooting long exposures, the water never looks perfectly smooth even with long shutters especially if you have the coastline showing. It might have looked better in this situation because the water was not washing up on a coast line but either way, the best option I had was the 1/2 second exposure at maybe F8 in the Variable Frame Rate option.
In post I was able to line up some of the brighter city light sequences on top of the more balanced blue hour sequence and change the mode to lighten. This allows you to capture the best of the blue hour and the intensity of the city lights that comes after nightfall. You do run into some blending issues towards the water where the boats pass through lights so I had to mask the later exposure a bit so that it still looked natural.
Hope that helps
Can I ask you what you mean with "Ideally I would have set the camera wide open at f2.8 and used a dark neutral density filter to make the exposure say 2 seconds or longer"? at F2.8 wouldn't the DoF be to tight with such lens?
I'm going to do a review on this but one of the biggest problems we have with timelapse is flicker caused by the aperture. If you set the camera in manual mode, lock the aperture, shutter, and ISO...most of the time you still get a flicker. This is caused by the mechanical aperture not stopping down perfectly every single time. I'm not sure what it does this but it does it. If you have an older manual aperture lens, you probably won't have this problem but you will if you have the newer electronically controlled apertures.
The reason you want to set your aperture wide open is because when it is wide open it will not engage at all causing a perfectly stable aperture. If you set your camera to say f8 or even to the smallest aperture of f22, more than likely the camera will stop down the lens to something that isn't perfectly that aperture.
The trade off of getting a perfectly flicker free timelapse by shooting at f/2.8 is that your depth of field will be more narrow and the sharpness of your lens won't be perfect. However, it my example here, the depth of field even at 2.8 is probably miles long because I'm zoomed in so far and the subject (NYC) is so far away. Also because I'm shooting video which is only using 8 megapixels out of the total 20 megapixel sensor, any lack of sharpness in the lens should be mitigated because of the lower resolution at least in theory. If you were to take a super sharp professional lens and attach it to a 4-10 megapixels camera with the same sensor size, you should see less lens problems than if you attached a 50mp camera to that same lens.
This is really cool to know, I've always seen some flicker but I thought it was due to the light changes in the scene (clouds ove the sun or similar) and I always corrected them with LRTimelapse. I always have to use a software to make my time-lapses because I use a Fuji X-T1 and it only have an intervallometer so it just give me a lot of images as an output. I will try to use the largest aperture, do you think using only the electronic shutter will improve the quality?
Mechanical aperture flicker was a HUGE problem on Nikon, since they're one of the very few that still use a mechanical coupling to activate the aperture, (Pentax being the only other I can think of) ...however with Nikon's new E lenses, I've had zero issues, and Sony timelapses have turned out amazing even with lenses that aren't just a dummy fixed aperture like a Rokinon.
So, is that Nikon mechanical coupling the only issue you're referring to, or is this present anywhere else that you've encountered?
I think it really depends on the lenses. We had some Nikon F mount lenses that never gave us problems and others that did. I can't remember which ones but the Tokina 11-16 was really bad and maybe that Tamron 15 - 30 was perfect? We had so many Nikon lenses that I can't tell you specifically which ones worked and which ones didn't but the flicker was found throughout most of them.
Aperture flicker also happens on the Panasonics too so I'm going to try to do a test to see which settings work the best. I have found that shooting wide open and using a ND filter to stop the light down is the most fail safe way of producing timelapses without flicker.
I use google maps to scout out almost all of my aerial photos before I go there, Its probably one of the most helpful things out there!
Hi Patrick, talking about scouting for location from home, you can check the app I wrote called Planit for Photographers, available on both Android and iOS. You can manually add markers with height and width (to simulate a building for example) then you can place the camera on a map location and simulate what it will look like by choosing a focal length. It also shows the overlay for star/sun/moon/milkyway. You check out see some photos planned using plait by our users at https://www.facebook.com/planitforphotographers/.
Thanks Patrick for this well documented article. What is funny is I followed the exact sequence of events yesterday morning, only, I turned around half way down port jersey blvd fearing if I am heading into private areas. I think I will head down there again this week and make it all the way till the end.
But the reason for this comment is to acknowledge how your article (and its intent) has benefited a fellow photographer like me.
I feel strongly against not sharing locations especially when folks reach out to me to understand about a specific location I visited. I just dont understand some of the new age landscape photographers who refuse to share locations. Preserving the environment is a collective responsibility and not of these photographers alone.
Further, are they not taking fellow aspiring photographers who join their "paid" workshops to the same locations that they refuse to divulge. Their counter argument will be that they will ensure that these vistors will leave the place clean. But what is the guarantee that they wont share it with others or let alone come back later and NOT leave the place clean?
As you can see, this is a vicious cycle and there is really no winning argument against sharing a location. I just feel they dont share it so that they can attract more workshop clients. In the name of preserving the environment!