Topaz Labs' DeNoise AI software does an incredible job of cleaning up images and removing unwanted noise. However, it works differently depending on whether you're using it in Lightroom, Photoshop, or as a standalone platform. Here, we take at look the best way to use it as a Photoshop plugin.
Topaz Labs make some fantastic post-production software. In its suite, there's DeNoise AI (for noise removal), Sharpen AI (for sharpening images), Gigapixel AI (for adding detail and resolution to images), and Photo AI (a kind of hybrid mix of all three). I have their bundle (though I'm not affiliated with them in any way and paid for everything myself) and use one form of software or another on almost every photo I edit. However, it's important to note that each form of software in the suite has its own quirks depending on whether you're using them as Lightroom plugins, Photoshop plugins, or as standalone platforms.
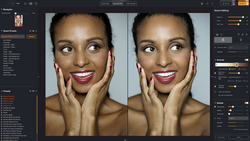
In this great video brought to you by Anthony Morganti, he demonstrates how you should use DeNoise AI as a Photoshop plugin. There's a ton of great information in there, but I think what I liked most (as a Photoshop plugin user of DeNoise AI) was the vital reminder that you should not do any editing at all on your file before you let DeNoise AI do its work. That's because adjustments often add extra noise to an image so if you want DeNoise AI to work its magic most effectively, you want your image as flat and untouched as possible. That was one big takeaway, but there are many more you should take note of here so give the video a look and let me know your thoughts.


Join the Fstoppers community for free
-
Post comments and join in the discussions
-
Browse the site ad-free
-
Share your work and get featured in the community
-
Compete in the photo contests for fun and prizes
3 Comments
When Denoise and Sharpen came out, I was on board early on. It has been getting better and found some glitches they have resolved. Customer support is excellent, and I can not say enough how good it is.
Yes, you do have to run your images through Denoise even if they are shot at a low ISO. It will make your images look much better. High ISO the software works very well. Just be aware that you can 'overdo it". I run the software at 200% (CNTRL + 3) so I don't.
I am lukewarm on the Photo AI that just came out. It does a good job with the click of the button. I guess I like doing the software individually.
Run Denoise and Sharpen before you continue post-processing.
Totally agree. I use Photo AI on anything over ISO 400 on my R7. The AUTO setting usually works well but you need to inspect every image at 100% to watch for sharpening halos or excessive smoothing. Sometimes I will rerun it at half the "recommended" settings. For files at ISO 400 or lower I usually find that Lightroom noise reduction and sharpening are enough. Or if I need to use Photoshop for anything then I'll go with High Pass Sharpen.
I was a long time User of Topaz and began using photo AI when launched as a free upgrade for those that had both NR and sharpen…. For me that’s when the wheels fell off. I experienced colour shifts, random artefacts and worst of all the forming of a square grid pattern across the whole image. After contacting Topaz numerous times I just gave up on it. I’m not sure if it was my Sony RAW files it didn’t like doing, but some inherent bug or bugs totally killed that product for me. I found the auto setting constantly unreliable delivering horribly over sharpened results. I shoot a lot at high ISO. It’s unavoidable when shooting birds and now I just rely on Lightroom’s newish noise removal, though I’m waiting for a real killer solution to be launched as Lightroom gives little in the way of control over the process.