Headshot photography is one of the fastest-growing segments in the industry and for good reason. With more people working from home and using technology to collaborate, our online personas have become more important than ever. Many people have started new careers and businesses due to the pandemic and need to update their branding images. This creates an excellent opportunity for aspiring headshot photographers, and in this article, I give you five tips that will radically improve your game.
1. Avoid Extreme Posing
One of the most common mistakes I see headshot photographers make is what I call “extreme posing.” This is when, for example, the photographer turns the client, pointing one shoulder almost directly towards the camera, and then similarly turns their head, creating an uncomfortable and forced pose or when the photographer has the client lean so far towards the camera that they risk falling over and proceeds to photograph them from such a high angle that they might as well be shooting from the International Space Station! In general, we should avoid these overdone moves.
I have found that the best headshots are usually the ones with simple poses and clean lines. So, I suggest starting your session with the client’s head and shoulders directly towards the camera and taking some head-on headshots first. When you do start to move them, do it in small increments. I will tell my clients, for example, “bring your right shoulder 5 degrees towards me” or “turn your nose slightly to your right side,” always making sure to remind them that small movements work best. This will result in much more natural-looking poses and avoid images that resemble glamour shots from a 1990s shopping mall. Plus, when you move your client’s nose left or right in small increments, you can start to see which angle suits their face the best, which will help you find the best pose for their unique face. Bear in mind that in many cases the head-on headshot will be the best, so make sure to get a good amount of images with them directly facing your camera.
Small adjustments in posing go a long way, so I recommend avoiding extreme posing angles.
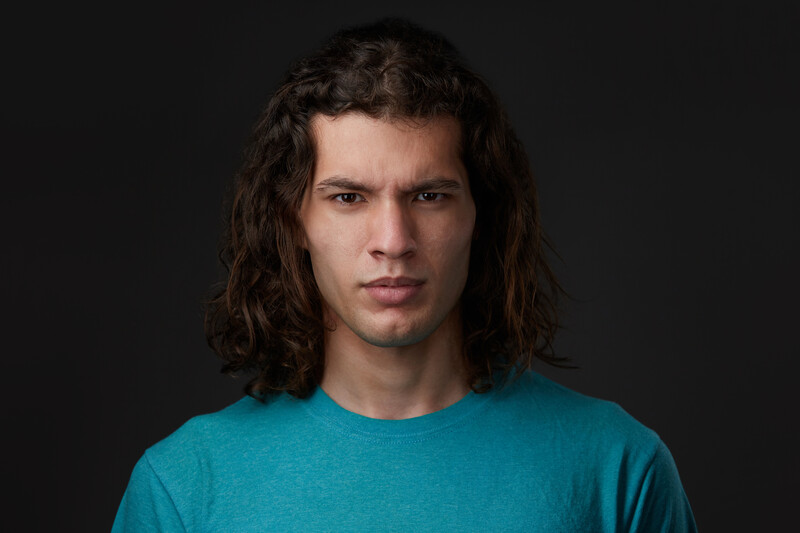
2. Get That Jawline Out
I would be remiss if I did not give credit for this awesome move to my mentor, Peter Hurley. This one move will radically improve any face of your photograph, and it has little to do with the person’s size or shape. This is when you have the client push their forehead out while keeping their head as tall as possible and then point their chin slightly down. Some people call this “turtling,” since it resembles a turtle’s head coming out of its shell. But, whatever you call it, having your client do this will create distance between their jaw and neck and instantly improve their jawline.
Some people believe that this technique is only needed to remove the appearance of a double chin, but the truth is that everyone, even those with very strong jawlines, will benefit from this method. It not only has a slimming effect, but even with model clients in peak physical shape, it enhances the jawline and creates stronger images. Once their jawline is out, you can then instruct them to move their nose or tilt their head slightly one way or the other, exploring the best angle for them.
When Tyler extends his neck forward and points his chin down slightly, it creates a sharp jawline and makes the image much stronger.
3. Never Say, “Say Cheese!”
Most people are very self-conscious when being photographed, and the minute they are staring down the barrel of your lens, they begin to feel uneasy. The very worst thing you can do is tell them to smile, or to say “cheese,” or to just stare at them quietly fiddling with your camera while the tension in the room builds! If you do these things, you are guaranteed to get results where the client looks uncomfortable or has a forced, fake smile.
Remember that the best headshot photographers are not the ones who are experts with lighting alone, but the ones who can get their clients to produce a natural, engaging expression that draws the viewer into the image. Your job as a headshot photographer is to make them forget that there is a camera in front of them to get a genuine expression.
There are a variety of ways to do this, but in my studio, it begins the moment the client walks in the door. Instantly, I make them feel welcome and begin to chat with them to create a rapport and a comfortable space. I also make sure to remind them of how my process works, so they know that they are in good hands and working with a pro who can get the job done. Once they are behind my lights, I also say whatever I need to distract them from the fact that I am photographing them. I will tell them jokes, ask them to make faces at me, or maybe joke about their profession in a good-natured way (even lawyers love a good lawyer joke). One of the best ways to make a client relax and give you a natural expression is to ask them about their children or pets. These two topics usually bring out the best in people.
Although there is no magic bullet since everyone’s personality is very different, the trick is to connect with your client as soon as possible and tailor your interactions with them to suit their personality. For example, if your client is very shy and quiet, the bombastic approach is probably not best. Or, if your client seems very uptight, you probably want to keep your jokes on the more reserved side. But, these situations are usually few and far between, and most people are good-natured and want to have an enjoyable experience at your studio.
Shooting tethered allows you to coach your client on expression and make sure that details like hair, makeup, and clothing are in order.
4. Shoot Tethered and Collaborate with Your Client
Tethering to your laptop, or preferably, a larger, calibrated monitor, is the fastest way to radically improve your work. If you are not tethering in 2022, I’m not sure what you are waiting for. It’s inexpensive to do, and your clients will love you for it. I use a Tether Tools Pro cable, which is bright orange and easy to see, and connect it with a Tether Block to my camera, which keeps it from being yanked out or damaged. Most cameras come with tethering software as well; for example, Canon’s Digital Photo Professional is a great option that is included with your camera.
There is no better way to make sure your clients are unhappy with the final results than relying on a three-inch LCD screen to review their images with them. This is because almost anything will look good on the tiny screen, but when you send the final results that are viewed on their computer, the details are easy to see and scrutinize. Tethering allows you to fix stray hairs, move collars, adjust necklaces, and gives your client an accurate representation of what they will get.
But there is another important reason to tether: it allows you to collaborate with your client. In my studio, I routinely have the client come out from behind the lights and we review the images together to ensure they get photos that they will love. As part of the process, I am talking with them about their expressions, angles, hair, clothing, and anything else we see together. Plus, having done this for a while now, I know instantly whether the client likes the photos or not, and I can get them to tell me specifically what changes they want to make. Most people are polite and don’t want to say outright that they don’t like a photo, but they will give non-verbal cues or react in a way that I know they are not happy. At this point, I remind them that I will not be upset and prefer their honesty so we can work together and get the perfect image.
Usually, the client will say things like, “I don’t like my hair,” or “I am sensitive about the lines around my eyes,” or something similar. These are all easy fixes that can be done either in-camera or in post. Sometimes, the client will say: “I don’t like the shape of my face from this angle,” and this kind of information is crucial to the success of the shoot. I had a client tell me this recently, and it was incredibly easy to put them back behind the lights and shoot from a slightly different angle. After a few minutes, I had them come back out to review the new images and their face lit up, and they instantly loved the photos.
Besides collaborating, tethering is an important way to help you empathize with your client. Each of us sees our face much more critically than others, and we tend to exaggerate the flaws in our minds. Many times the way we view ourselves physically is tied to an emotional trauma that happened early in our lives, so being kind and compassionate when reviewing images with your client and helping them create an image that they love can be a rewarding and empowering experience for them.
5. Use a Simple, Flattering Light and Backdrop
If you are relatively new to headshots and watch some YouTube tutorials, you will find a dizzying amount of lighting setups, from simple one-light rigs to setups that require a variety of lights and reflectors positioned all-around your subject. My suggestion for you is to start with a simple, even, flattering light, that everyone will love.
One of the best simple setups is parallel lighting. This is when you take two lights and place one on the left and one on the right of your subject, with each light feathered slightly towards their opposite shoulder. The lights are parallel to each other and perpendicular to the floor. In other words, the lights are not pointed directly at the client’s face. Parallel lighting is relatively easy to do, and since there are no shadows cast on the face, the light is very flattering and helps to fill in fine lines and other imperfections. Plus, you can create a variety of looks with this setup simply by feathering the lights towards or away from the client’s face. The more the lights are feathered, the greater the falloff will be on both sides of the face, so there is room for some drama with this setup too. In most instances, though, pleasing light will make your client extremely happy, especially if used in conjunction with the other tips presented in this article.
Some Final Thoughts
Headshot photography can be an extremely rewarding career, both financially and artistically, for those willing to put in the time and energy to become the best in their market. Much of the credit for this, in my opinion, has to be given to Peter Hurley. Peter not only single-handedly redefined the headshot and made it cool, but through the Headshot Crew, he has also created a recipe for success that has helped countless photographers, including myself, turn a hobby into a viable career that is both rewarding and fun. For me, there is no better feeling than seeing a client’s face light up, sometimes for the first time in their life, when seeing their headshot.
If you'd like to learn how to take professional level portraits of any kind of face, the best instructor to learn from is Peter Hurley in his Perfecting the Headshot tutorial. If you purchase it now, you can save a 15% by using "ARTICLE" at checkout. Save even more with the purchase of any other tutorial in our store.
Thanks for the feedback, it's much appreciated! And also, for the great tip. Silly faces is also a good tactic, and I do bursts as well because the perfect expression is usually somewhere in the middle of a series of shots!
Generally I get them right in there and just make them forget about the camera as soon as possible. I personally don't like the sound of "test shots" since it sets up expectations for what the first few images will be. Sometimes you get a great image almost immediately. I think a lot of times the test shots are more for the photographer than for the client, but if you've really got your light and method figured out it's best to just make it fun and distract them.


 Some Final Thoughts


12 Comments
Thank you.
Thanks for reading!
Great article, and thanks for actually having an article not just a video
Thanks, Doug. Appreciate the feedback!
Thanks, Paul!
Not everyone had kids or pets.
But everyone eats. Have them talk about their favorite food.
Yes! I forgot that one but that's one of the best topics too.
Thanks for the feedback, it's much appreciated! And also, for the great tip. Silly faces is also a good tactic, and I do bursts as well because the perfect expression is usually somewhere in the middle of a series of shots!
Generally I get them right in there and just make them forget about the camera as soon as possible. I personally don't like the sound of "test shots" since it sets up expectations for what the first few images will be. Sometimes you get a great image almost immediately. I think a lot of times the test shots are more for the photographer than for the client, but if you've really got your light and method figured out it's best to just make it fun and distract them.