There’s a slew of backdrop options out on the market today for you to choose from. Sometimes, those options don't always fit your vision, whether because of budget or creativity. So, what do you do then? Why not make your own canvas?
If you have the time to create your own, it may work better for both your budget and creativity, especially when you can choose the exact color scheme to fit your vision. Yes, time is mone,y but it may be saving a lot more in cost versus ordering some already-made backgrounds. In the end, everyone is different and so are their budgets; the choice is yours on which route you want to go. Lui Cardenas shares how he creates his own canvas backdrops in this video. If you have done any home painting projects yourself, you already have the painting tools to go with this project, saving you from having to buy additional tools. There is a wide variety of paint rollers, all with different textures, which you can combine all in one canvas or use for different ones. As shown in the video, you can also add splatter textures with a sponge or use other items for more texture. When creating your own canvas backdrop, the possibilities are limited on by you.
How many of you have created your own backdrops before? Throw up some photos in the comments below showcasing your backdrops!


Confused about the dimensions given - 216" length; Dick Blick sells the primed canvas by the yard. 3 yd is 108", 4 yd is 144". How did you get to that dimension? (Yes, got the tip about cutting in half lengthwise making two units.)
Also, I assume that by the time front is all painted up, the canvas should be quite sealed and that you could use the unprimed backside for a separate color, probably a darker one so that priming is not an issue. Think I'll try that.
Hi Peter! you are correct, Dick Blick sells their rolls by yard. The one I used is 6 yd long (which is 216"). I just thought it would be easier if I kept everything in inches.
To paint the back and get 4 backdrops from the same roll, I've used acrylic gesso to prime it, and then paint the back without having any problems. Thanks!
Excellent work!
Thank you Motti!
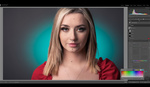
i would have liked to see a "after" photo of it complete.
You're right, I should have included that in the video. Here's a photo of it. Thanks for checking it out.
Hi Lui, Great work love the finished product. I've been trying to find a roller like that for months. I can't find one here in Australia. Could you please provide the exact name of the roller product and if possible a link to the maker. Cheers David
Hi David! thank you so much. I got the roller at Home Depot. Let me attach the link, and in case that doesn't work. I'll leave the name of it, hopefully you can find something similar in Australia.
https://www.homedepot.com/p/Linzer-9-in-Sponge-Faux-Finish-Roller-Cover-...
9 in. Sponge Faux Finish Roller Cover (by Linzer)
Hope to see what you creat!
—Lui
Nice tutorial. I recently painted this backdrop. It's a 150x200cm blue canvas I painted with green, white, black and yellow acrylic paint using a big brush and a sponge. No gesso needed. The trick I think is to stretch it up on a frame so you don't get any wrinkles and keep it really wet. After drying I taped it to a broomstick. Above all it's very fun to do.
gorgeous backdrop!
Ah! That's beautiful Mark! Love the combination of colors you used.
Great video, what weight canvas did he use?
Hi Christian! the canvas I used is 8.5 oz. This is the one I used:
https://www.dickblick.com/items/07381-1072/
Thanks for checking it out!
—Lui
Awesome, thank you so much for the reply and once again thank you for your video!!
My pleasure!
Hey, thanks for a great and inspiring video. I have just gone ahead and ordered 10 meters of canvas roll. I have been to my local home depot and the tell me that the acrylic exterior flat paint is not as flat as a normal supermatt indoor paint would be, I was wondering it this was the case when you bought the paint? I live in Norway so it could be that they don't have supermatte (flat) outdoor paint?
Hi André I'm glad you got inspired to create your own canvas. In my case I used exterior paint because it is supposed to be a little tougher than interior paint. I haven't heard about the interior one being flatter, but in my case, I've had no reflections or any shiny effect with the one I used. (I posted a photo of the actual canvas here in the comments above so you can check it out).
Thank you Ethan!
This is great Lui! Could you share how you attached the canvas to the frame? And did you weigh it down at all when it was hanging? Many thanks
Sophie! Sorry for the super late reply (was not aware of your comment). For this specific canvas I used a PVC tube to attach the canvas using gaffers tape. On some of my other ones I've used the left over cardboard tube from one of my old seamless backdrops.