
As a landscape photographer, I don't usually deal with too much noise in my images unless I'm shooting nightscapes. Once I started shooting more wildlife during my time in Alaska, I decided to give it a try and I was absolutely blown away with the results. As someone quite new to wildlife photography which involves shooting in the exact opposite style as landscape photography, there was a lot to learn. One of those lessons was that I have to bump my ISO to gut-wrenching levels, at least by my standards which typically include never going above ISO 400. After capturing a few shots around ISO 5,000 and then pushing all the way to ISO 12,800, I felt it was time I tried one of the plethora of software options I'm continually getting ads for to see if they could do anything close to what they advertised.
Throughout this article and video I'll be using ON1 NoNoise AI but fully suggest you try all the available options out there to find what gives you the best results. Many of them have free trials and you can test them at your leisure.
Nightscape Noise Reduction
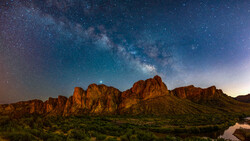
Previously I tried reducing the noise in a few nightscape images I had taken over the years and had mixed results. Sometimes it would give me decent results and other times it didn't do much at all. I ran a recent nightscape image I took in Oregon through ON1's NoNoise AI with decent results. No matter what software you're using they typically suggest that you process your images through the program as raw files, rather than after you're done editing them. I had already finished this image which involved a 20-star stacked Milkyway blended with a 3-minute exposure for the foreground, thus I wasn't delivering the best possible file to the program yet it still did a great job.
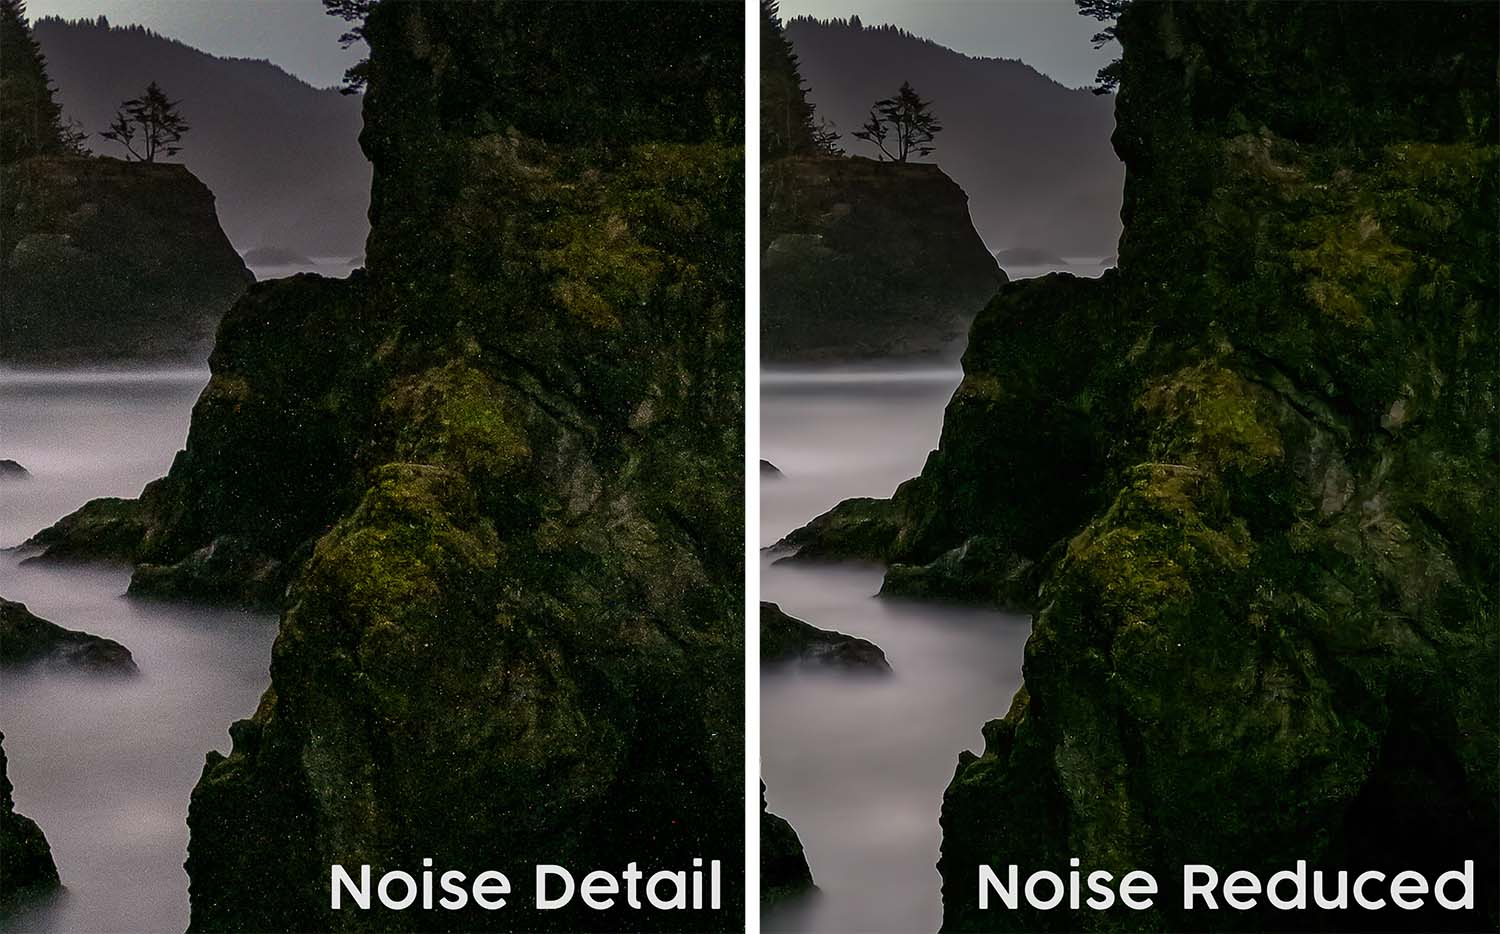
Above is a close-up of the before and after the noise reduction. The obvious difference is the amount of noise removed from the dark areas but what is important to pay attention to is the detail put back into those areas. Also, notice how great the water looks without reducing the ethereal feel of that three-minute exposure. If this smoothing is too much for you, you can always adjust the amounts applied or get specific and mask out certain areas.

Here is the final full image before and after, keep in mind that the starry area was stacked in both images meaning there isn't much noise to remove. What was nice is that the processing didn't remove detail within the milky way and star areas. Overall I was very happy with the results but I wasn't blown away... Until I started processing a few wildlife shots I took.
Mind Blown
Unlike the previous image, my workflow for these images involved running ON1's NoNoise AI first and then applying my edits which should give the best results than doing it in reverse.
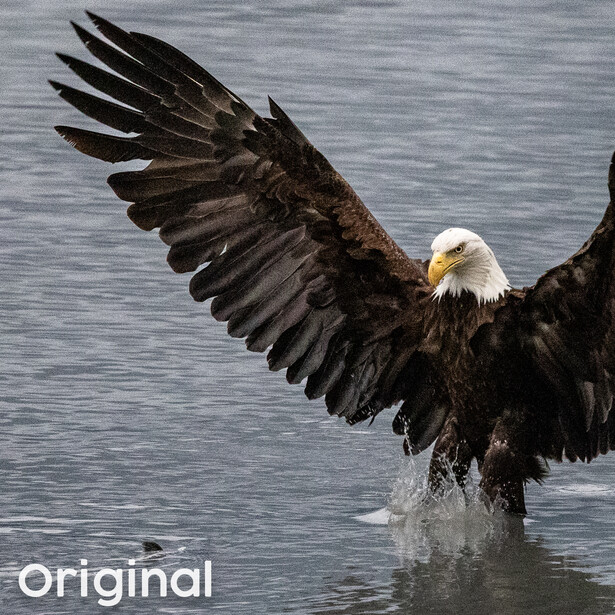
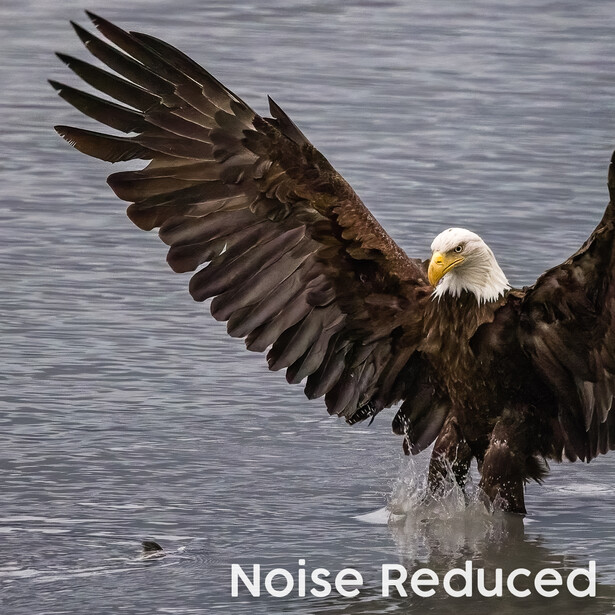
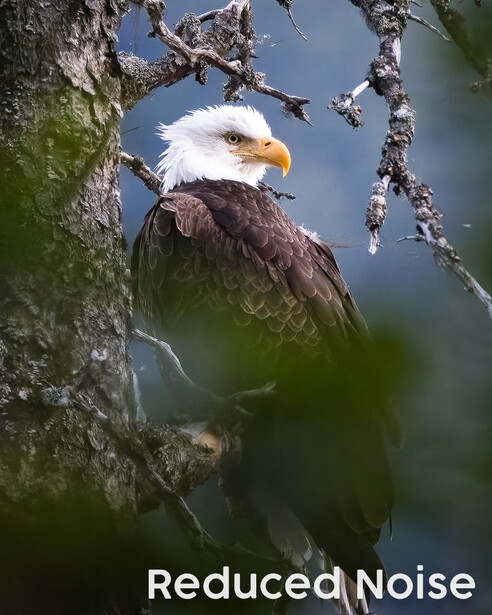
The above image was taken at ISO 12,800 and while the uncropped version would have been passable for online use, as soon as I cropped in on the eagle, the noise from the Canon R5 became much more apparent. This is when I tried processing it through the software and was quite literally blown away. Not only did it reduce the noise very well, but it also added and enhanced the details in subtle yet realistic ways. Pay attention to the definition of the eagle's feathers throughout the image, both brown and white. To my eye it not only reduced the grainy noise texture, it also provided a sheen-like texture back into the feathers that wasn't there before. Just as before also notice the water, how it keeps the definition of the ripples without removing detail yet completely removing noise.

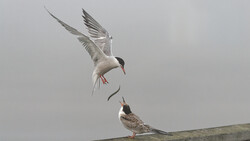
I took this image a few weeks prior and posted it to Instagram without adding any noise reduction outside of lightroom's integrated noise reduction. Even at small resolutions, I noticed the noise specifically in the blurry tree areas, and essentially wrote this image off as unusable because of it. Although it was taken at ISO 5000, I had to recover quite a bit of shadow detail and overall those out-of-focus areas were distractingly noisy.
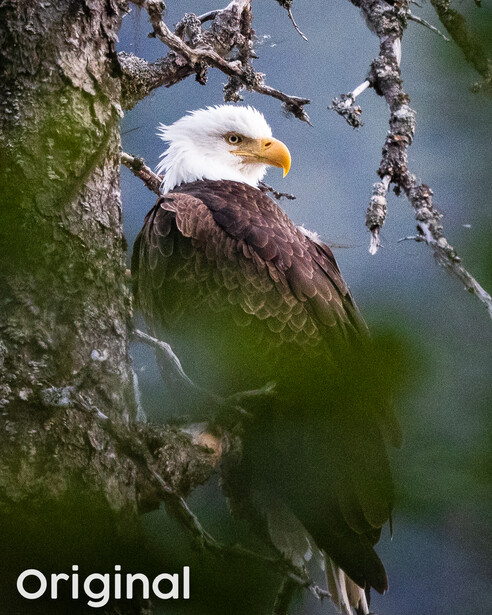
At almost 100% crop it becomes quite obvious how incredible the results are and to me, this feels like magic. The feathers, the beak, the out-of-focus areas — every single thing within the image looks better after processing it through the software. Look specifically at the areas where there are out-of-focus leaves in front of the eagle and how the transitional area from those blurry leaves to the eagle feathers has a lot of green in it, as you'd expect from blurry leaves. Then look at the noise-reduced version and how it kept the essence of those blurred green parts yet still reduced the noise correctly. Typically noise comes through as green or red grainy texture and the fact that it can differentiate between the noise and what is actual details within the image is amazing.
If your results aren't as pleasing I'd suggest adjusting the amounts of processing you're applying to your image. The truth is, I don't think I changed a single setting on most of these images. You can find more examples in the video within this article.
Conclusion
Years ago when I tried software like this it would always give very mixed results and end up ruining parts of the image like the transitions from branches to background. Ever since adding learning-based computation, the AI part of all recent software suites, the results have become mind-blowingly powerful. Specifically when it comes to wildlife. When the software can detect what type of object, in this case, a bird, within the image. It does an even better job at enhancing the areas of the image after removing the noise.
The results of the nightscape are good, but it is limited by trying to guess and evaluate every object and detail within the image. Overall I'm very pleased with the results and it means I can print such an image much larger than I could before but where ON1's NoNoise AI really shines is high ISO wildlife photography. I've had varying success depending on the animal within the photo as well and it really is dependent on the clarity of the original image.
I'd love to know your experience with AI-based noise reduction software. Share some of your before and afters in the comments below as I'd love to see just how far you can push this technology. I'll have a future article coming out that takes a look at AI sharpening and how important it can be for landscapes so be on the lookout for that.


Join the Fstoppers community for free
-
Post comments and join in the discussions
-
Browse the site ad-free
-
Share your work and get featured in the community
-
Compete in the photo contests for fun and prizes
17 Comments
This is crazy. And it's one step closer to cell phone cameras taking over.
How'd you know I took all these photos on my Nokia?
I've played with noise reduction many times. It works great if you want your photo to look like a watercolor painting.
Then, you did it wrong. Author's examples doesn't look like a watercolor painting
You obviously have not tried the new AI based noise reduction software. I am very picky and very useful.
I tried a similar AI based noise reduction and compared to simple Lightroom features. The difference was much less than expected. And, of course, details that simply are not there cannot be recovered, only invented. The AI simply keeps a nice balance between edge sharpness and blurring over the noise.
As someone who has used Lightroom since version 1, I have to disagree. Last year after upgrading my camera I was not happy with my results from Lightroom. I did a comparison of 3 other RAW development tools. Lightroom was the fastest but I was shocked by how much better my results were with the new AI tools. I never thought I would move on from Lightroom, I have years of Lightroom experience and knowledge, but I am much happier with my results since switching.
Ed, which raw development tool were you most happy with? Thanks
I use Topaz Denoise AI. Yes it is like magic. Love the smooth but detailed results. This kind of software has advanced a lot recently, specially with the addition AI masking.
I have been a user of Topaz DeNoise AI since it came out. It is part of my workflow as I run my RAW images through it on auto mode or clear. The results are amazing what the software can do even at a low ISO. I have noticed if you over-process, the blacks block up. If you match this with the Topaz Sharpen AI you can see fence posts at 3/4 mile with my D800 on my test images.
Adding to your comment and mine: it is worth checking the effect of DeNoise AI even at low ISO. You may be pleasantly surprise. I always run them on my low ISO landscape images. Haven’t had a single misfire from this software.
I recently had to do some shots in a dark club where they didn't allow flash photography. Even shooting wide open at 1.4, when I got home the pictures would have been unusably noisy. With very low expectations, I ran them through topaz denoise and was blown away at the results - it recovered all the details where they needed to be and didn't look at all 'painterly'. The clients ended up over the moon with the shots, if they'd have seen the results without the noise reduction, I doubt that would have been the case!
I use both NoNoise and Topaz. They both have strengths and weaknesses. NoNoise is either a standalone or integrated in On1 Photo RAW. It is quick and does a particularly good job with little artifact though its NR algorithms are limited. It can be applied to RAW or other file formats though NoNoise doesn't handle color noise as well as Topaz. Topaz is slow, clunky and it can produce areas of artifact where either NR isn't applied or random smudges/smears occur. It offers better color noise reduction and more algorithms than NoNoise. Neither software program is perfect and when I encounter issues in one, tend to switch to the other.
With the current AI denoise software on the market, I believe "DxO Deep Prime" provides the best overall performance, and the image after denoise appears very natural. The disadvantage is that it cannot be used with JPEG files.
While Topaz DeNoise AI has a variety of AI modules, its performance has not improved since it was first released, and its noise reduction frequently produces strange patterns in low light. (Regardless of which module you use, nighttime performance is consistently poor in the sky. During the day, the high ISO performance is impressive.)
Overall, the ON1 did okay, even if it didn't perform exceptionally well.
At the moment, I'm looking forward to seeing how the Noiseless AI launched by Luminar Neo performs in the future.
Topaz AI was maybe the first and others just follow. The trick is to go from Lr or other with the lens correction first also like Dxo, this is key to keep metadata with lens info also Lr has LC's for lenses that are not chipped like the old Rokinon 14mm f/2.8. You can start in Lr edit basics zero sharpen. Look NR was very bad in the past years even in PS/Lr and all others like C1. One thing of note is those who turn off in camera NR you will get dead/hot pixels that I have found none to rid even stacking images.Used to have to remap pixels by changing the date by a month turn off and return before heading out for a night, now remapping happens when turning off camera. First Lr got rid of dead/hot pixels when importing but a big thing about Sony cameras with disappearing stars and it no longer does. Cameras have gotten better too with ISO invariance. The best thing is to use NR both for RAW and jpeg in the field saves hours in post. A positive is after using Topaz the result can be further edited like brightening in shadows. Even enlarging with Topaz Gigapixel AI does some NR. And the Sony A7Siii has dual level NR IF you really need to go that far, even the first image using the old A7s and Voigtlander 10mm f/5.6 was only at 4000 mainly to control the cloud highlights where they disappeared at higher ISO's. Today with 1.4 and 1.8 lenses shots are faster and not longer with lower ISO.
I tried some and the less know DxO DeepPrime function is my favourite. DeePrime work on Raw only and is available in the DxO Photo lab editor or as a standalone function in the PureRaw tool. I found it a bit better in preserving the fine details compared to Topaz. Both products provide incredible results
I have done a lot of denoise testing to make a long story short:
Lr is fine for if you know how to work ALL sliders.
Topaz is really good.
On1 even though I like on1 and their AI is not all that good, way too many artifacts and ruins patterns and grass + it over sharpens to compensate, slightly superior to Lr.
Dfine is simple basic and good, not AI but better than Lr
C1s has the second best built in denoise (#1 dxo deep prime)
dxo deep prime is way better than all the others except really severe noise - the only humongous downside it will only open and work on files from cameras in their compatibility list, which means no phones or cameras like most dji and action cameras, which is annoying because the small sensors needs the denoise the most.
(not sponsored by any of them)