
Ever taken a photo only to find dust and small hair particles on your sensor. It can be quite aggravating. Here is a quick and easy way to clean up your sensor and only spend $8 doing it.
Cleaning your sensor can be a delicate process. If you have never done it before I'd highly recommend sending it in to a trained professional that knows what they are doing. One bad move and “Wowza!” that sensor is history. The frustrating part is that it costs $50+ to have any one clean the camera sensor. So what do we do when that annoying dust particle or small hair decides to hangout out there?
Here is one effective and simple cleaning process that can knock out a good amount of any little creatures on your sensor. If after doing this you are still having dust issues, then a full sensor cleaning with swabs might be required. But before dropping the money on that this is the option I use to clean things up and as you'll see it works fantastic.
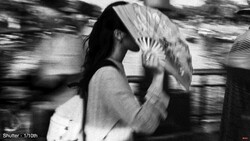
1. Check your sensor for dust. Easiest way I have found to do this is to put up a bright white background on your monitor. Put your camera on Aperture Priority Mode (AV) - dial in the narrowest aperture you can – for instance F22. Set your ISO to a low number (100 for example). The camera should be giving you a pretty slow shutter speed. Now point your camera at the white background on your monitor and press the shutter button as you quickly rotate the camera. The idea is that you want to blur everything, thereby making it more obvious where the dust particles are on your camera sensors. Here is an example of the one I did this morning while pointing it at my white desktop on my computer. You will notice my logo was on my desktop is blurred because I rotated the camera quickly as I shot the picture. Notice all the dust, hairs and other little creatures on my sensor.

2. If your sensor shows it needs to be cleaned like mine does then pick yourself up a Giotto Rocket Blower. They run about $8. Once you got your rocket blower in hand go find yourself a clean environment, preferably indoors, and turn off any fans nearby to keep dust down.
3. Take your lens off and look in the menu of your camera for a setting to clean the sensor. On the Canon menu it says “Sensor Cleaning” then when you select it it gives you 3 options. You’ll want to choose the one that says “Clean Manually.” When you do that, you’ll hear the mirror of your camera flip up and lock into place. At this point you’ll be able to see the camera sensor. Don’t touch it. The sensor is extremely delicate and you could cause a costly repair if you touch it incorrectly.

4. Now while holding your camera turn it so the opening (where your lens once was and your sensor exposed) is facing down. Take your Rocket-Air blower and blast a few nice blows of air in the hole, being careful not to insert the blower to far (it would be devastating if you hit your sensor).
5. Reattach lens and shoot another shot at your bright white background on your monitor again doing the same as you did in step 1. Hopefully you'll see an improvement. If there are still a number of dust particles – then that means you are going to need a more intensive cleaning which at that point you might consider taking it in and having it cleaned for you. I have cleaned my own sensor using sensor swabs but it is not something I feel comfortable trying to teach.
Here is my second shot after blowing off the sensor.

You can notice it made a huge improvement. I hope this was useful. Often cleaning a sensor takes no more than shooting some clean air up there to blow the dust off. It’s not 100% effective, but it’s a cheap, quick and easy solution most of the time.


Join the Fstoppers community for free
-
Post comments and join in the discussions
-
Browse the site ad-free
-
Share your work and get featured in the community
-
Compete in the photo contests for fun and prizes
15 Comments
One of the very first things I picked up when I got my first DSLR. That and a good sling pack to carry all that crap in. Haha! Cant stress enough how important one of these is. I was out in Maui with my wife for an exstended vacation with friends. After the first day I noticed all my images had 2 pretty large grey spots showing up in the same spot of all my images. Got back to the room that night and pulled out the Giottos from the bag and clean the sensor. Sure enough specs went away and I shot the hell out of that island for the rest of the week. Haha! I have the mini version for the sake of my pack is smaller and I am all about saving space. I think it was 4 or 5 bucks and totally work every penny!!
Have always had one and will always have one... My order is to run two self cleanings with the lens off, face down so dust will fall out, then do some blowing, replace the lens and run one more self clean... It's become a pre shoot ritual for me...
Ya know I have to be honest, ever since Canon put in the "self-cleaning" sensor I've not had a single problem with dust *knock wood*
Granted, I'm exceptionally careful with my equipment, and clean my gear regularly and send it into CPS every 6 months, but I've never had to touch my 5d3 sensor.
...tho... I could just be lucky, and I really don't tempt fate by changing lenses in a dust storm :D
Coming from someone who cleans a lot of sensors (100+ a month), this little tip will help prolong the time before you should get your sensors professionally cleaned. My additional notes:
I. Don't only blow the sensor, but also the chamber of the camera. Make sure the camera is turned upside down so that the particles can actually fall out. Also, don't just go crazy with the blower, give the particles time to move in between your depressions.
II. For a better understanding of what's on your sensor, don't shoot at f/22; try an f-stop closer to f/8-10. This is for two main reasons. 1. your probably not shooting a perfectly clean surface; to shoot at a small aperture will show the surfaces' imperfections. 2. it allows you to shoot at a faster shutter speed so you minimize camera shake (I know, the second thing I've said contrary to the poster). The reason I advise against the shake, in the realm of getting a better idea of what's on your sensor, is because a lot of imperfections do not show up as strong markings, they are faint. If there is a ton of movement, they can be blurred into the background, leaving only the major markings.
This is just my input. Like all things, there is more than one "right" way of doing something. The poster has theirs, I have mines. Another example is I shoot on infinity, the gentlemen working next to me prefers to pick a point of focus. Our end results are always the same, a perfect sensor when seen under a loop.
-RS
www.ronaldstewartphotography.com
B&H isn't accepting orders now, but a adorama is. :) http://www.adorama.com/GTRAB.html?gclid=CJDBzY3Hs7kCFZFcQgodMkkA2A
Adding my tip: unfocus !
In addition to the smallest aperture and slow speed + motion blur, when I'm test-shooting to a close white surface, I manually set focus to infinite, in order to blur any detail that could be present on the white surface. Only dust specs remain sharp.
You´re out of luck if you own a D600. I have used my blower extensively, and the sensor still looks like its made in Sahara.
Learn to clean your sensor. It takes all of 5 minutes. The only caveat is to make sure you get a cleaning kit for a particular sensor with or without a fluorine coating. Certain Canon cameras have this, dunno if other brands have it.
It doesn't matter how much you blow...
Spot Healing Brush Tool will be always your photo savior.
Had one for years and it is a great but of kit - highly recommended!
Matt Limb
www.mlimages.co.uk
A while ago a photo magazine in the UK had a pretty decent offer on. 3 issues of the magazine for £5, and a free camera cleaning kit (which includes the rocket blower.)
The magazine was toss, but it was worth purchasing for the cleaning kit. 'Real' giottos rocket blowers are a lot more expensive
I had hoped I would never need to attempt this. I seldom swap lens and try to be super careful. Still, your test revealed several spots. My Giotto blower got a few but not the biggest. I set my teeth and went after the spot with my LensPen. I found the correct area immediately (remember, the image is reversed and inverted) and got it clean. Thanks for your blog post.
I recommend the "Koh Hepa Jet" Air Blower. It's filtered dust-free air that you blow on the sensor. I love mine. Works great and I can trust the air is filtered. http://www.kohglobal.com/JetAir.html
For those of you who never remove your lenses and think you're immune to this, take a photo as described above (except aim it at a blank wall, not Trevor's logo ;-) ), then bring your image into Photoshop, add a levels adjustment layer, and press the auto button. Now go out and get a blower and a sensor cleaning kit...
Having changed from Nikon to Canon I can only say that I have much less problems with dust