If you have ever struggled to get perfect exposure with accurate colors in your videos, then you are not alone. But with the help of the X-Rite ColorChecker Video and DaVinci Resolve 17, you will be able to create perfect-looking videos in a fraction of the time.
Step One
Start with trying to get an accurate exposure and white balance in camera. Your goal is to expose the gray patch on the X-Rite Color Checker Video just below the white patch to 42 IRE. As a general rule, middle gray should read around 42 IRE on a waveform monitor, though this varies slightly depending on your camera profile.
But what if you don’t have a waveform monitor on your camera? Alternatively, you can use false color to help gauge when you have middle gray accurately exposed. If you don’t have access to a waveform or false color, you should be able to set your camera's zebras to indicate when you are close to 42 IRE.
If you find yourself in a situation where you only have access to a camera with just a histogram, make sure you do a test exposure while taking note of the position of the histogram and see which exposure looks the most accurate against the waveform monitor in Davinci Resolve.

Step Two
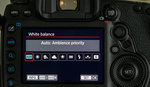
Once you zero in on the method for getting accurate exposure you prefer and that works best for your camera and color profile, the next step is to set a custom white balance using the solid gray side of the X-Rite Color Checker video card.
Step Three
Make sure you capture the front of the card with the color chips accurately exposed in the lighting conditions for the scene, with the Color Checker close to your talent's face. If you change the lighting or move to a different location with different lighting conditions, make sure you repeat the steps above.
Step Four
Once you have the X-Rite Color Checker Video captured in the shot, you can use it to refine your color adjustments using the scopes in the color tab in Davinci Resolve. Watch the video above for a step-by-step walkthrough of the adjustments you will need to make in post-production.
If you are not already using Davinci Resolve, you can download the basic version for free, and if you would like to unlock some more of the advanced features, you can learn more about DaVinci Resolve Studio 17 right here. Here’s where you can buy the X-Rite Color Checker Video if you don’t already use one.
Let me know in the comments section below if you have any exposure or color grading tips that you would like to share with the Fstoppers community.