
Got dust? Yea, thought so. In this article we'll delve into the surprising array of effects that different types of lens and sensor contamination can have on image quality. Some of them kind of cool. None of them good.
This is the sixth in a series of articles on how to improve the sharpness of our images. In previous articles in the series we've examined: Optical Design of the Lens (Part 1), Missed Focus (Part 1), Subject Motion (Part 1), Camera Shake (Part 2), Depth of Field (Part 2), Noise (Part 3), Atmospheric Disturbance (Part 3), Mirror Slap (Part 4), Diffraction (Part 4), and Image Stabilization (Part 5).
Lens/Sensor Contamination

A sandstorm in the Namib Desert fires dust at every crack and crevice in a camera system’s defenses.
Potential contaminants are everywhere. In many parts of Africa and the American southwest, the primary concern is dust. Not just a few specks floating lazily in the air, but dust fired at our equipment with all the might terrestrial and solar forces can conspire to produce.

Yasuni National Park, Ecuadorean Amazon.
Not so in the rain forest. The rainforest has goop instead. In fact, we saw only a single speck of dry, free-floating dust on our last trip to the jungle. We’d just glimpsed it when we heard a soft slurping sound, so humid was it. The little speck, only just visible initially, grew to the size of a sodden raisin in a fraction of a second, hung motionless in the air for a moment as if unsure what had happened to it, then plopped to the forest floor, landing with a tepid splash in a vat of brown mud. Gone was the single speck of dust.
But moisture? That was everywhere.
What Does This Loss of Sharpness Look Like and What Causes It?
These different contaminants can impact our images in different ways. Let’s take a look at how they can degrade image quality and at what we might do to remedy their effects.
Dust
The image below was made in the fynbos of South Africa, out in the Western Cape. The region is inherently a bit on the dusty side, and I didn’t do a good job of mitigating it. Worse, this type of shot is the perfect setup for highlighting the presence of dust nearly anywhere in the optical path.

A shot directly into the sun exacerbates the effects of dust in the optical path. (Fynbos, Western Cape, South Africa.)
If we zoom into the central section of the original image (see below), three different types of artifacts can be observed. A speck of dust on the sensor (top left) casts a small, and relatively distinct, shadow in the final image. Sensor dust is most noticeable within large fields of uniform color. Dust on the front or rear of the lens can have a similar effect. The resulting shadow is typically larger, fainter, and more diffuse, however, as dust particles on the lens are further from the sensor. The impact of lens-based dust on image sharpness is usually relatively minor, especially at wider apertures where the amount of light blocked by any given dust particle is a small fraction of the total light passing through the lens.

Three different lens-based causes of image artifacts are seen in this closeup: dust on the sensor, dust on internal lens elements, and reflection from internal lens surfaces.
The second artifact one may notice is the spot of bright cyan at bottom-center. It’s easy to see in the full photograph that this spot is one of many brightly colored circles linearly arranged along a line passing between the light source and lens center. This is characteristic of flare caused by internal reflections from the surfaces of the lens elements and their coatings (it’s the lens coatings that often contribute a specific color to a circle).
Finally, notice that there is yet a third type of artifact. A specific example is circled at bottom-right. It consists of a characteristic series of nested, brightly colored concentric circles. To be candid, I don’t fully understand the physics of what’s causing this type of artifact. My suspicion is that it involves Fraunhofer diffraction from particulates that have gotten deep into the lens barrel. This particular image was shot with a Tamron 15-30mm f/2.8. I was able to reproduce the effect with this same lens this past weekend. The size of the artifacts depends on the focal length; they are largest at 30mm and smallest at 15mm. They are only visible at apertures of f/11 or smaller. They remain visible after a thorough cleaning of the front and rear lens elements as well as of the sensor. And they appear on images shot with both Nikon Z7 and D810 camera bodies. All of which leads me to believe they are the result of dust that has gotten deep into the inner workings of the lens. I don’t recall having seen this type of artifact before on the web, so if anyone has seen other examples or better understands what’s going on please leave a note in the comments.
Moisture
The other common cause of contaminant-based image degradation is moisture. In the rainforest or islands, moisture is everywhere. Thick, tropical air is laden with it. Keep your camera in your nice, cool air-conditioned room overnight and when you step outside in the morning all that moisture is destined to end up on your lens, eyepiece, and even sensor if you're unlucky enough to change lenses.

Overnight condensation on a cabin window in the Galapagos. Step outside with a cool camera body and lens at dawn and within a few seconds it will start to look like this as well.
Even if your room isn’t air-conditioned, the temperature can easily drop below the dew point at night encouraging all that humidity to condense onto your camera body and optics while you sleep. In both cases, the moisture can be challenging to remove since as long as your gear remains below the effective dew point, more moisture will condense onto it again. The effect of fine condensation on a lens is shown in the image below, shot more than a half-hour after leaving our air-conditioned cabin one morning.
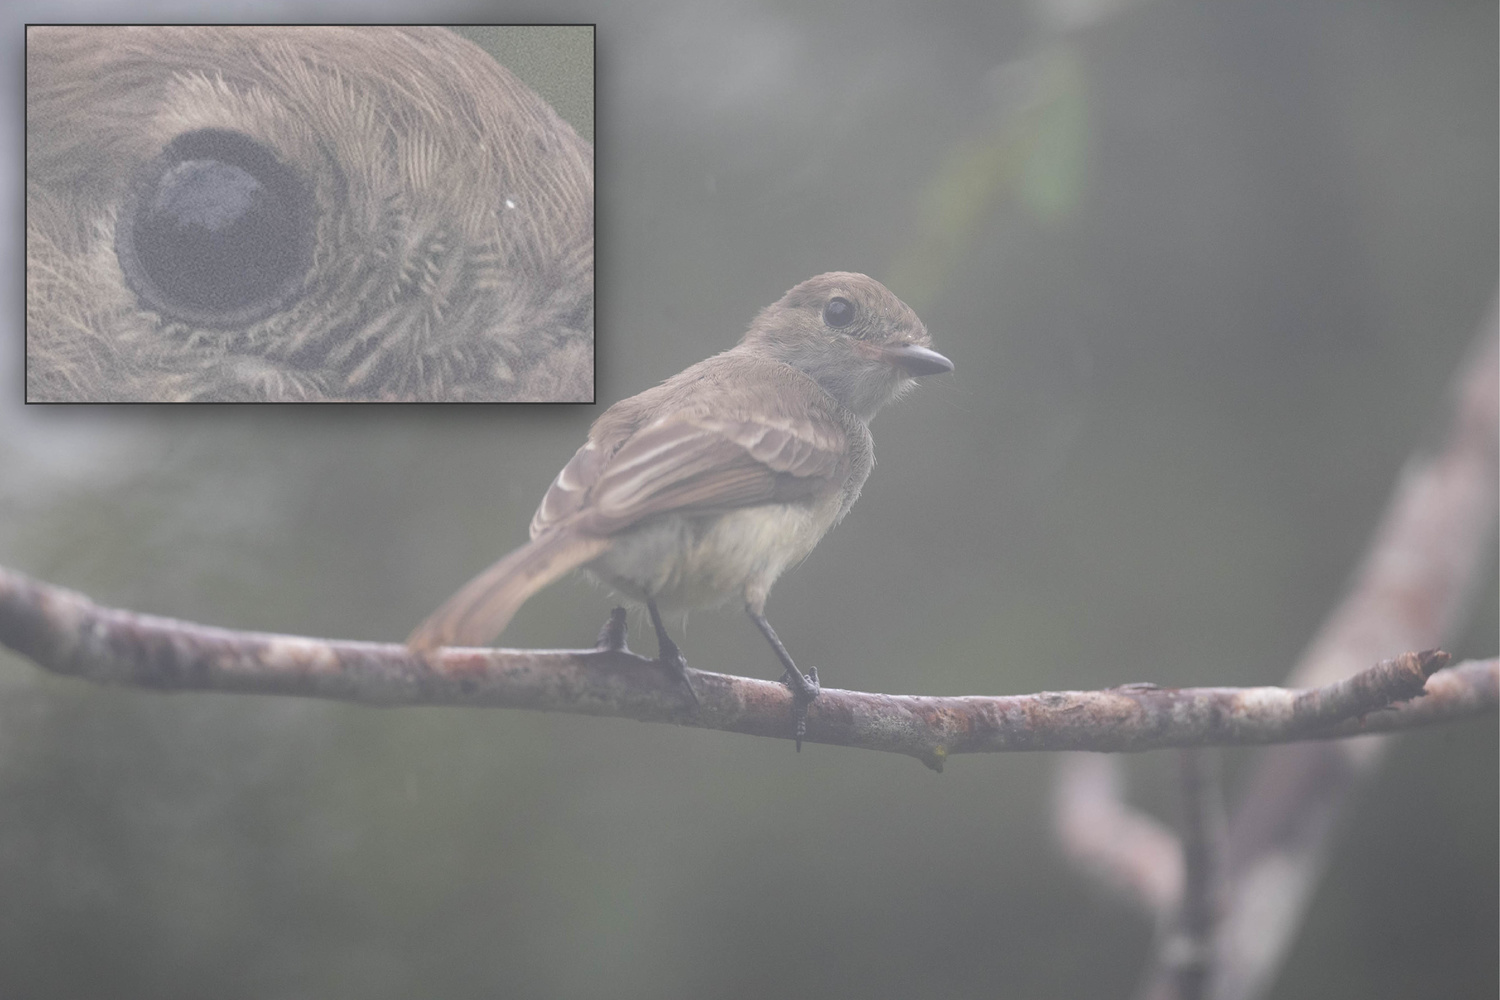
Uniform, microscopic droplets of condensation tend to result in a global loss of contrast rather than a local loss of sharpness. (Galapagos Flycatcher, Isla Santa Cruz, Galapagos.)
The interesting thing is that so long as the droplets remain very small, condensation has little impact on image sharpness. Notice that the fine details remain clearly visible in the inset above. As anyone who has done some macro photography can probably attest to, small droplets of water can act like little lenses. Their effective focal distance, however, is comparable to the droplet diameter. For microscopic condensation, this is just tens or hundreds of microns. As a result, at distances much greater than the droplet diameter, condensation effectively scatters light uniformly (see illustration below).

An individual droplet of water acts like a small lens. For spherical droplets the focal distance is comparable to the droplet diameter. At macroscopic distances they appear to scatter light fairly uniformly opposite the light source.
The impact of many small droplets taken together is a relatively uniform plane wave across the entirety of the imaging surface (illustrated below), effectively just raising the background brightness. The result is the uniform reduction in contrast observed in the image of the Galapagos Flycatcher above.

Many small, randomly dispersed droplets lead to a plane wave of uniform intensity falling across a wide swath of the sensor.
The impact of larger droplets, however, such as those typically formed by raindrops on a lens, is more troubling. The rivulets left by raindrops can have an effective focal length comparable to the lens itself. The result is that they can preferentially refocus light destined for one area of the sensor to someplace else on its surface, effectively blurring the image. An example of this is shown in the figure below. Not only have some areas of vegetation clearly been blurred, but areas of the foreground and sky have been softly refocused onto the water and vice versa, resulting in patchy areas of lights, darks, and unexpected color.

Macroscopic raindrops blur some areas of an image and mottle others with patches of light and dark. I had long since run out of anything dry to wipe the lens off with. This was the kind of day where you ring your boxers out when you’re done with the hike. (Isla Santa Cruz, Galapagos.)
How Can We Manage Contamination?
Avoiding Condensation
As is frequently the case, it’s better to prevent contamination than try to fix the effects later. Storing gear outside of air-conditioned rooms in warm, humid environments (where feasible and safe while traveling) can eliminate issues with condensation that may otherwise be challenging to overcome when you first go out to shoot. Alternatively, placing gear in the sun for a few minutes — or tens of minutes — before use can allow it to warm up and condensation to evaporate off; again, where that’s possible.

Screened in rooms are perfect for enjoying the sounds of the rainforest at night, but also mean that the humidity level is a constant 100%. There was a dry box in this room, however, just beneath the safe, that provided some protection for our electronics. (Ecuadorean Amazon.)
On the other hand, we’ve often stayed in screened-in lodges while traveling in the tropics that didn’t have air conditioning. While temperatures may remain quite warm overnight (even stultifyingly hot), it’s still possible for gear to drop below the dew point. To help protect electronic equipment, many lodges will provide a dry box in the room. Just a small cabinet with a light bulb in it to keep your gear above the dew point. This can help minimize the amount of moisture that gets into or onto your equipment. If a dry box is available, all of our electronics stay in there unless they’re actively being used. The small cupboard just below the safe in the image above is one such dry box.
Keeping Contaminants Out
It’s important not just to keep moisture and other contaminants off the surface of our gear, but also out of the internal workings. Highly weather-resistant and tropicalized bodies and lenses provide a critical layer of protection when visiting or working in extreme environments, helping to prevent the ingress of both dust and moisture. This can be important, not just for image quality, but for the long-term survival of your equipment. Serious weather hardening is one reason professional-grade bodies and lenses can cost significantly more than their consumer-grade counterparts.
Additionally, if you’re planning on shooting under challenging environmental conditions you might consider purchasing or renting internally focusing and zooming lenses. These minimize the amount of air transferred between the outside environment and the inside of the lens barrel. By contrast, the front element of the Tamron lens mentioned above moves in and out by half an inch or so as the lens is zoomed. When the outside dimensions of the lens change, an equal volume of air must necessarily pass into or out of the lens barrel to compensate. This air carries all of the dust and moisture present in the environment with it. Once these contaminants are within the lens barrel, then, focusing (which moves an additional set of internal elements) can further redistribute them into the deepest recesses of the equipment.
By contrast, the outer dimensions of internally focusing and zooming lenses never change. As a result, there’s far less potential for the transfer of contaminants between the environment and internal lens spaces. If you spend a lot of time working in challenging environmental conditions, lenses that are well weatherproofed and have a constant external form factor can help prevent a lot of issues with image degradation down the road.
Contaminant Removal
Just because something has gotten onto the lens or sensor doesn't mean it can't be gotten off. Taking the time to ensure that optical components are as free from contamination as possible before important shots can dramatically improve the technical quality of your images and reduce the amount of effort required in post. Lens and sensor cleaning kits can be purchased from B&H, and previous Fstoppers articles can help walk you through the process of cleaning a lens (here) or sensor (here and here).
One word of caution, however. As mentioned above, it's entirely possible for dust and other contaminants to get inside the lens barrel. One might be tempted to remedy this situation themself. Stop. No, really. Stop. Modern optics are incredibly complicated and terribly sensitive to even minor misalignments. Reassembling a lens into working order usually involves the use of expensive, specialized testing equipment. You almost certainly want to either live with the contamination or send the lens back to the manufacturer for cleaning and service. A misaligned lens will typically result in far worse image degradation than a little dust, and of the sort that can't be corrected with post-processing.
Mitigation
In some cases, lens or sensor contamination is unavoidable. Once present, there are a couple of options. We can try to avoid situations that highlight the presence contaminant, or we can attempt to remove its effects with post-processing.
Avoid Highlighting Contaminants
As alluded to earlier in the article, there are certain situations that exacerbate the effects of a lens contaminated with dust, where a bright light source is located near the central axis of the optical path, for example, and/or where smaller apertures are used.
The worst effects of a bright light source within the frame can often be eliminated with a handy double-exposure technique that’s been covered here, as well as in Elia Locardi’s tutorial series. I, unfortunately, forgot to take advantage of it in the image of the fynbos at the top of the article. The idea is to block out any direct light source with your finger in a second exposure of a scene. This provides a version of the image without the worst effects of lens contamination and flare that can be selectively blended with the first exposure.
On the other hand, many of the effects of lens contamination are most significant only at the smaller apertures typically used to maximize depth of field. When shooting an action photo that needs a lot of depth of field this may be unavoidable. But if you’re shooting landscapes from a tripod, anyway, focus slicing can be used to avoid the necessity of small apertures, and likely yield much sharper images. This great technique was covered in a previous article in the series.
Alleviate with Post-Processing
The use of either of the above approaches is preferable where possible, rather than relying on post-processing to mitigate contaminant effects. They will almost always yield better final results with far less effort.
If you do find yourself back at the computer with a raw image suffering the effects of lens or sensor contamination, however, there are some things that can help mitigate them in post. Capture One, Lightroom, and Photoshop all have tools for removing dust spots. Capture One’s tool even allows you to distinguish between dark shadows, such as are caused by dust on the sensor, and broader areas of decreased light intensity, such as are caused by contamination of the lens. For larger, more complex issues, Photoshop’s Content-Aware Fill tool under the Edit menu can work wonders in some situations.
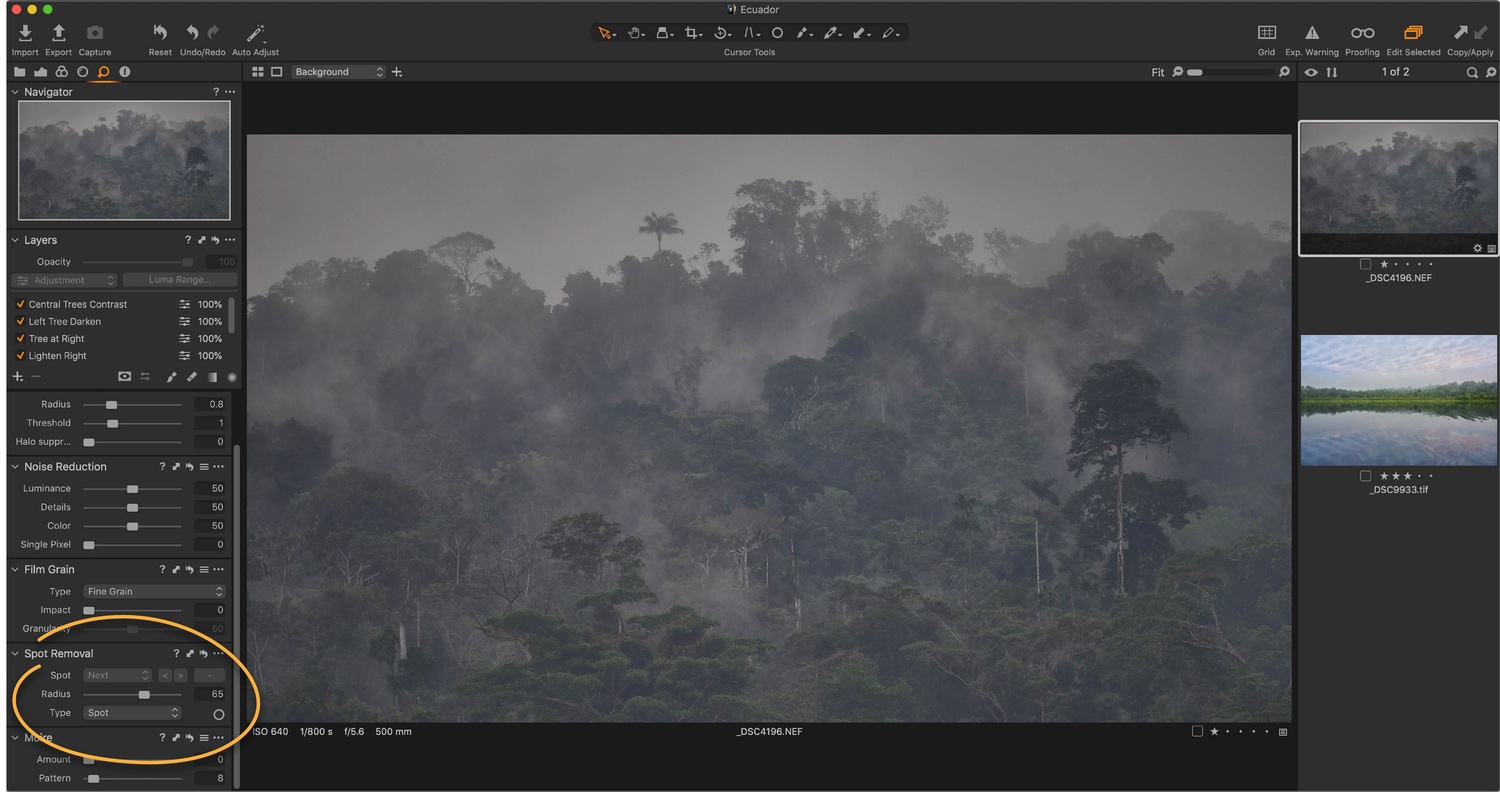
Capture One’s Spot Removal tool.
Finally, the diffuse reduction in contrast caused by uniform condensation across a lens can often be remedied with a combination of Lightroom’s Dehaze and Clarity sliders.


Lightroom’s Dehaze and Clarity sliders can often be used to recover much of the contrast in an image taken with condensation on the lens.
Note, however, that from the perspective of image quality, this isn’t free. Condensation-induced haze in the original image decreases the effective dynamic range. Any post-processing adjustments to recover image contrast necessarily increase the effective prominence of noise in the image, potentially substantially, relative to what it would have been if shot without condensation. Again, always best to prevent rather than mitigate!


I'm over here writing about Lightroom and you're on part 6 of your Ted Talk.
Nice and very useful article, thank you!
This series has been very informative. I have a few bookmarked. Thank you for this.
I have learned a lot from this whole series so far. Thanks a lot for going through all this effort!