Ever gotten your images off the camera, zoomed into 100%, and been a little disappointed with the results? Ever had a hard time figuring out what went wrong? In this series, we’re looking at 11 common causes of poor clarity and how to address each. With a little practice, you’ll be able to glance at an image and know how to fix it.
Last week, we looked at three common factors that can lead to a loss of image sharpness: the optical design/assembly of a lens, missed focus, and subject motion. This week we’re going to look at two more: camera shake and depth of field.
Camera Shake
What Actually Causes the Loss of Sharpness?
The fundamental problem is a limit to how steady we can hold our hands. Trying to aim a camera involves complex feed-forward and feedback loops in the brain, integrating the visual system, motor cortex, and an intricate web of sensory neurons. Further, there are at least 36 different muscles that must be actuated to allow us to simultaneously control a camera’s six different degrees of positional and rotational freedom.
The question isn’t why can’t we hold a camera still? It’s how are we able to hold one as steady as we are?
Any residual motion in the process of steadying the camera has the potential to cause a loss of sharpness for the same reason that subject motion does. The scene is moving relative to the sensor while the shutter is open. In this case, though, it’s the camera body/lens that’s moving rather than the subject.
What Does This Loss of Sharpness Look Like?
Because of their similar roots, camera shake looks identical to motion blur, except that the whole field of view moves uniformly. The result imparts images with a characteristic appearance.

This image obviously suffered from some camera shake even though it was taken at 1/1250th of a second (Red throated bee-eater, Albert Nile, Uganda).
The image above, for example, was shot hand-held from a small motorboat. Even zoomed out, the blur has the asymmetric appearance of camera shake. If we zoom into 300%, we can better see what’s going on.

Camera shake typically blurs the resulting image asymmetrically.
The camera was moving roughly from the upper left of the image to the lower right while the shutter was open. In general, edges parallel to the direction of shake tend to remain sharp and well-defined since the shift is across regions of roughly the same color/luminosity. Edges perpendicular to the direction of motion, however, tend to undergo obvious blurring as the colors on opposite sides of the edge are smeared into one another. Examples of each are highlighted in the image above.
How Can We Manage It?
Shutter Speed
Since the root cause is closely related to subject motion, one of the solutions is also the same: increasing the shutter speed. One of the first rules of thumb one often learns when taking up photography is to use a shutter speed at least as fast as one over the focal length of the lens, e.g., for a 300mm lens, you’d likely want to use at least 1/300th of a second. That depends on a number of factors, though: how much coffee you’ve had, the resolution of the camera sensor, whether you’re shooting from steady ground or a moving boat, etc. Play around.
Vibration Compensation
Many lenses and camera bodies also have vibration compensation elements built into them that can add 3-5 stops to the effective shutter speed range. Try shooting at a wide range of different shutter speeds, taking three or four shots at each with the vibration reduction system engaged. The results can inform decisions you later make in the field. I’ll usually do the experiment completely handheld as well as with my elbows braced on something to see what ratio of keepers is achievable at each shutter speed.
Multiple Shots
Since camera shake tends to be random, there will often be some times when the camera is moving less than others. Taking multiple images often allows you to come away with a keeper or two at a slower shutter speed than is possible to pull off reliably with a single shot. Leaving the shutter release in continuous high-speed mode can make it easy to knock off three or four images in quick succession.
Tripod and Bracing
A tripod can also limit motion, even if it’s not locked all the way down (bracing works in a similar manner). In the hands, a camera has six different degrees of freedom. It can move in any of three directions and rotate about any of those same three axes. Putting a camera on a tripod, even if the ball head is loose, removes four of those six degrees of freedom making it significantly easier to get a steady shot. Lock it down and the last two are removed as well. The use of a remote shutter release or timer can further minimize external sources of vibration.
Post-Processing
Finally, there are ways to partially ameliorate the effect of camera shake in post-processing. Photoshop has a sharpening filter specifically targeted to this task: Filter > Sharpen > Shake Reduction. The effect can be seen in the image pair below, with the original image at left and the processed image at right.
Impact of Photoshop’s Shake Reduction filter. Original image at left with the post-processed image at right.
The result is actually pretty impressive, significantly increasing the clarity in the details around the eye and many other places. That said, camera shake results in a loss of spatial information that can never be regained. It is always better to get things right in the field than to try to patch things up in post.
Depth of Field
The second factor we'll look at today that can impact sharpness is depth of field.
What Actually Causes the Loss of Sharpness?
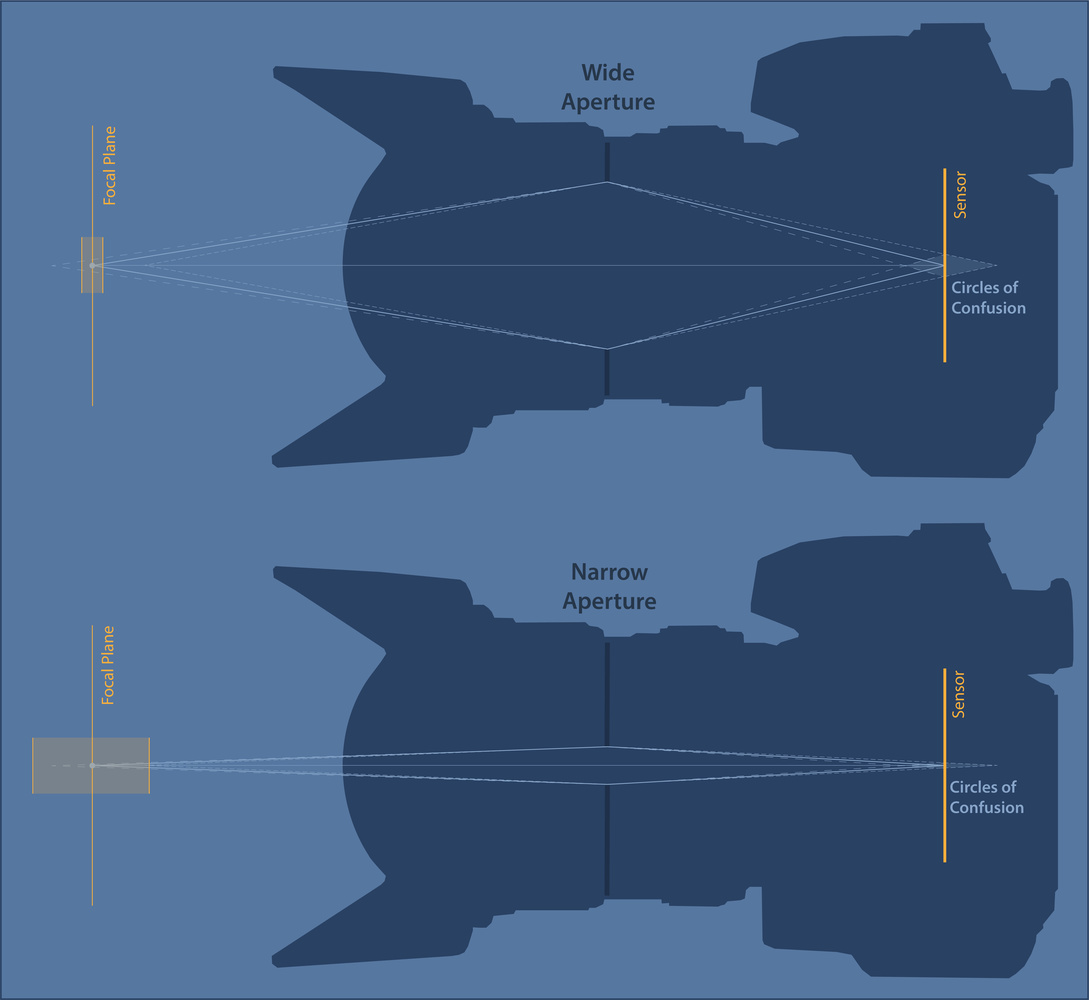
A point is sharply focused when all of the light rays emanating from that point are focused by the lens onto a single point on the sensor. We saw in the last article that different types of lens aberration can lead to rays from one point being smeared out across multiple pixels. The same thing happens when points in a scene aren’t located precisely on the focal plane. Points that are in front of or behind the focal plane will tend to focus behind or in front of the sensor. This results in the light rays blurring across a broader swatch of the sensor called a circle of confusion (see figure below).

In general, a wider aperture leads to broader circles of confusion on the image sensor which, in turn, translates into a narrow depth of field within a scene.
For a given aperture, the maximum size circle of confusion we're comfortable with translates into a particular distance in front of or behind the focal plane that an object can be and still be viewed as acceptably sharp. The distance from the closest to furthest point deemed sharp is called the depth of field (the translucent orange boxes in the figure above). Points outside this region may not be as sharp as we'd like.
What Does This Loss of Sharpness Look Like?
Recall from the previous section that camera shake often induces a spatially homogeneous but anisotropic loss of sharpness across an image. By contrast, a limited depth of field causes isotropic defocusing that depends on the distance a subject is from the focal plane.
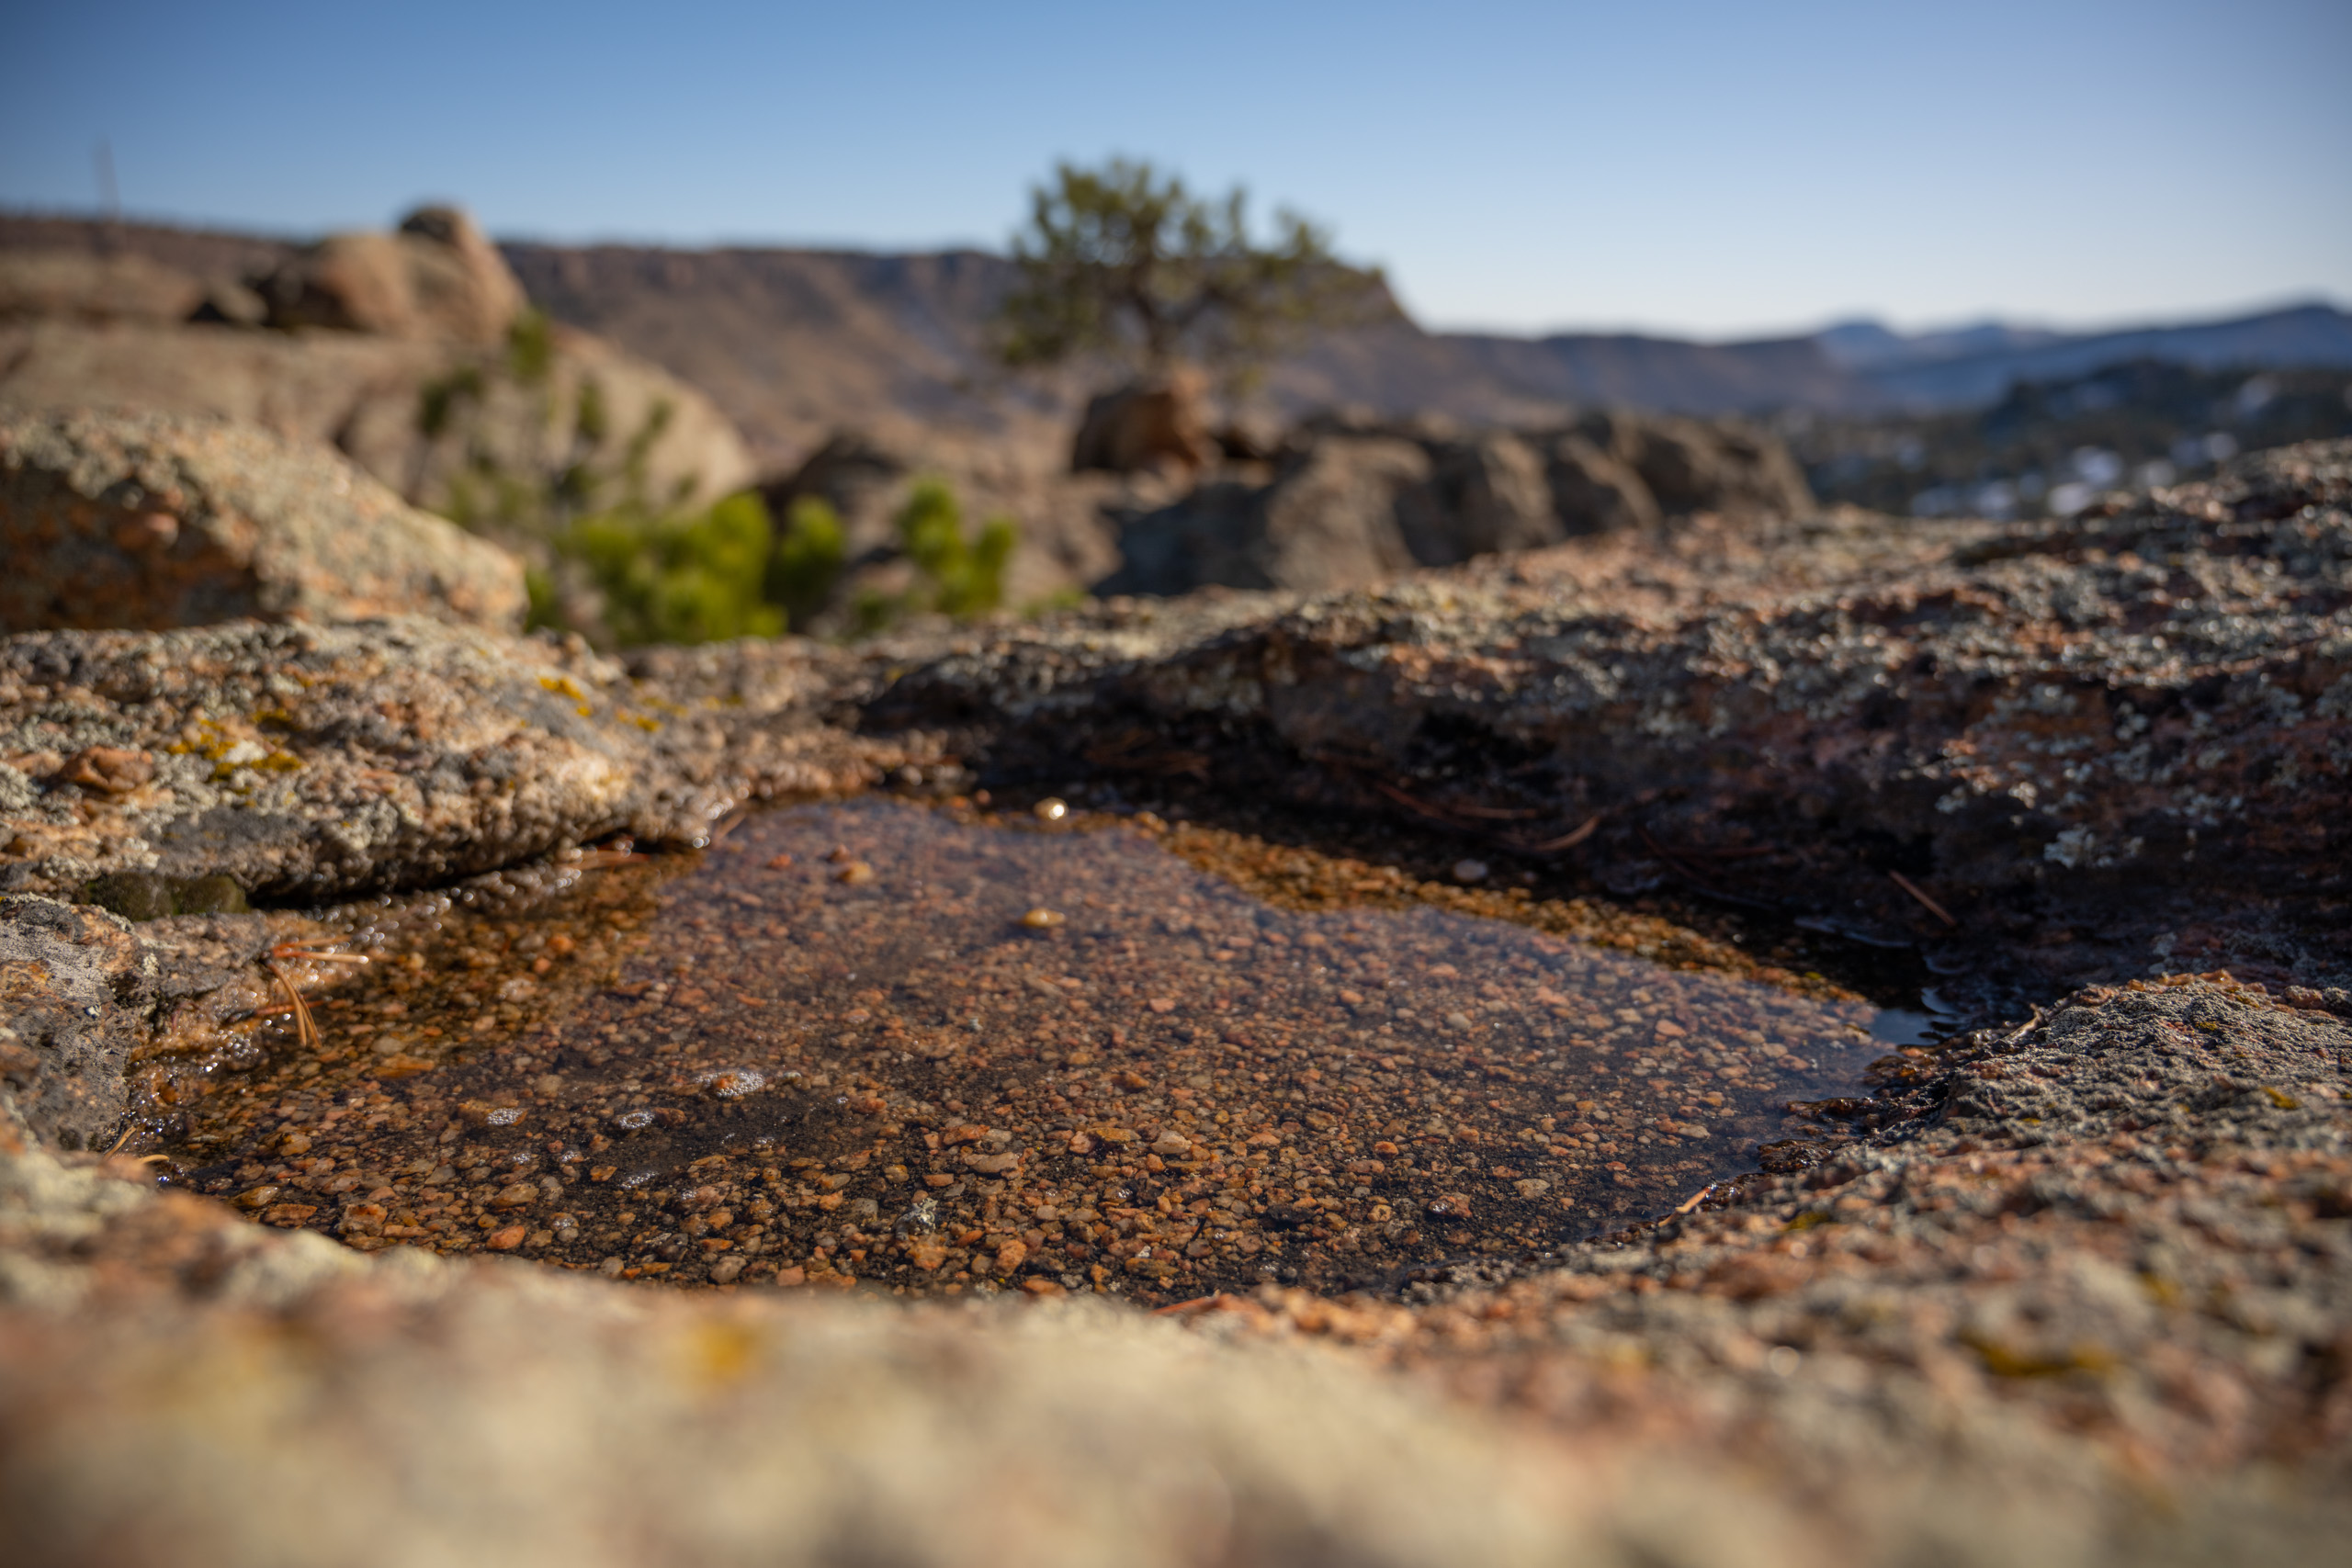
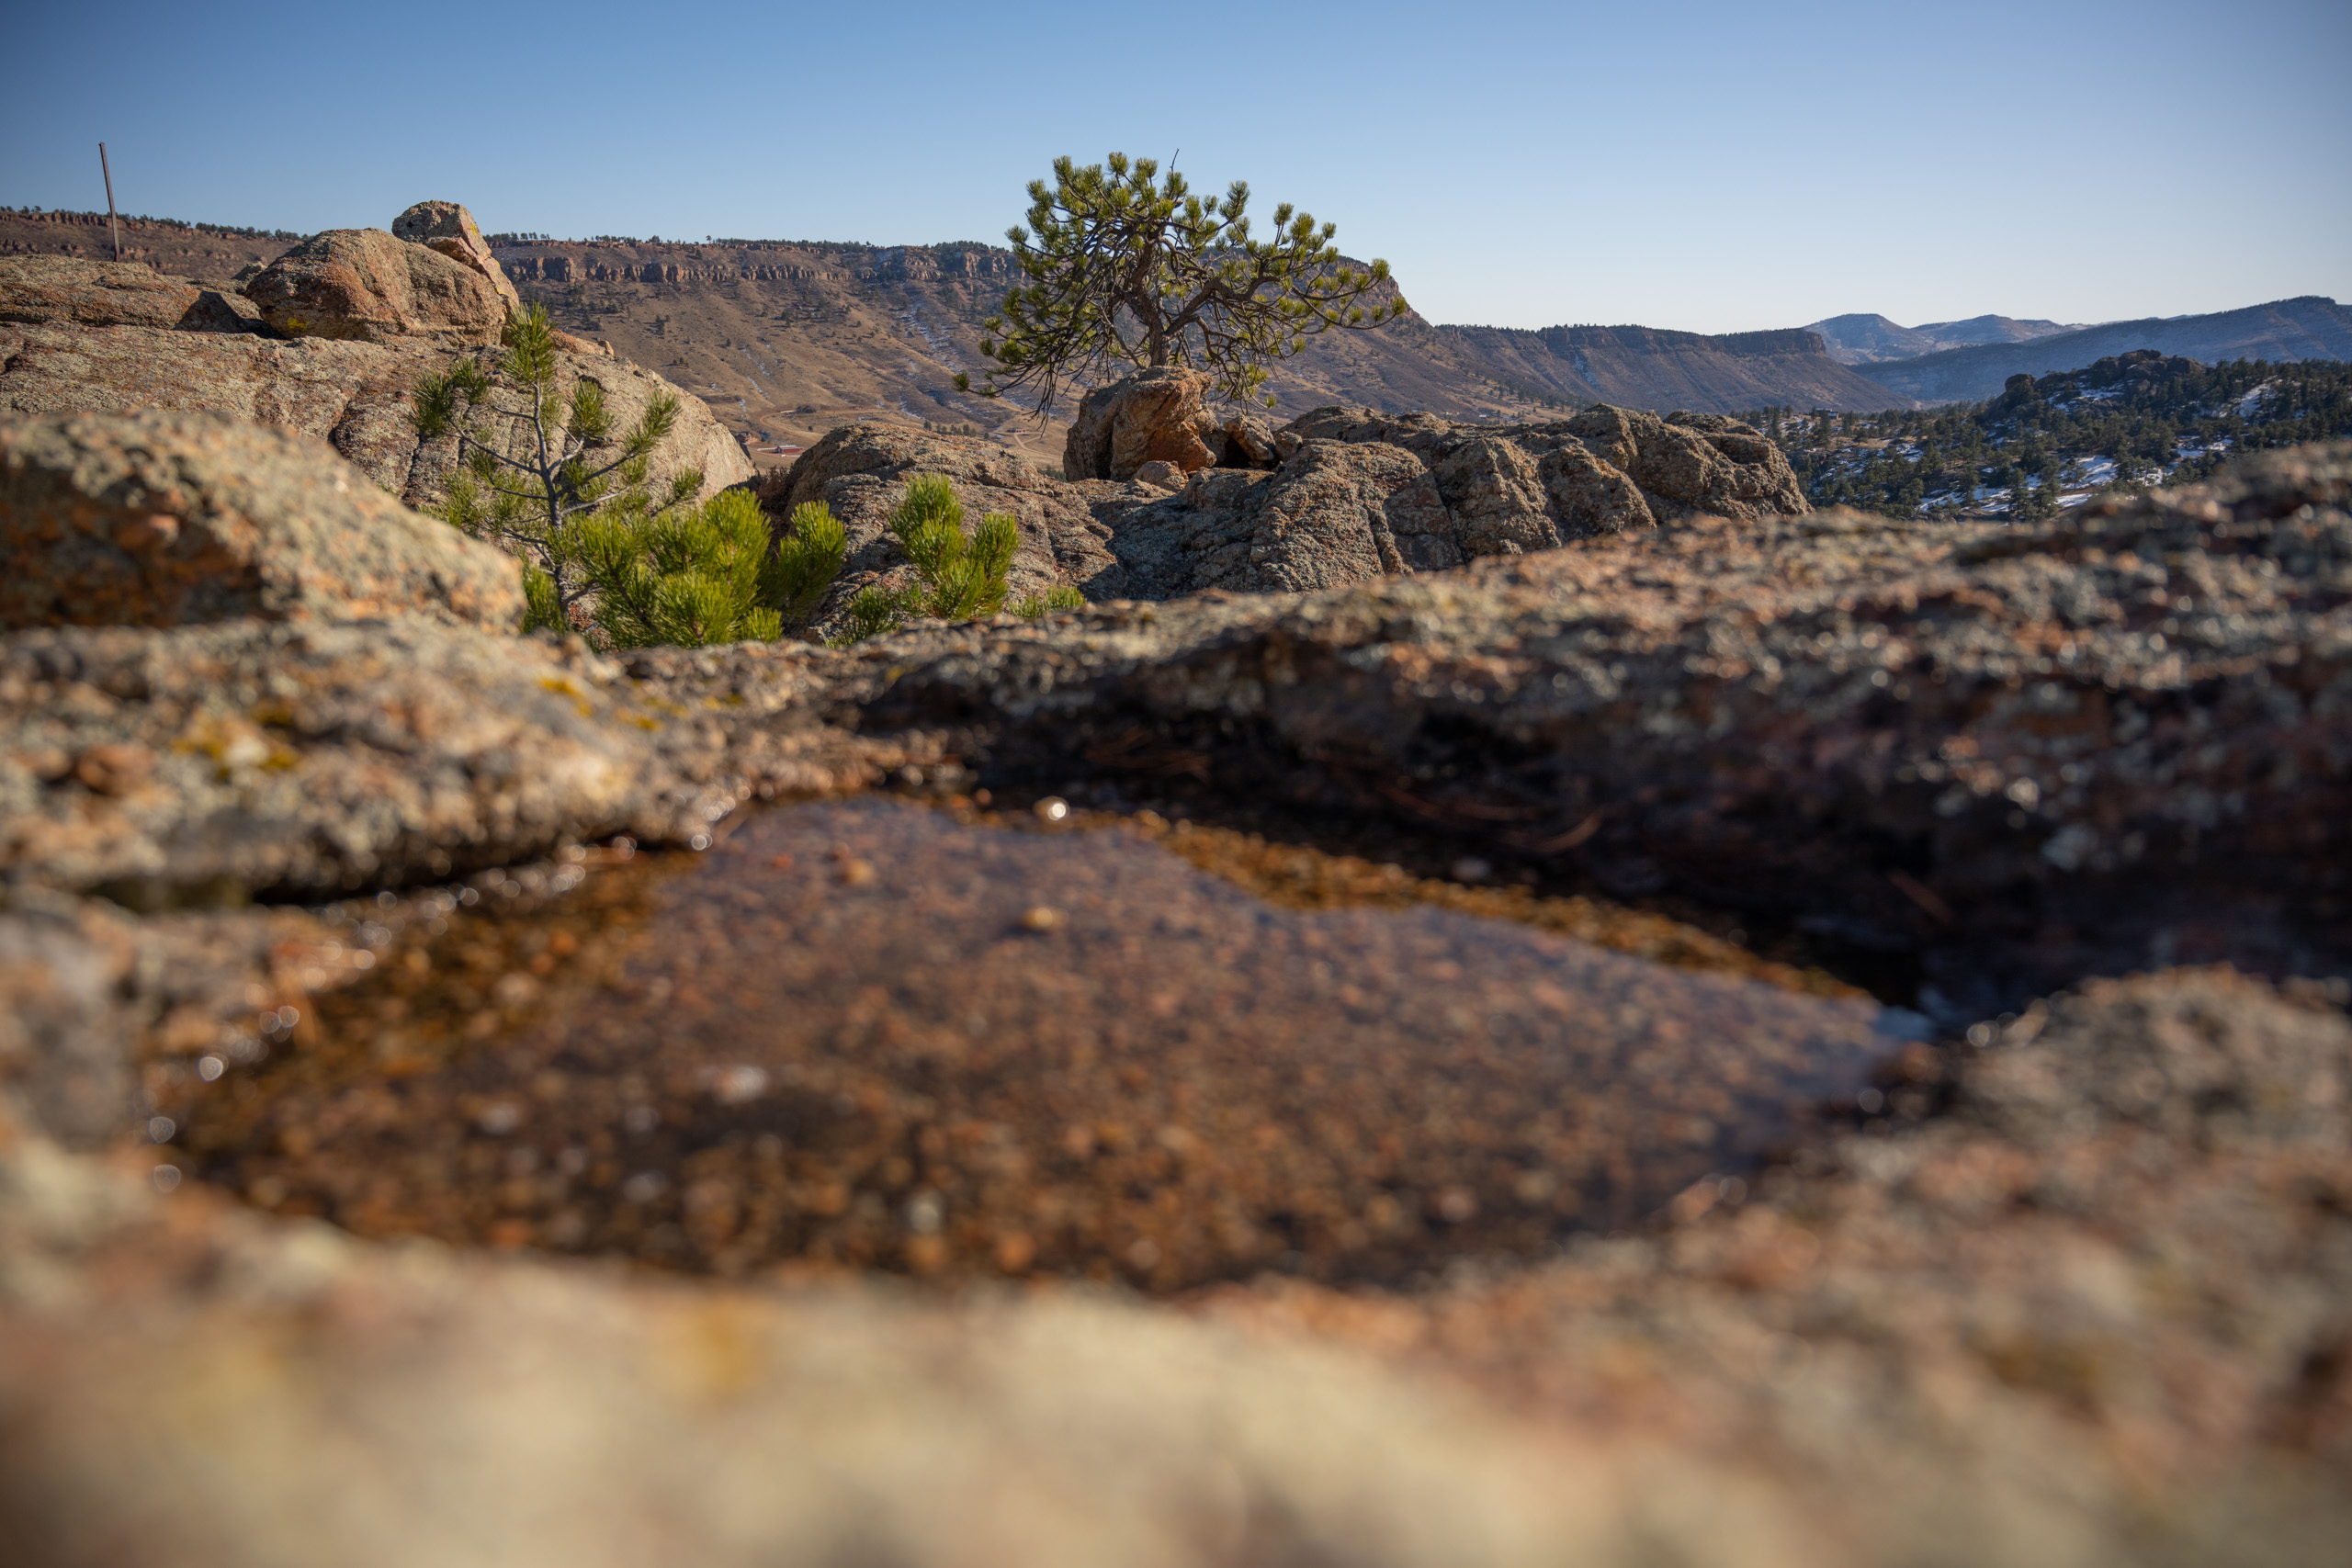
Landscape scene with a narrow depth of field with focus close to the lens (left) and near infinity (right).
In the figure above, we see the same scene shot at an aperture of f/4 with the focus adjusted to the foreground (left) and background (right). Because of the narrow depth of field, a portion of the image is always out of focus. This depth dependence of the sharpness is a key characteristic of depth-of-field-related issues.
How Can We Manage It?
First, note that we don’t necessarily have to manage anything. In fact, in many genres of photography and many artistic situations, a shallow depth of field is highly desirable. Blurring image subjects outside the primary focal plane can be a very effective way to soften potentially distracting image elements and strengthen a composition. The tree in the middle ground above, for example, is less distracting in the image at left when it’s a bit out of focus. There are some places, though, where a wide depth of field is often desired, such as in many landscape photographs.
Narrow Apertures
One way to increase the depth of field is to use a narrower aperture. In many situations, this is a simple and effective technique that yields great results. Experiment a bit, though, as moving to an aperture that’s too small can have adverse side effects such as defocusing (resulting from the lens design) and diffraction (which we’ll cover in an upcoming article). Also, with a limited amount of light available, a narrow aperture can translate into either substantial exposure times (necessitating the use of a tripod to avoid camera shake) or high ISO values (which, as we’ll see in an upcoming article, can also lead to an effective loss of sharpness).
This also might leave you wondering at what distance into an image to set your primary focal plane. The hyperfocal distance can be a great starting point (see here or here). But there are other possibilities worth having in your quiver.
Focus Stacking
If you’ve got the tripod out anyway, there’s an alternative technique you might consider, focus stacking. The idea is to take a series of images with the focal distance adjusted slightly between each so that the sharpest parts can later be blended into a single photograph. Many modern cameras provide an automated way to do this. On the Nikon Z 7, for example, Focus Shift Shooting is an option on the Photo Shooting Menu. Once familiar with it, it only takes a few seconds to specify the size of the focus step and number of images you need. The camera can, then, snap an entire series of focus-stacked images for you in rapid succession.

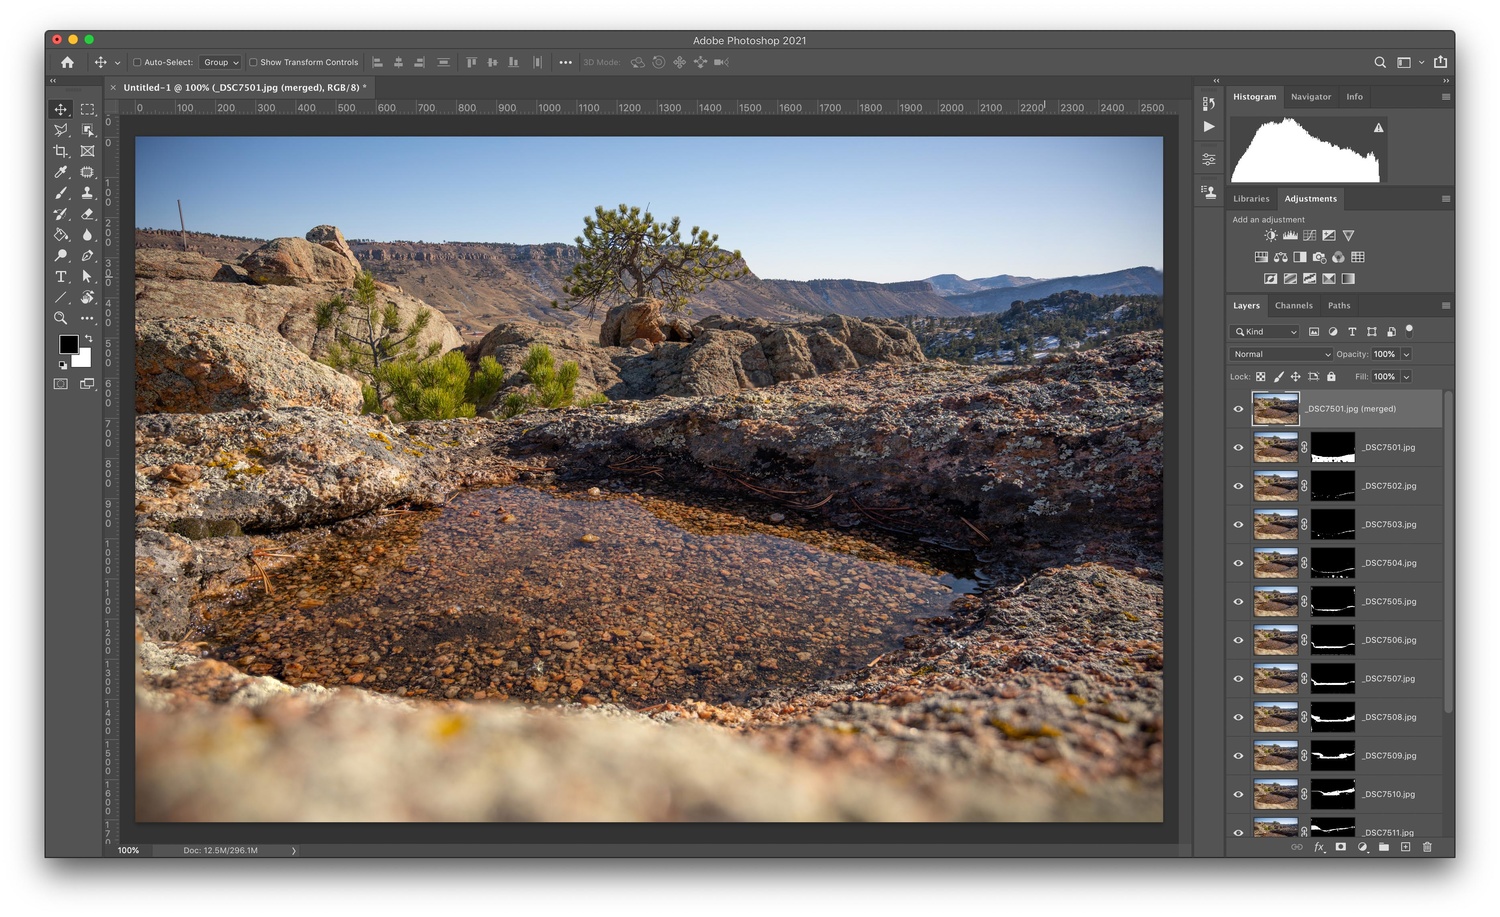
A focus-stacked image in Photoshop.
Combining the images using Lightroom and Photoshop is straightforward. First, make any necessary adjustments to one of the images in Lightroom, then copy the settings and paste them across all other images in the stack so that they have identical exposure settings and color correction. Select the images in Grid View and right-click, then from the context menu, select Edit In > Open As Layers In Photoshop…
Once in Photoshop, select all of the layers and choose Edit > Auto-Align Layers…, then Edit > Auto-Blend Layers…, selecting the Stack Images Blend Method on the resulting dialog. Photoshop will automatically create layer masks, highlighting the sharpest layer to use for each portion of the final image (see figure above), as well as creating a final merged layer for you. In the focus-stacked image above, for example, everything is in sharp focus from the minimum focus distance of the lens out to infinity.
That’s five factors influencing sharpness down. In upcoming articles, we'll look at six more factors that can affect image clarity. If you have any tips or tricks we’ve missed, let us know in the comments!


Should be noted that the auto blend function in photoshop is very hit or miss when it comes to results, at least in my experience. Great article Brent.
Great point! Trust but verify....
Thanks for this article! Always glad to learn more!
Topaz Sharpen Ai really comes in handy for some shots.
Informative piece one thing that might be a help to some of the lesser experienced is the importance of a good lens filter and camera cleaning routine. Working as a photo guide one thing that is common is photographers that have never had their sensors cleaned let alone their glass.
Amen! Great point.
Very helpful and clear articles, thank you very much.
I set up my cameras to have a telephoto shootout between my Pentax KP with 55-300mm and my Nikon D750 with Nikkor 200-500 lens. The D750 would win hands down, or at least I thought. Both cameras were set to same focal length, f-stop, time, ISO. I shot a target about 200 yards away, a house with pine trees, brick, other trees, stained wood, a complex winter scene with snow and overcast. I focused both cameras manually and auto, on tripod, no vibration compensation, no in camera processing, remote shutter, mirror up, electronic and manual shutter for Pentax. Both images were very similar except when zoomed in to 100%, then sometimes one camera was not sharp and other times it was reversed. After some time I noticed that the atmosphere effects were causing heat ripples in the image. I could see this in live view and that explained what was happening. So, I have come to realize that atmospheric effects can overwhelm the best camera, lens, or any precaution to get a sharp image. The atmosphere is part of the lens. So now when I shoot telephoto at some distance and I want the sharpest image I shoot multiple shots and hope one is sharp.
Great segue Theron! We'll be covering that one in the next article!
The very first thing I noticed, before I even read the name of the article, is that the header image is way over-sharpened.
Helicon Focus is excellent for stacked photos.
Thanks Paul! Only an occasional practitioner so wasn't sure what the best tool for the job was for more serious users. Sounds like you would agree with Alex, that if that's your bread and butter, it may be worth investing in something beyond Photoshop...
Interesting that stopping down for more depth-of-field is mentioned, when the current craze, espoused by Fool Frame Fanatics, is for extreme selective focus.
It's worth noting that µ4/3rds cameras have both better "vibration stabilization" due to their smaller sensors, and greater depth-of-field.
"Fool Frame"? Good one :-)
One of those really useful articles, even for non-beginners. Something not often seen on this site. Would you mind to explore a relatively rare case of a soft focus in an architectural photography using a high-resolution cameras like D850 and good primes, when you have a really tall building, focus at the bottom of it and have a top part not in focus? I keep my lenses parallel, and yet have to focus stack.
Hey German!
Without knowing your precise setup, a couple of possibilities occur to me: is the lens focal plane really perfectly parallel to the building? If it's a tall building, then even a slight tilt could cause the top to be in a different focal plane than the bottom. Have you tried a tilt-shift lens?
The other possibility that comes to mind is something discussed in the blog post by Roger Cicala that I linked to in the first article. The focus field of your lens may be curved so that the edges of the frame are in sharpest focus at a slightly different position than the center (Roger was seeing this even in high-end professional lenses). That, too, could cause the results you're seeing --- and would be fixed by focus stacking. You can check out Roger's post here:
https://www.lensrentals.com/blog/2019/10/things-you-dont-know-about-stop...
I'd be interested to know what you think relative to the issues you're seeing once you've given that a read through!
Well, I am normally using a tripod and try to level the camera carefully. Of course, slight misalignment is still possible. Yes, I am now aware of field curvature, but I've been seeing this with several primes and always at the borders (haven't checked middle areas very closely, though), so this makes me thing there is something else. My initial silly idea was that horizontal distance is much smaller than that diagonal to the top of the building, but then the focus would be miles off :-) So maybe camera misalignment together with field curvature results in what I see.