
Ever gotten your images off the camera, zoomed in to 100%, and been a little disappointed with the results? Ever had a hard time figuring out what went wrong? In this series, we’ll look at the primary causes of poor clarity and how to address each. With a little practice, you’ll be able to glance at an image and know how to fix it.
In this series, we’re going to look at 11 different factors that can affect image sharpness, from the design of a lens to the ISO setting you choose to shoot at. We’ll provide an explanation of the underlying cause(s) of each and example(s) of what they typically look like in the final image. We’ll also suggest ways to remedy each the next time you’re in the field.
We’ll start with some of the most common factors affecting image sharpness and work our way through to some of the less common but no less important issues that can adversely impact image clarity. The first three factors will be covered in this article with the remaining factors covered in the coming weeks.
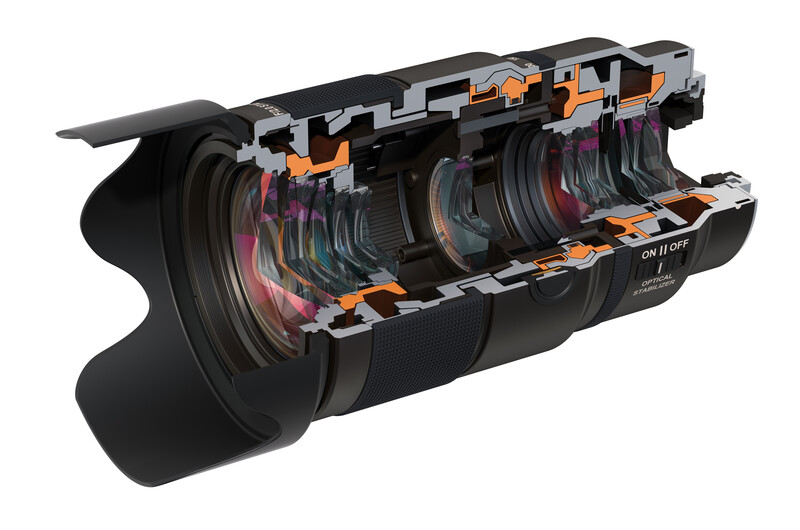
Optical Design of the Lens
One of the most significant factors affecting image sharpness is the design and assembly of the lens. This constrains everything else that follows. Soft lens, soft image. Doing a little research upfront can impact the clarity of the images we produce for years to come.
What Actually Causes the Loss of Sharpness?
What causes a loss of sharpness in lenses? In short, aberrations. There are a half-dozen or so major types of aberration (defocus, field curvature, spherical aberration, chromatic aberration, astigmatism, coma) along with dozens of more subtle and complex ones. Aberrations are just ways that light rays from a single point source can fail to converge at a single location on the image plane (or fail to converge at the correct location). All lenses have aberrations; the question is simply to what degree.
Unfortunately, minimizing aberrations can be costly. The greater the degree to which we’d like to reduce them, the more complex, highly optimized lens designs are typically required; and the more likely those designs are to involve exotic lens element shapes, materials, and coatings. Both can run the cost of a lens up. Roger Cicala, over at LensRentals, has a great discussion of lens sharpness on his blog, including some actual example data.
The issues don’t stop at the design stage either. Imperfections in the manufacturing of lens elements and their assembly can also lead to a loss of overall sharpness. Good quality control can help significantly, but it’s expensive, and great quality control is really expensive. Each of these things: design, production, assembly, and quality control contribute to the overall cost of a lens and are why high-end, professional lenses can easily hit $10,000 or more.
What Does This Loss of Sharpness Look Like?
Different types of aberrations have different characteristic appearances. A lens design or assembly that’s poorly focused will typically yield an isotropic blur. Chromatic aberration causes the appearance of color bands. Coma creates comet-like tails. Etc.

How Can We Manage It?
On the one hand, these issues are kind of baked into the lens. We deal with many of them by doing our research before we make a purchase, by figuring out what’s important to us and what trade-offs we’re willing to make within our budget constraints.
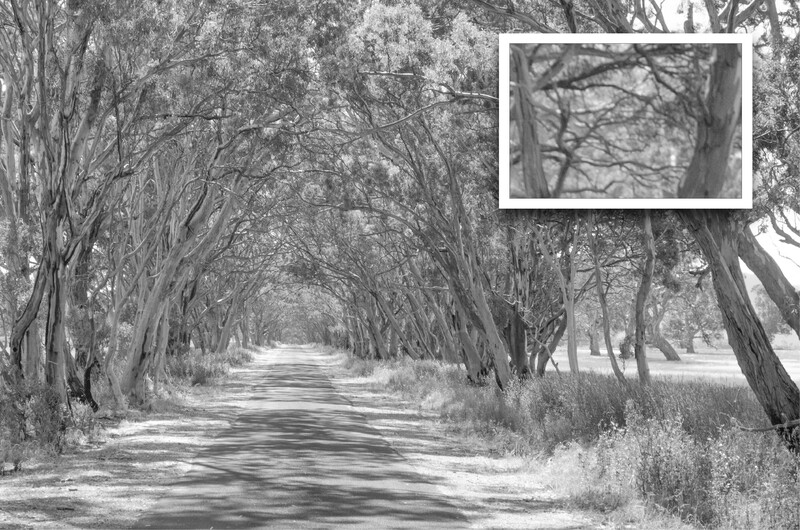
That said, we can almost always benefit from knowing the equipment we’ve got, where its individual pitfalls are, and how to get the most out of it. The overall sharpness of a lens, for example, tends to vary both with aperture and location within the field of view. When I get a new lens, I usually take a bunch of pictures of the built-in bookcases across the room from my desk. They provide a wide, largely flat surface with a ton of fine details. Running through the apertures from wide open to fully stopped down (taking two or three images at each and refocusing each time) usually yields a lot of useful information about the lens. I make mental notes about any apertures where the image sharpness starts to fall off, check out the corners, and make note of any softness or chromatic aberration. When I’m in the field, then, I know what trade-offs I’ll likely have to make to emphasize one aspect of image quality over another. I have a Nikon 24mm f/1.8G ED, for example, that’s tack sharp from f/2.8 up, but starts to suffer some degradation below f/2.5. If I want that extra light, I know I’ll be trading it for a bit of defocus in the final image.
Missed Focus
What Actually Causes the Loss of Sharpness?
There are a couple of main causes of missed focus.
Subject Motion Out of the Focal Plane
The first can occur when a subject is moving toward or away from the camera. If the subject is moving rapidly perpendicularly to the focal plane, the autofocus motor may not be able to keep up. Alternatively, the motor may be fast enough, but the camera may tell the lens to focus at the wrong distance at a point that lags the subject. Each time we make a shot, the camera needs to figure out what the current subject distance is, a process that information, direct the lens to move to that point, wait for the lens to get there, then release the shutter. By that time, the subject may no longer be in the same focal plane, resulting in a loss of sharpness.
Focusing Imprecision
The second cause of missed focus can happen even with a stationary subject. Just because we place a focus point over something in our field of view and engage the autofocus doesn’t mean that the camera body/lens combination necessarily focuses on precisely that distance. No autofocus system is perfectly accurate or perfectly repeatable. If you defocus a lens, then use the autofocus system to regain focus a few times, it will actually focus at a slightly different distance with each repetition. For a great illustration of this, check out Jim Kasson’s blog post. He compares the accuracy and precision of the autofocus systems on the Nikon D850 and Nikon Z 7. The D850 uses a standard phase-detection autofocus system with the autofocus unit completely separate from the sensor. The Z 7 uses an on-sensor phase-detect autofocus system in many modes and may back that up with contrast detection for fine-tuning. In my experience, the D850 is typically faster, sometimes significantly so. But Kasson demonstrates that that speed can come at a cost. The autofocus system on the Z 7 can be a bit slower, but it’s also typically both more accurate and more precise.
What Does This Loss of Sharpness Look Like?
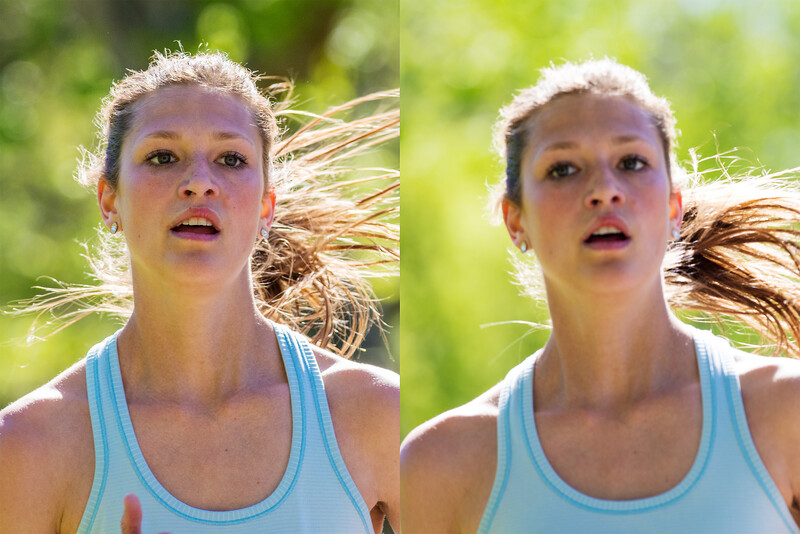
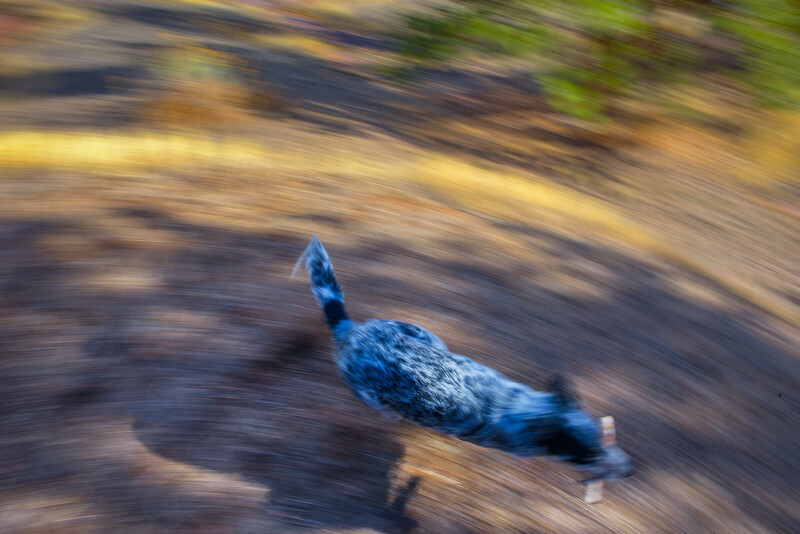
At the point of interest, the missed focus can look identical to defocus with the target simply appearing soft. If there’s another image plane in sharp focus, however, it will be apparent that there’s not an overall sharpness issue with the lens, just that the lens was at the wrong focal distance. In the figure below, for example, the runner is in sharp focus in the image taken first (at left). As she approached the camera, however, the autofocus motor wasn’t able to keep up, allowing her to run through the focal plane (right). The fact that her ponytail is in focus a few inches back is a clear indication of missed focus.
How Can We Manage It?
Higher-end camera bodies and lenses, especially those targeted at sports and wildlife photographers, will often have better processors and faster autofocus motors than entry-level models. Both can aid in tracking moving subjects. Many Nikon DSLR bodies also include a 3D predictive focus tracking mode that continuously adjusts the focal plane so that it follows the subject in real-time, predicting where it will be when the shutter is released rather than where it was when the measurement was made. In my experience, it is impressively good. (My apologies, I’m not personally familiar with comparable modes that may be available on Canon, Sony, or Fuji bodies.)
With respect to stationary subjects, some of the new mirrorless cameras may outperform their DSLR counterparts in accuracy and precision (though potentially with other drawbacks). Doing a bit of research and testing before your next purchase can help ensure you get a body that meets your needs in terms of the trade-offs between speed, accuracy, and precision.
Many camera bodies will also allow you to correct for slight front/rear focus issues on a lens-by-lens basis. This can improve accuracy in some cases, but rarely precision. To manage precision, I often take multiple shots, manually defocusing the lens slightly after each, then refocusing on the target. Doing this 3-4 times almost always yields some shots that are slightly sharper than others, allowing me to pick the best in post.
Subject Motion
We saw in the last section how moving subjects can cause a loss of sharpness as a result of missed focus. The movement of a subject within the frame while the shutter is open can also cause motion blur.
What Actually Causes the Loss of Sharpness?
If a subject moves while the shutter is open, a single point on the subject may end up projected across multiple pixels on the sensor. The longer the shutter is open, the more moving objects will be blurred. How much blur occurs depends on the speed of the object, the distance of the object from the camera, the focal length of the lens, and the duration of the exposure. The closer a subject is to the camera and the longer the lens, the more potential there is for motion blur.
What Does This Loss of Sharpness Look Like?
When it’s macroscopic in scale, this type of blur is trivial to spot. Subjects in motion relative to the camera sensor turn into long streaks. If the speed or direction of motion isn’t uniform, the streaks can form complex curves with varying color and luminosity along their length. This large-scale motion blur can actually be used to great artistic effect.
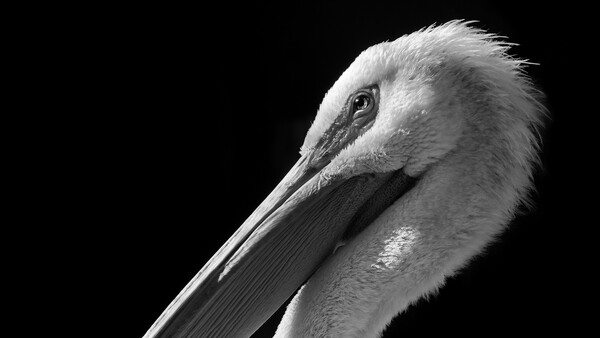
When motion blur is of a smaller scale, however, it’s rarely aesthetically pleasing. As the Nazca Booby below was preening itself, its bill was in nearly constant motion. The images below were shot just moments apart, both at 1/320th of a second. The image at the left shows how this motion can translate into a loss of sharpness. Focus on the detail around the eye. It’s soft with a characteristic look, an asymmetry, that’s readily identifiable with a little practice. The image at right, on the other hand, happened to catch a slow point in the motion, yielding a near tack-sharp image. (Both are 100% crops from much larger images.)
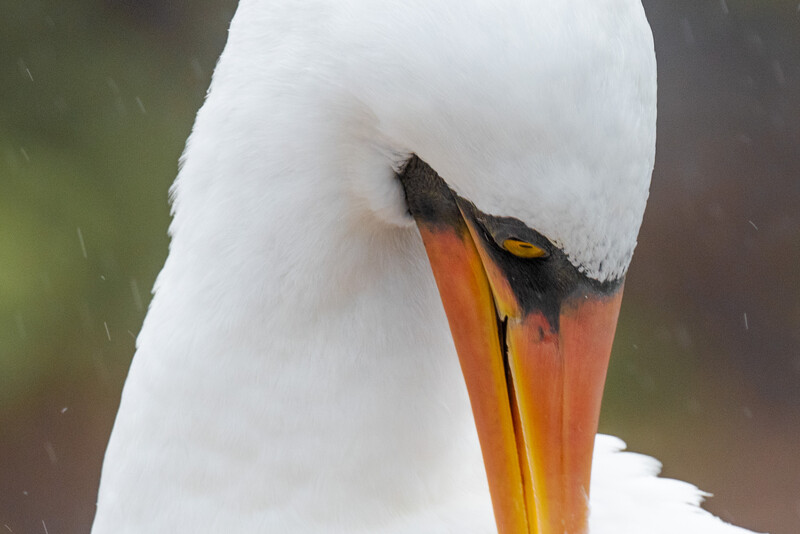
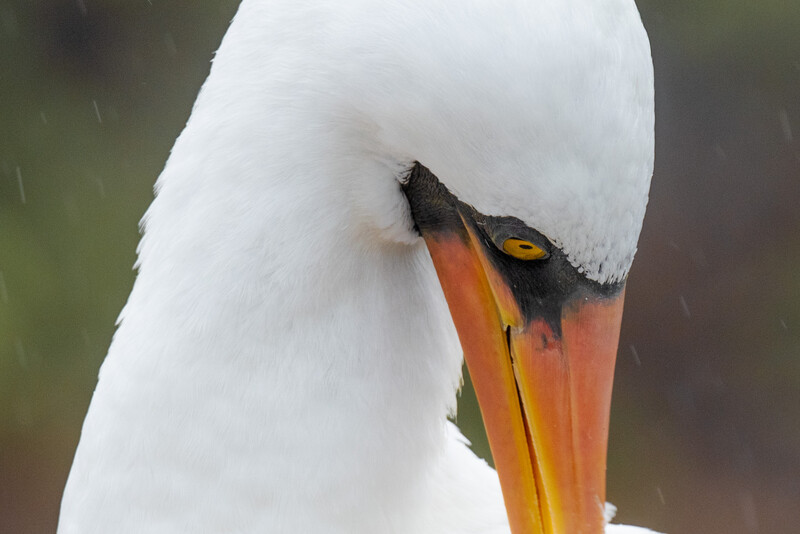
The motion of the head during this Nazca Booby’s preening led to motion blur around the eye in the image at left. The image at right, taken just moments later, caught a slow point in the motion and yielded a much sharper photograph. Both were shot at 1/320th of a second. (Isla Genovesa, Galapagos)
How Can We Manage It?
There are a handful of ways to manage motion blur.
Shutter Speed
The first is through the use of a faster shutter speed. The precise shutter speed required depends on the rate and direction at which the subject is moving, the focal length of the lens being used, and the distance the subject is from the camera. A walking human might require a shutter speed of 1/250th of a second, birds and many other animals at rest often require at least 1/500th of a second, and a bird in flight often necessitates 1/2,000th of a second or faster. Very fast shutter speeds put harsh limits on the amount of light that can be collected, however. This, in turn, can increase the amount of noise, which may also reduce the effective sharpness (as we’ll see in a later article). This is one reason you tend to see professional wildlife and sports photographers carrying massive lenses with huge apertures.
Multiple Shots
As alluded to above, a second way to manage motion blur is to take multiple shots. This obviously doesn’t work in some situations — trying to capture participants in a triathlon, for example, who are in constant motion. But for subjects undergoing varying or intermittent motion, such as preening, taking many images can often yield a few keepers even at relatively slow shutter speeds, allowing you to manage noise effectively.
Panning
One can also coordinate camera movement with the motion of the subject — such as panning as a bicyclist passes by. This doesn’t actually remove motion blur from an image but, instead, alters which parts of the image are affected by the motion blur. With a little practice, you may be able to keep a sprinting bicyclist or cheetah in sharp focus while allowing other parts of the image to blur. The effect can often improve the image composition by softening distracting details in the background.
Astrophotographers use the same idea, as well, albeit typically with the help of sophisticated equipment. Motorized mounts can pan a camera across the sky precisely in time with the movement of the stars so that hours long, rather than seconds long, exposures can be made.
In upcoming articles, we'll look at eight other potential factors that may affect image sharpness. If you have any tips or tricks for improving image clarity that we don't mention in an article, let us know in the comments!


Join the Fstoppers community for free
-
Post comments and join in the discussions
-
Browse the site ad-free
-
Share your work and get featured in the community
-
Compete in the photo contests for fun and prizes
No comments yet