

Ever pulled the images off your camera, zoomed in to 100%, and been a little disappointed with the results? Ever had a hard time figuring out what went wrong? In this series, we’re looking at 11 common causes of poor clarity and how to address each. With a little practice, you’ll be able to glance at an image and know how to fix it.
In the first article in the series, we looked at three common factors affecting image sharpness: the optical design of a lens, missed focus, and subject motion. In the second article, we looked at two more: camera shake and depth of field. In this article, we’re going to explore an additional pair of ways that images can lose a bit of their forceful clarity: noise and atmospheric distortion.
Noise
Noise? What does noise have to do with sharpness? Lots, actually.
What Actually Causes the Loss of Sharpness?
Noise is an indication of the amount of information available in an image. The more noise, the less information we have about individual pixel hues, saturations, and luminosities. And, perhaps most interestingly, the more noise an image has, the less information it contains about the spatial location of image features.

To see how, check out the figure above. The three left-most panels in the image have varying amounts of noise with standard deviations of roughly: 0%, 6%, and 15% of the mean luminosity moving from left to right. Notice that in the left-most panel the location of the boundary between the two shades of blue is well defined and readily obvious. With even a little bit of noise (second from left), the line begins to blur in a couple of places. At 15%, the standard deviation of the noise is greater than the difference separating the bands (about 10%) making it challenging to determine the shape or location of the original boundary with certainty.
Why does this happen? When noise is introduced, pixels to the left of the boundary can randomly end up darker and more saturated than pixels to the right of it, even though on average, the converse is true. In order to accurately determine the colors of the two bands, we need to average over a few pixels. The amount of noise in this average decreases as the square root of the sample size. So, if we do a simple box blur, the noise decreases in proportion to the length of the box side. The bigger the box being averaged over, the more accurate a representation of the true color the average represents. Yet, by averaging over a box, we also limit the scale of features that can be detected. To obtain a good estimate of the two colors in the image above, for example, it was necessary to average over a box with an edge length of 6 pixels. This limits our effective spatial accuracy to about that same scale. The same is true whether we do the averaging explicitly in Photoshop, or implicitly in the brain. Noise introduces uncertainty in both color and space. And this spatial uncertainty degrades image sharpness.
What Does This Loss of Sharpness Look Like?
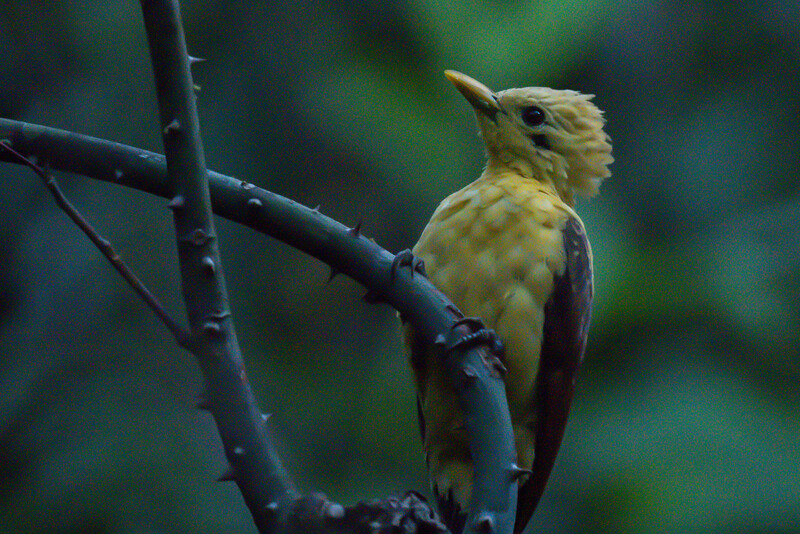
As a real-world example, the image below was shot at dusk at an ISO of 12,800. The raw, straight-out-of-camera image is shown on the left. Notice, first, that the bill appears tack sharp with a clear boundary. While there’s a substantial amount of noise in the photograph, the standard deviation of that noise is significantly less than the difference in color between the bright, cream-colored bill and the dark-green background. As a result, the boundary remains well defined.
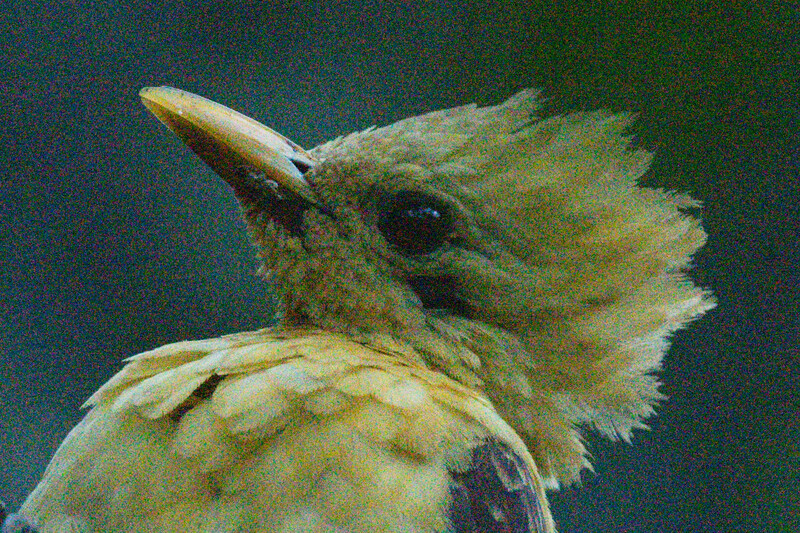
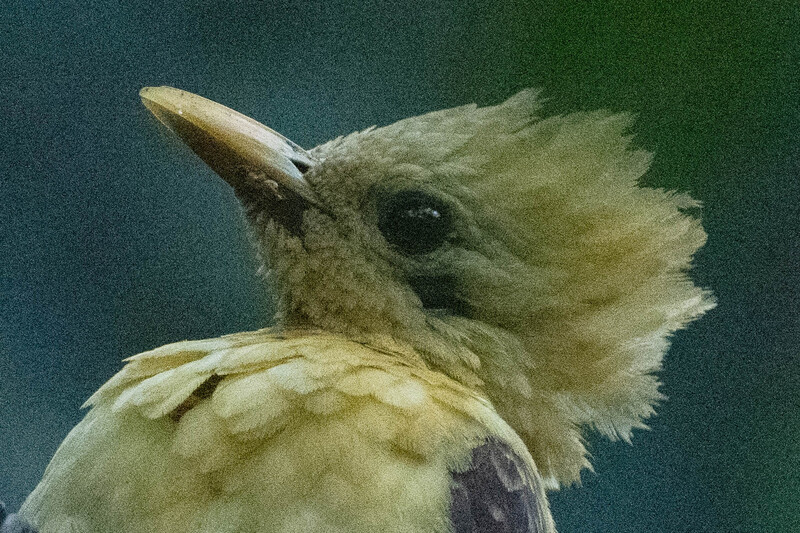
Left: Raw image straight from the camera at ISO 12,800. Right: With Lightroom’s default luminosity (0) and color (25) noise reduction. (Cream-colored woodpecker, Amazon basin, Ecuador.)
Just to the right of the bill, however, detail in the feathers is wholly missing, and even the precise boundary of the eye is hard to pinpoint. The color differences across these boundaries are much more subtle and, hence, overwhelmed by the noise. It’s as though the image has effectively been defocused, but by an amount that depends on the color difference across feature boundaries and the relative magnitude of the noise. The characteristics of this loss of sharpness are, thus, quite different from many of the other ways an image can effectively blur.
How Can We Manage It?
There are some options for dealing with this type of image degradation.
Be Aware of What You’re Shooting
One way is to be cognizant of the type of scenes we’re shooting at higher ISO values. Have you noticed that some scenes tend to suffer severely at an ISO of 6,400 while others turn out fine? As we saw above with the woodpecker bill, if color/luminosity differences are significant enough across feature boundaries, the image can retain its full sharpness even with significant amounts of noise. If color shifts are more subtle, though, details can be completely lost when the ISO is pushed. Keeping noise low relative to the color differences between important features is key to achieving tack sharp images; but because it’s all relative, you can often get away with more noise in higher contrast photographs.
Gather More Light
Anything that can be used to get more light on the sensor without adversely impacting other sources of noise or image clarity can help, including longer exposure times, wider apertures, and a full frame sensor. If a single long exposure won’t work, say because of the potential for camera shake, multiple exposures at a higher shutter speed can often be combined in Photoshop to reduce noise to levels commensurate with the total exposure time. There are a couple of nice introductions to this technique here and here. Some newer sensors also have better high ISO performance than older models.
Post-Processing
Finally, don’t hesitate to play around a bit with Lightroom or Capture One’s noise reduction settings. They aren’t ever a substitute for actually collecting more information in the field, but when you’ve already done everything you can on that front, they can sometimes allow you to optimize the use of the information that you do have.
Comparison of Lightroom Noise Reduction settings. Left: Luminance set to 0; Color set to 100; Right: Luminance set to 100; Color set to 0.
Beware, however, that first, you can go too far, and second, it’s worth paying a little attention to how the human visual system works. Neurologically, color information doesn’t need to be provided to our brains at near the resolution that luminosity details do. There’s a great example of this here. The converse experiment, at the end of this article, most definitely doesn’t work. Essentially, we can get away with averaging over the hue and saturation channels (above left) to a much greater extent than we can averaging over the luminosity channel (above right).
Atmospheric Distortion
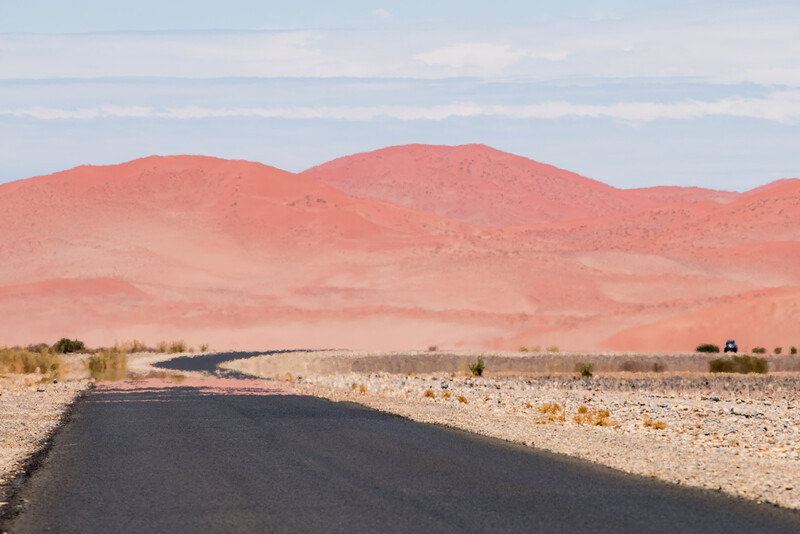
Ever have the feeling that you did everything right and you’re still not getting the results you’d hoped for? It might not be you. It might just be the air you’re shooting through. We’ve all seen extreme cases of this where the air over a hot road causes a mirage. But atmospheric disturbances don’t need to be nearly so obvious to wreak havoc on image quality.
What Actually Causes the Loss of Sharpness?
To understand what’s actually causing problems it’s necessary to understand a bit about optics.
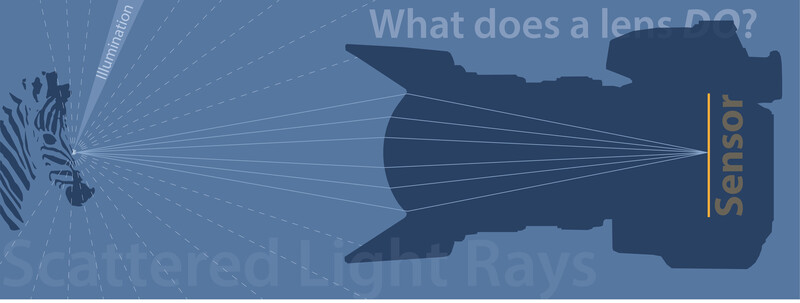
How Do Lenses Work?
When light hits a point on an object it tends to scatter from it in many directions. The job of a lens is to collect those rays, which all began at a single point in space, and bend them in just the right way so that they all cross again at another single point in space, ideally, right on the surface of the camera sensor.

Note that when discussing light waves, we talk about the index of refraction rather than the wave speed. The greater the index of refraction, the slower light waves travel. (If you really want to nerd out and find out why light waves change speed when passing through different media, check out this great video from the folks at Fermilab.)
Other Things Can Impact the Light Path Too
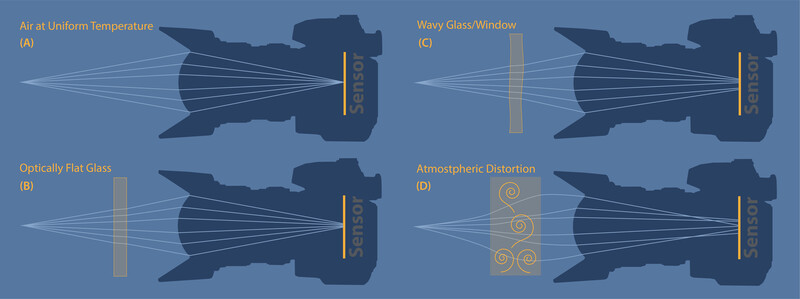
Lenses aren’t the only thing that can alter the light path. Water is another obvious example. So, too, does the UV filter that’s likely screwed onto the front of your lenses. In fact, the reason even a standard UV filter is so expensive is that it has to be extremely flat to avoid bending the light rays coming through it in different directions, depending on where on the surface they hit. Technically, a UV filter does cause light to focus at a slightly different point (see panel (B) below), but it’s still at a single point so that it’s easily compensated for by adjusting the focus slightly. Since autofocus is done through the same UV filter as imaging, you never even know the slight shift in focus has occurred.
On the other hand, you can see what happens when glass isn’t perfectly flat by taking a photo through a home or car window. Windows are transparent, but rarely all that flat (at least on the scales we’re talking about). The result is that there’s almost always some degradation of sharpness in images shot through standard glass. The imperfections in the surfaces act as soft, random lenses bending incident light rays by different amounts in different locations. The result is shown in panel (C) in the figure below. It’s not just that the light rays don’t necessarily focus on the sensor after passing through a window. It’s that they actually don’t all focus at the same point anymore. There’s nothing a camera lens can do to compensate for that. The result is that the image will always be a bit blurry no matter what the focal distance is set to.
Atmospheric Distortion
What does this have to do with atmospheric distortion? It turns out that the index of refraction of air, the wave speed of light in it, depends on the air’s temperature. As the temperature goes up, the wave speed increases, lowering the index of refraction. The result is that local changes in temperature can act like a lens, bending light rays. On a sunny day, for example, the layer of air right above the surface of a dark road may be significantly hotter than the air higher up. This can cause light rays to bend, just as they would moving through a lens (though in the opposite direction since the index of refraction is lower rather than higher). The result is a mirage.
Air rarely sits in nice, calm layers though. The air above a hot surface tends to form complex, turbulent, convection rolls that mix areas of hotter and cooler air. Because the refractive index varies with temperature, a ray of light passing through the convection rolls follows a circuitous path, bending one way and then another. Light rays initially heading off at even slightly different angles can experience very different temperature gradients. This can lead to significant distortions, as well as to what’s effectively a sinister type of ever-changing defocusing aberration, with light rays emanating from one point failing to focus again at any other single point (just like the wavy glass). Further, since the convection rolls are moving, they can even cause motion blur of a stationary object.
What Does This Loss of Sharpness Look Like?
It’s easy to identify severe atmospheric distortion. Edges have a characteristic wavy appearance and are often ephemeral and ghost-like, repeated multiple times. Atmospheric distortion is additive, as well, so that the further light rays pass from subject to sensor, the greater the possible magnitude of the distortion and blur.
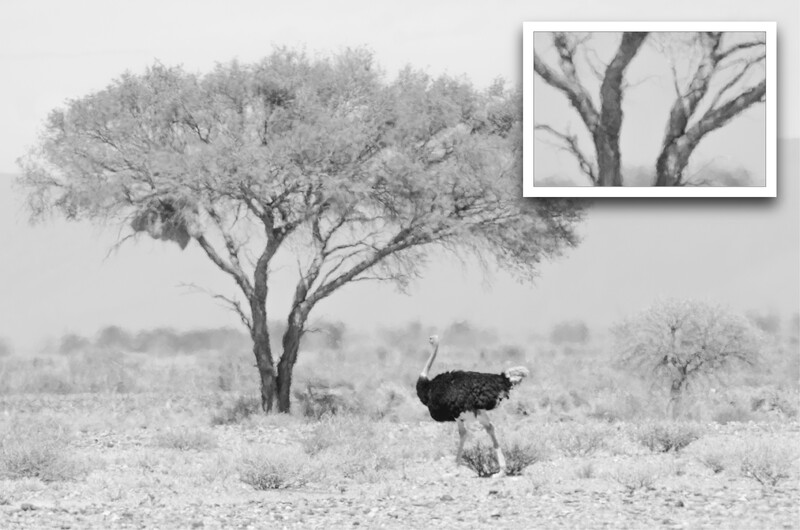
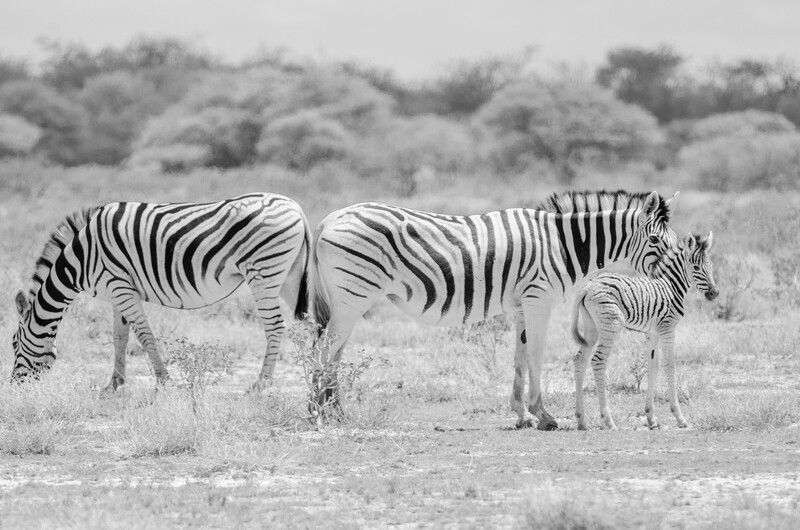
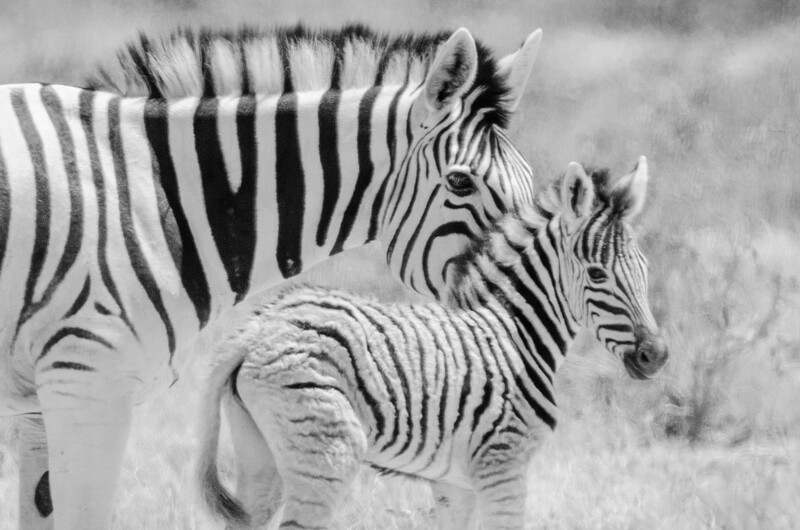
The potential presence of atmospheric distortion is fairly obvious in the distant trees, but far less noticeable, and more difficult to identify, in the foreground. Yet, its overall effect on the apparent sharpness of the zebra is dramatic. (Burchell’s Zebra, Etosha National Park, Namibia.)
How Can We Manage It?
Unfortunately, there isn’t all that much that can be done to mitigate atmospheric distortion from the typical photographer’s perspective, other than avoid it. Being able to recognize it is critical, however, so that time isn’t wasted trying to solve other problems you don’t actually have.
I do try to avoid making images on blisteringly hot days when possible or at least try to manage my expectations as to how they'll come out. It can also be useful to avoid shooting across particularly hot surfaces whenever possible, such as an intervening road or the hood of a car. Sometimes, a higher vantage point, say the roof of a safari vehicle, can help get you above the worst of the turbulence, but it also obviously changes the perspective of an image.
One final point of interest, it is actually possible to correct for atmospheric distortion using adaptive optics. A special array of lenses can be used to detect the curvature of a perturbed wave front. Once processed, this information can be used to drive a dynamic, deformable mirror placed in the light path to precisely compensate for the perturbations. There is a nice overview on Wikipedia. Unfortunately, this isn’t a technology typically available on your average hand-held body.
Alright, that’s seven factors influencing sharpness down. In upcoming articles, we'll look at four more factors that can affect image clarity. If you have any tips or tricks we’ve missed, let us know in the comments!


Join the Fstoppers community for free
-
Post comments and join in the discussions
-
Browse the site ad-free
-
Share your work and get featured in the community
-
Compete in the photo contests for fun and prizes
2 Comments
Hi Brent! Thank you for this great educational piece. I have a suggestion for a future article that would be worthwhile for many, I think: Improving low-light scenes in a "around the fireplace" setting. I have not come across a really tutorial for this difficult subject. Thank you, Vince
Thanks for this helpful article! Always happy to learn ways to improve!