
So much of photography is about capturing a moment, a place, a person, a glance, a tiny slice of history that is impossible to recreate. When we've only got one shot, we want to make sure we get it right. In this series, we’re examining 11 things that can lead to a loss of image sharpness, what causes them, how to recognize them, and what to do about them!
In the first article in the series, we looked at sharpness factors including the optical design of a lens, missed focus, and subject motion. In the second article, we touched on camera shake and depth of field. In the third part, we examined noise and atmospheric distortion. In this post, we’re going to dive into mirror slap and diffraction.
Mirror Slap or Shutter Vibration
What Actually Causes the Loss of Sharpness?
When I got my first decent telephoto, I spent hours photographing the pages of the travel adventure book I was then reading at our dining room table, comparing the results to those of the cheap zoom the new prime was meant to replace. I was not impressed, especially given the price differential. It took me quite a while to realize that the blur in the images — all taken from a tripod — actually depended on the shutter speed.
What?
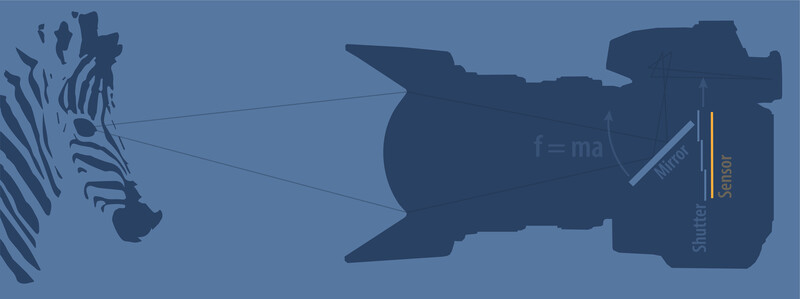
A DSLR allows us to peer through the same lens and focus settings that will be used to record the final image. This is made possible through the use of a mirror that diverts the image away from the sensor and up to the eyepiece. While this confers a lot of advantages, it also means that before an image can be made, the mirror needs to be moved out of the way (see figure above). That means that each time the shutter release is pressed, two things physically happen in the camera: the mirror undergoes a 45-degree rotation up and out of the light path, and the shutter slides aside to expose the sensor. Both actions require the sudden acceleration of the internal parts of the camera. The Slow Mo Guys have a great video showing, at 10,000 frames per second, what happens when the shutter is released. The motion is surprisingly violent.
Now, remember Newton’s Third Law, the one about equal and opposite reactions? Anytime we apply a force to start or stop the motion of the mirror or shutter, there’s an equal and opposite force placed on the camera body. That force is enough to incite vibrations in the camera and lens. When those vibrations are amplified by a long telephoto, they can result in multi-pixel swings in the field of view.
What Does This Loss of Sharpness Look Like?
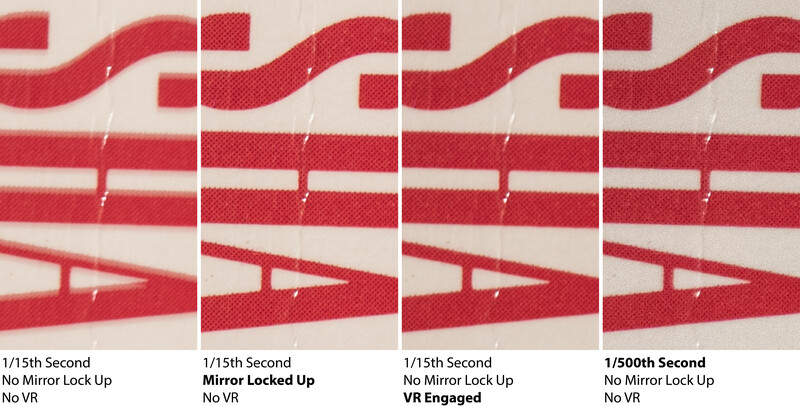
Mirror slap basically causes a small amount of camera shake so the effect on the resulting image is essentially the same, with the caveat that the motion is often of smaller amplitude and more regular. An illustration of the effect of mirror slap can be seen in the figure below, taken with a 500mm lens at 1/15th of a second. Note that the direction of the blur is primarily vertical since the mirror is constrained to move vertically.

We can see what's going on in more detail in the image below, taken by Jerry Lodriguss. Lodriguss was making an exposure of the night sky when he happened to capture a satellite moving through the field of view. The path of the satellite inadvertently left a trace of the lens vibration in the photograph.

Two-second exposure of the path of a satellite. The apparent rippling of the satellite path is caused by the vibration of the lens. Image by Jerry Lodriguss | www.astropix.com
In this image, the total length of the exposure, and therefore satellite trail, was two seconds. From this, a quick measurement in Photoshop suggests the period of the vibration is about 0.1 seconds, corresponding to a frequency of about 10Hz. In general, the amplitude and frequency will vary a bit from lens to lens and body to body.
How Can We Manage It?
Mirror Lock-Up
Ideally, we’d like to prevent the issue from occurring in the first place. The options available depend on the camera body. Higher-end DSLRs often have a mirror lockup feature that allows the mirror to be retracted with one shutter press and the shutter, itself, released a few seconds later with a second press. Using a remote shutter release ensures that the act of pressing the shutter release doesn’t cause even worse vibration. Additionally, some DSLR bodies have an electronic front curtain shutter that pre-opens the first shutter curtain to eliminate a second potential source of vibration. The impact of locking the mirror up is shown in the second panel of the figure below. All images were taken from a tripod mount with a Nikon D810 body, Nikon 500mm f/5.6 PF ED lens, and remote shutter release.
On mirrorless bodies, there’s by definition no mirror to worry about. Many mirrorless bodies also have a silent shooting mode that uses an all-electronic shutter. In that case, there shouldn't be any mechanical movement to disturb the image at all, with the potential exception of the vibration reduction or in-body image stabilization system, though, as we’ll see in a moment, these aren’t necessarily bad. Do note, however, that the use of an electronic shutter can lead to rolling shutter effects and may not be desirable for situations with fast-moving elements in the scene.
Vibration Reduction
Image stabilization systems within the lens or camera body may be able to mitigate the worst effects of mirror slap. The image in the third panel in the figure above was taken at 1/15th of a second without the mirror locked up, but with the lens' vibration reduction system engaged. While not quite as tack sharp as the image with the mirror locked up, the VR system is impressively good at removing mirror-slap-induced vibration. The VR system has the added benefit that it can also obviate much of the need for a remote shutter release.
Exposure Duration
The effect of mirror slap is most pronounced when using a long telephoto lens at relatively slow shutter speeds. Yet, when shooting with a long telephoto, we’re likely to be making relatively short exposures for other reasons, such as to avoid camera shake or subject motion blur. In such cases, a mirror slap is rarely a significant issue. In fact, as long as we stay away from shutter speeds near the resonant period of the lens, the effect of the mirror slap is likely to be minimal.
What exposure durations should be avoided? Recall that in the image above we were able to calculate that the period of the vibrations was roughly 1/10th of a second. A 1/10th of a second exposure, then, would capture the entire first period of the vibration. Even at 1/20th of a second, the full range of motion could be recorded. In fact, since the initial amplitude of the motion in this example is 7 pixels, an exposure time shorter than roughly (1/7) x (1/20) = 1/140th of a second would be needed to remove pixel-scale blur. This time varies from lens to lens based on the amplitude and period of the vibration but is a pretty reasonable ballpark estimate.
An image shot at 1/500th of a second is shown in the right-most panel above. From the perspective of the mirror slap, the image is effectively as sharp as the one taken with the mirror locked up. Notice, however, that because of the far shorter exposure time a much higher ISO value was needed and, as a result, the noise level is substantially greater (which, you might recall from an earlier article, can also cut into the effective sharpness).
On the flip side, longer exposures may yield acceptable results as well. The satellite trail represents a duration of two seconds. Most of the motion, however, appears to be damped out after about a second, with the worst of the vibration gone after the first half second. If a four-second exposure were made, the worst of the vibration would, therefore, be limited to one-eighth of the total exposure time, with the vibration induced blur roughly three stops fainter than the image features. A 32-second exposure would reduce the intensity of the blur by three additional stops. Again, these are only estimates, but are likely pretty good starting points.
Diffraction
The next factor affecting sharpness crops up when we try to use small apertures. You may have noticed that when it comes to sharpness, there’s a sweet spot in the f-stop range. There are a number of reasons for this, but one of them has to do with something called diffraction. When an image is made at a very small aperture, diffraction can lead to a significant loss of both local sharpness and overall image contrast.
What Actually Causes the Loss of Sharpness?
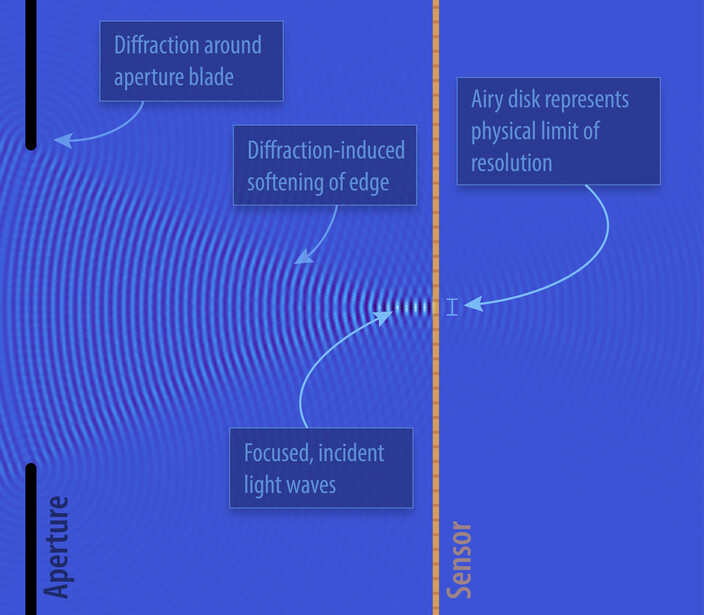
In an earlier article in the series, we saw how light actually propagates as a series of waves. Because of this wave behavior, edges often end up acting, effectively, as a secondary source of waves radiating out uniformly in all directions. This effect is known as diffraction. In a camera lens, the aperture blades can act as just such a set of diffraction-inducing edges. Each causes a small amount of light that was otherwise focused at a single point on the sensor to diffract off in other directions. The interference of these waves places fundamental limits on the maximum physical resolution that can be achieved. The smallest region that diffraction-limited light can be focused down to is called an Airy disk. The size of this disk depends on the diameter of the aperture.
At wide apertures, as in the figure above, the diameter of the Airy disk is relatively small. As the diameter of the aperture is decreased, however, the size of the Airy disk, the fundamental limit of resolution, increases. In the figure below, the diameter of the aperture is decreased by a factor of two which results in the diameter of the Airy disk increasing by a factor of two.
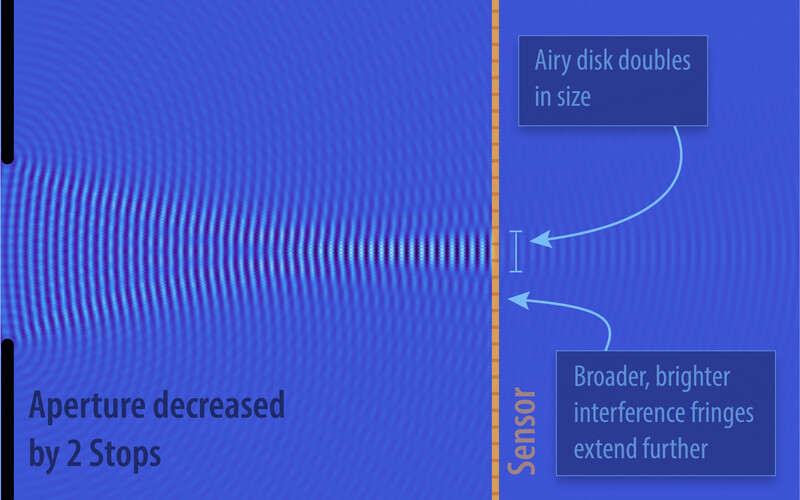
When the diameter of the Airy disk exceeds the pitch of a pixel, the image begins to blur. This is accompanied by an increase in the brightness and extent of the interference fringes beyond the Airy disk as well. These larger-scale features cause a broader, overall loss of contrast in addition to a local decrease in sharpness.
What Does This Loss of Sharpness Look Like?
Both the loss of local sharpness and the decrease in overall image contrast can be seen in the image pair below. The two images were taken from the same location and focused at the same distance, with an aperture of f/4 used in the image on the left and f/22 used on the right.


Impact of diffraction at small apertures. Left: f/4. Right: f/22.
Notice the specular reflection on the small stone at the center-left of the image. In the f/22 version of the photograph, diffractive light streaks are clearly visible to the upper right of the highlight, extending for 30 pixels or more. That same diffraction is happening at every single point in the image; it’s just not so glaringly obvious in most places. Instead, it contributes to a more subtle loss of image contrast.
How Can We Manage It?
The sweet spot in the aperture range for most lenses is somewhere between f/5.6 and f/8. More depth of field can be eked out beyond that, but it starts to come at the increasing cost of lost sharpness and contrast. If that depth of field isn’t specifically needed, the middle range of apertures is likely to yield sharper images. If you do need the broader depth of field, focus stacking may serve as a useful alternative to decreasing the aperture. Focus stacking was discussed in an earlier article in the series in the section on depth of field.
Have we missed anything? Do you use other techniques to help mitigate these losses of sharpness? Let us know in the comments below.
Astrophotography image used with permission.


Join the Fstoppers community for free
-
Post comments and join in the discussions
-
Browse the site ad-free
-
Share your work and get featured in the community
-
Compete in the photo contests for fun and prizes
3 Comments
As a tech guy I love this series (and of course the previous ones), I hope to see more of Mr. Daniel's work!
I hate to be a stickler but I only count 9 topics so far. Is another article forthcoming? Perhaps I liked the first 9 so much that I'm looking forward to more from this author.
Ha! Hi Mike, yep, we'll be covering 10 and 11 in the next article...