
It's what a tilt-shift lens was born to do. Learn how to straighten up your leaning buildings with this simple technique and never have a parallax problem again.
When shooting architecture, especially when you need to get up close to the building from the ground, you'll notice that the buildings all mysteriously seem to be leaning back away from you in the photos. Why does this happen? Well, it's all to do with height. If you're on the ground floor and the building is much taller than you, then the top part is farther away and therefore appears to converge into a central point. This effect is more exaggerated when shooting on a wide-angle lens and particularly when you're shooting close to the subject.
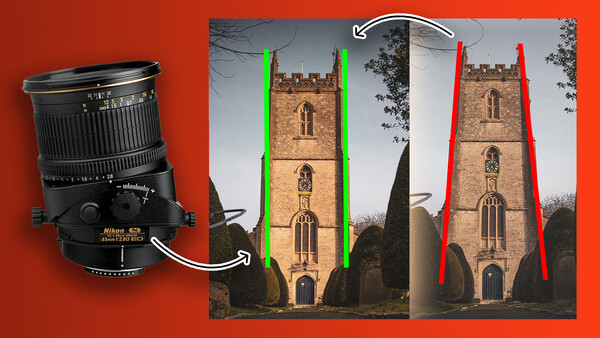
To counteract this we can use a tilt-shift lens that literally shifts the glass inside the lens to correct for this distortion. It appears to make one half of the frame wider and thereby straightens the converging lines (also known as the parallax effect or parallax distortion). It's also possible to correct this in editing software, but getting it right at the source is usually the best approach. If you're an architectural photographer, or want to get into it, a tilt-shift lens might be your next best purchase. Sadly though, tilt-shift lenses are manual focus and fixed focal length (at the time of writing) and are quite expensive. However, their optics are incredible and the Nikon 45mm f/2.8D tilt-shift lens I'm using is insanely sharp and built like a tank. Move the slider in the before/after below to see how a quick shift from the lens can correct the problem.
Get Set Up
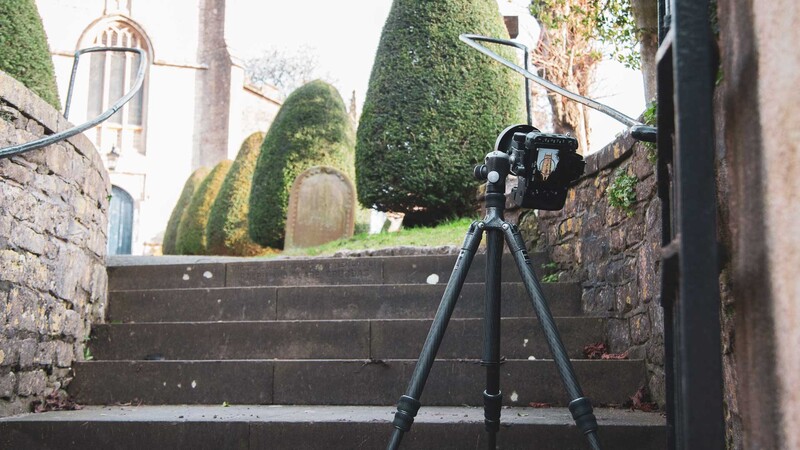
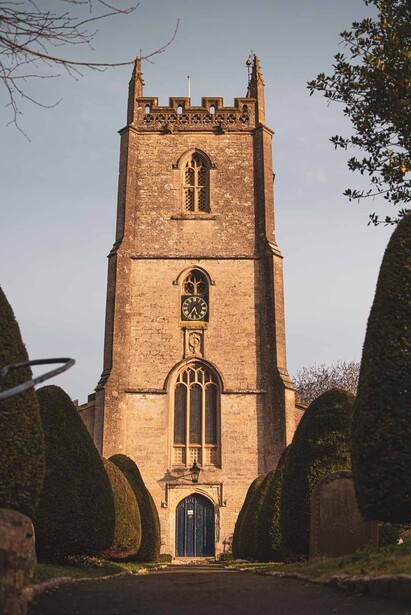
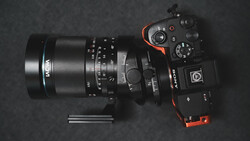
To shoot my scene I set my Nikon D750 on my Gitzo traveler tripod to keep everything steady and then composed my shot of this old church by placing the camera at the bottom of the steps. At a low vantage point, I could now fit the whole church into the frame with a wonderful leading line provided by the path and trees in the bottom of the frame. I shot this on a Nikon 45mm f/2.8D tilt-shift lens.
Keep It Level
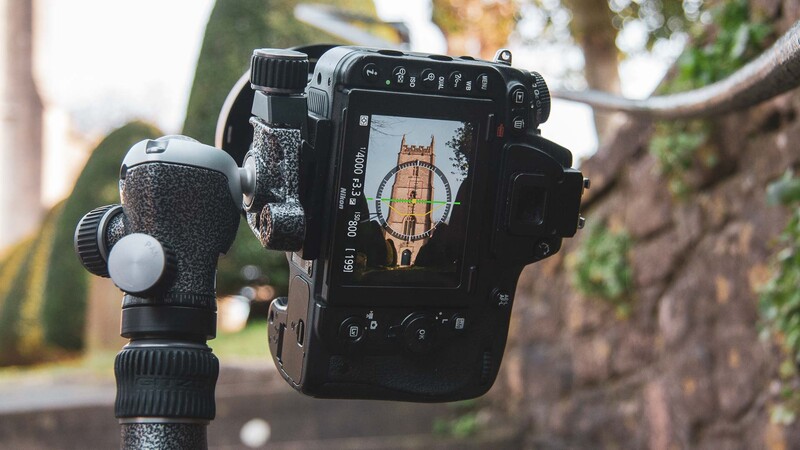
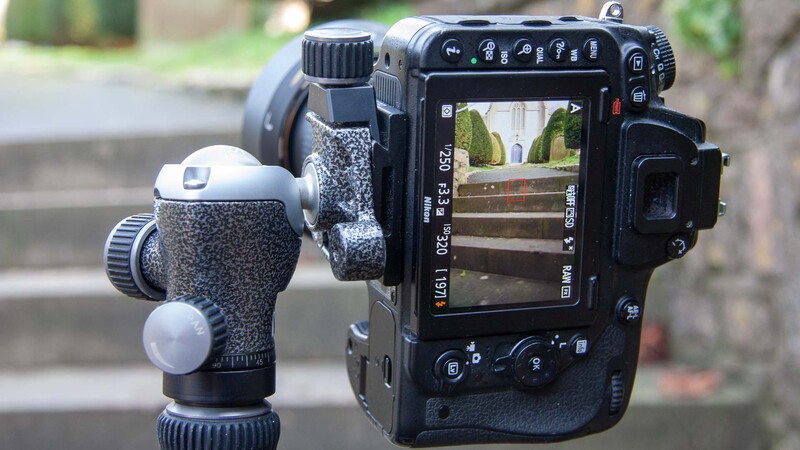
Architectural photography is all about being precise with the camera. Though we'll be working towards getting the converging lines straight we must first level up the camera. On my D750 I turned on live view and hit the info button until the virtual level displayed. This tells me precisely how level my x and y-axis' are. When I've got the horizontal leveled out perfectly the yellow line turns green as you can see in the image above.
Zoom in To Focus
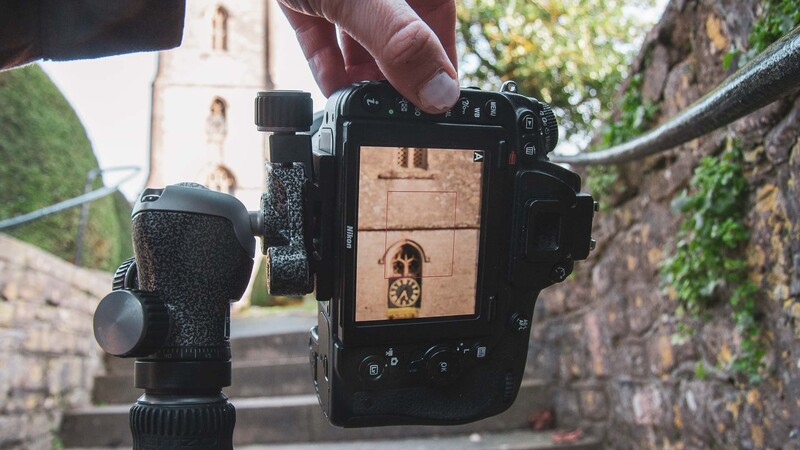
The Nikon 45mm f/2.8D tilt-shift lens I'm using is manual focus, as indeed is every tilt-shift lens in existence (at the time of writing). So it's important to take your time to focus things up. I turned on my live view and zoomed in on the screen using the + button. Then I turned the focus ring back and forth until it was tack-sharp. Luckily, the focus ring on this lens is so smooth and accurate that I could fine-tune my focus until it was absolutely perfect.
Spin the Lens
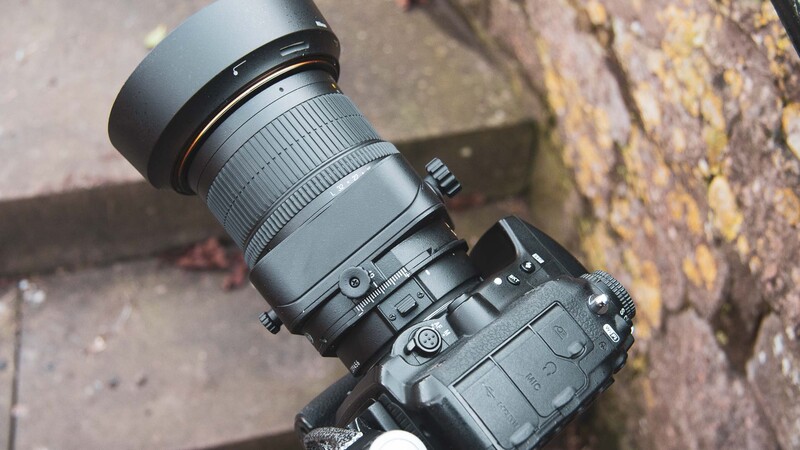

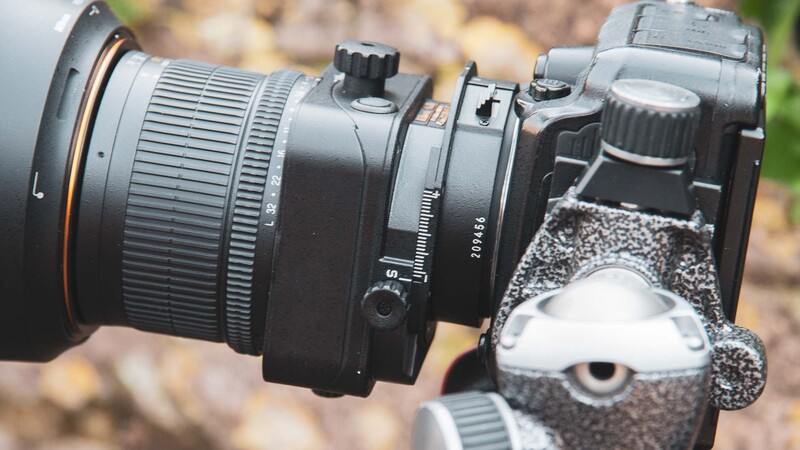
So there I was, lining up the shot, I had my focus and started to shift to straighten those pesky converging lines when all of a sudden it was straightening horizontally. Oh no! I'd just spent all that time lining up only to find out my tilt-shift lens isn't oriented for vertical frames. But no, you'd be mistaken if you thought that you could only do this in horizontal format. Thankfully, there's a switch on the lens that allows it to rotate around the camera, much like the longer telephoto lenses have. So I could rotate the lens and not the camera, leaving my composition intact. If you have the same problem, check that switch and pivot the lens around until you've sorted it.
Maximum Shift
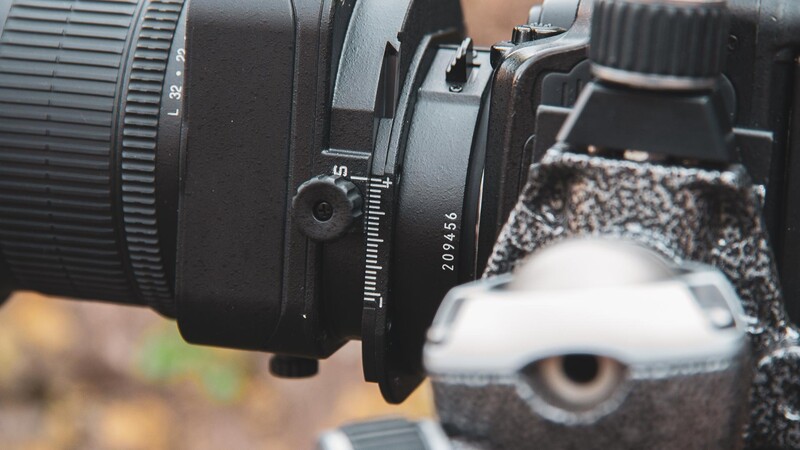
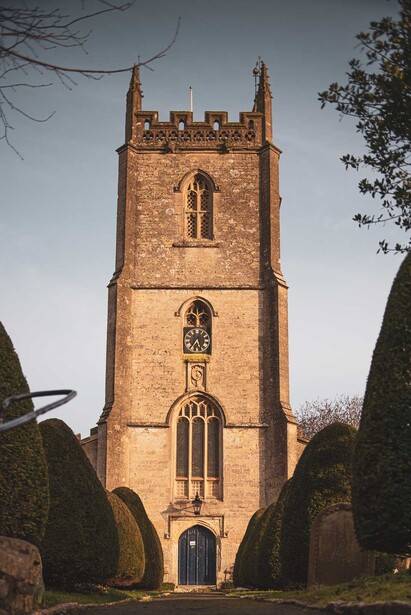
With my composition spot-on and the focus nailed I was ready to dial in my shift. With the orientation of my lens I turned it to maximum positive shift in order to correct the parallax distortion and have my church stand upright, instead of slanting away from me. At this point, you may find that you need to recompose though, depending on how close you are to your subject. Luckily, I was okay but if there's little wiggle room in your frame then you'll find a drastic lens shift like this will cut out one side of the frame.
What About Negative Shift?
How does this differ from positive shift? Well, not to sound too much like Captain Obvious, it goes the other way. Instead of making our buildings nice, tall, and straight, they start to lean even further away. Of course, it depends which way up you've got your lens mounted though, so you might find that the negative shift actually straightens your building if you're shooting in the opposite direction to me. Simply put, I'm going in the opposite direction here and it's shifted everything back the other way. Take a look at the back of my screen now and we can only see steps!
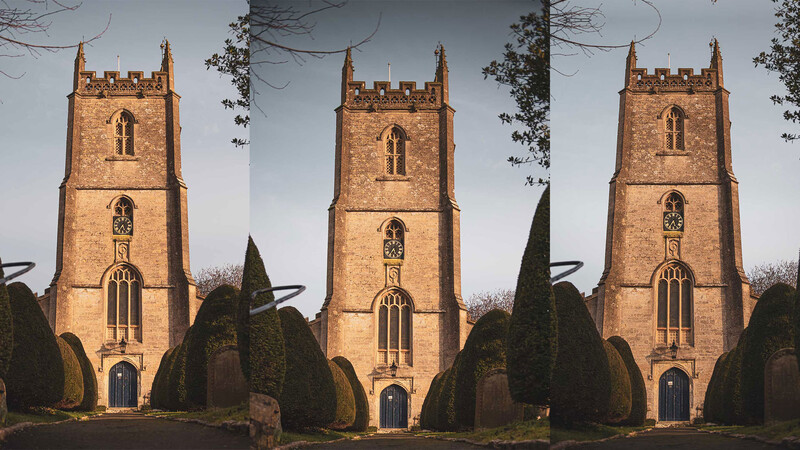
Here's a look at all three shots together, left is regular with no shift, the middle is with the maximum positive shift, then right is the maximum negative shift. Notice how the photo on the right makes it look like the church is leaning back even further than the first unshifted shot on the left? It's not usually a look you go for in accurate architectural work, but it could be used as an artistic/creative device in certain situations.
As you can see using a tilt-shift lens to correct the converging lines on a building for architectural photography is actually pretty simple. You just need to compose your scene, level everything up, and get the focus nailed while shifting the lens to correct for the distortion. Your camera settings will also impact the scene, as in any photo, with a narrower aperture providing a longer depth of field, and if a long shutter speed is used then you'll want to use a tripod to avoid camera shake.
If you'd like to shoot better real estate and architecture, consider checking out Mike Kelley's architectural photography tutorials. Mike is a world class teacher and one of the most well known architectural photographers out there. His techniques will help take your images to a professional level. Make sure to save 15% by using code "ARTICLE" at checkout.


Join the Fstoppers community for free
-
Post comments and join in the discussions
-
Browse the site ad-free
-
Share your work and get featured in the community
-
Compete in the photo contests for fun and prizes
18 Comments
Your light falloff with the shift is noticeable. Large Format lenses with much larger image circles and including wide angles with graduated center filters are a good tool for overcoming this problem.
I don't know if your maker has the graduated neutral density filters but if so it would be good practice to use them.
However flawed and misleading this article is, it deals only with one application of lens shift. Even with maximum shift on a levelled camera, it is not always possible to fit the entire subject into a single shot - usually because the camera is too close to the subject. A further technique, therefore, is to take 3 shots; max positive shift; normal; max negative shift. Stitch these 3 shots together in post to create a vertical panorama. (Also useful for landscape panoramas).
Shifting isn't only useful in minimising converging lines. It's also useful when the tripod is in a very tight spot, making it impossible to adjust the height for the ideal composition. Shift gives a fine-tuning capability.
Just as useful is the tilt component. Used in conjunction with shift, it is extremely valuable in architectural and landscape photography. Tilting pivots the lens up or down so that the lens axis is no longer perpendicular to the film plane - changing the relationship between DoF and focus plane (scheimpflug principle). Tilting down enables a greater focus range between foreground and background. Tilting up decreases the range – creating a very shallow focus plane: the ‘toytown’ effect.
Out-of-the-box, the Nikon 24/45/90 series of pc-e lenses don’t enable tilt and shift in the same plane, but a simple mod does. Architectural and landscape photographers usually prefer this arrangement, however it is not changeable in the field.
The latest Nikon 19mm pc-e does enable both tilt and shift to be engaged individually, and/or in combination, which I believe most Canon perspective control lenses do.
Tilt-Shift is also good in the studio for shooting High Res, by taking 3 shots, 1 far Left, Center, and far Right. Or just the opposite for vertical, then combine in PS or LR! Works very well!
I don't know how sturdy is your tripod head, but I prefer to use now a L bracket, to assure that the camera doesn't fall down, which happens even if you screw it tightly with the fast plate.
And I wish this type of lens (I have the 24mm Nikon) would have the tilt and the shift in the same direction. Or that you could turn them separately. I know it's possible to change it at Nikon's, but it's kind of pricey.
Is anyone else bothered by the headline photo not having anything to do with the actual content of the article? I get that the tilt function of the lens bending the focal plane is a better visual of the way the lens can adjust. But then the entire article is centered around the shift function... not the tilt function of a tilt SHIFT lens.
It has ruined my life. How can such a grievous act be countenanced. And to add insult to injury, the f-stop is set to 2.8, which wouldn't give the depth of field shown in the photo. The horror.
Lol
Now granted, I'm all for getting it right in camera, but for most users, I sort of feel an effective use of adaptive wide angle filter in photoshop can produce a nearly identical image without dropping 2 grand on a highly specialized lens? Perhaps I'm missing something? I've always found tilt-shift interesting but could never really justify the investment.
Not really, it can't.
It's all about quality. If you want to use your maximum resolution and don't want to cut off pixels while straightening the lines, you're way better of with a tiltshift lens.
In case you stitch images to get a higher resolution, it's also recommended (you have to take care of light falloff when shifting to extremes).
If you're shooting landscape and don't want focus bracketing for overall sharpness you can tilt the lens slightly to tilt the plane of focus so you can shoot everything in focus in one single shot with f8 or even f5.6, wherever the sweet spot of your lens lies.
That doesn't mean you have to invest that much, but it saves post production time and increases quality when done correctly.
Anyway, just watch the second hand market, those lenses are to be found, for nearly have the original price. With modern mirrorless cameras you can also adapt cheaper versions like to the good old Canon FD 35mm f2.8 TS, which you can use on all mirrorless systems with an adapter without electronics. Manual focus, manual aperture. It's a little gem.
Jason, while I do appreciate your trying to introduce people to the world of tilt-shift lenses I really do feel this article could have been better. Your use of "parallax effect and parallax distortion" to describe what you are achieving with the shift of the lens is completely wrong. And as pointed out by another person typically (like 99% of the time) when shooting architectural photography the camera is either on an L-bracket or a much heavier duty head and tripod. In addition I can't remember ever shooting a building at f3.3 unless I was shooting a specific detail. Now you could have explained that maybe you used a combination of tilt and shift movements to achieve a perfect focal plane parallel with the face of the building, but you didn't. That would have been something to write about and much more interesting as well. Please in the future when writing articles just make sure you know your audience and have one of your professional peers look it over before submitting it. ~Thanks!
I agree with James. Perspective distortion is not "parallax distortion." Parallax is, of course, the phenomenon encountered with Twin Lens Reflex cameras and gunsights, where what is seen through the viewer is not quite what the film or rifle "sees."
I have just picked up a second hand Nikon 24mm Tilt shift. I already had the old 28mm and 35mm Nikkor lenses.
For me it is much better to do it properly with this lens, rather than do key-stone correction in post. This lens and my others gives a more natural result.
I would also recommend using a geared head with these lenses as it makes getting the camera level much easier and quicker.
If you wish to dip your toes in shift photography, then the 28mm can be picked up quite cheaply and gives respectable results. I had the Samyang 24mm TS, but hated it for some reason. I was lucky I sold it for more than I paid for it and put it towards the Nikon 24mm
Nice post! I'm finding more uses for my tilt/shift adapter over time. Don't forget it goes down, as well as up; I recently wrote a blog post about that:
https://jimhphoto.com/index.php/2020/10/11/tilt-shift-adapter/
I don't think you could possibly fix 'parallax' issues with a TS lens. At least not in that way. I believe you meant to write perspective distortion.
Well, actually you can prevent parallax when stitching panoramas by using a TS lens and shifting the camera instead of the lens, to take several shots.
I see a lot of misinformation and mis-use of the ts lens. First thing: If you are low and want to shoot a tall building you tend to tilt the camera backwards to get everything in the frame. At that moment your sensor (film plane) is not vertically parallel to the verticals in your subject and that is what causes the distortion (building falling back)
So when you found your vantage point you first level your camera as seen in the picture (green line) and also level it vertically (The yellow box under the green line has to disappear into the green line as wel) this makes your image sensor vertical. Now you just see the lower part of the building but all verticals are correct. Then you shift upwards to include the top of the building. This is how it works. The statement ' It appears to make one half of the frame wider and thereby straightens the converging lines' is absolute nonsens. I work almost daily with ts lenses (15mm/19mm/24mm/85mm).
"Nikon 45mm f/2.8D tilt-shift lens I'm using is insanely sharp" on your old D750? Test it with D850 and let us know.