
The tilt-shift lens is probably one of the most special lenses available. It allows the photographer to turn, shift, and tilt the lens in many different ways. In this article, I explain when and how to use the tilt function.
As I have shown in the previous article about tilt-shift lenses, the movements of these lenses can be quite intimidating. There are a lot of dials and knobs that allow you to move or rotate the lens. That first article covers the shift function which allows you to prevent the well-known perspective distortion. If you haven’t read that article yet, it might be interesting to do so.
The other function of the tilt-shift lens is the tilt. It allows the lens to be placed at an angle relative to the sensor plane. At first, you might think it gives the possibility to shoot at that angle, but this is not the case. Tilting the lens will only change the orientation of the plane of focus. In this article, I will explain how this works.
The Focal Plane
Before I dive into the tilt function I need to explain something about focusing a lens. I will keep this as simple as possible, because it’s all about understanding the principle instead of covering every physical detail. That is why I will ignore the so-called field curvature of the focus plane. If you want to find out what this is, I would suggest doing a search on Google for the Petzval field curvature.
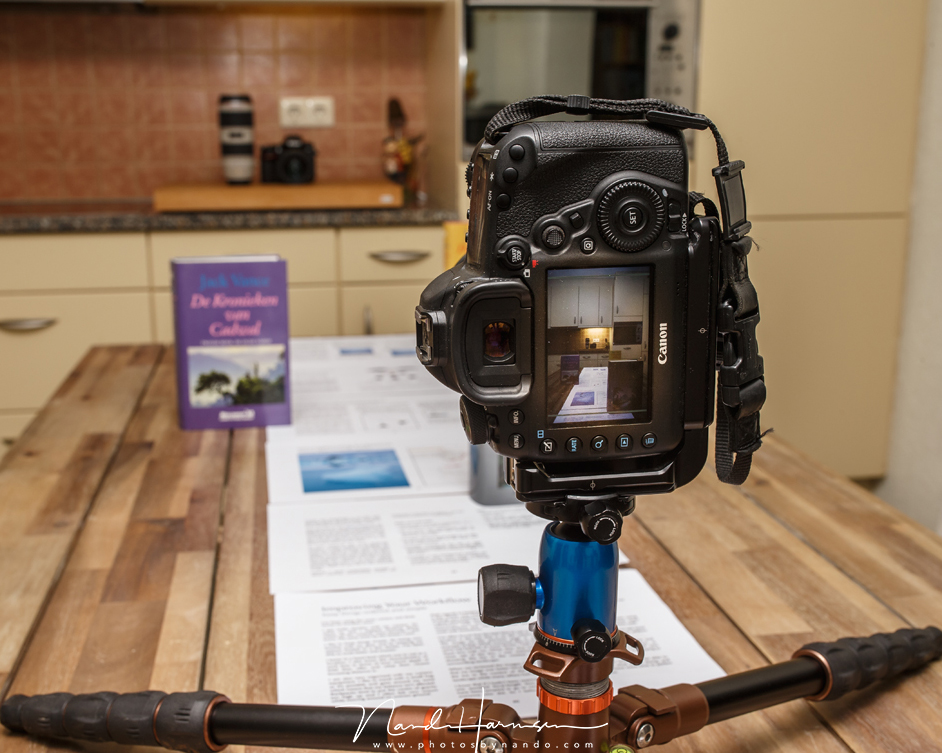

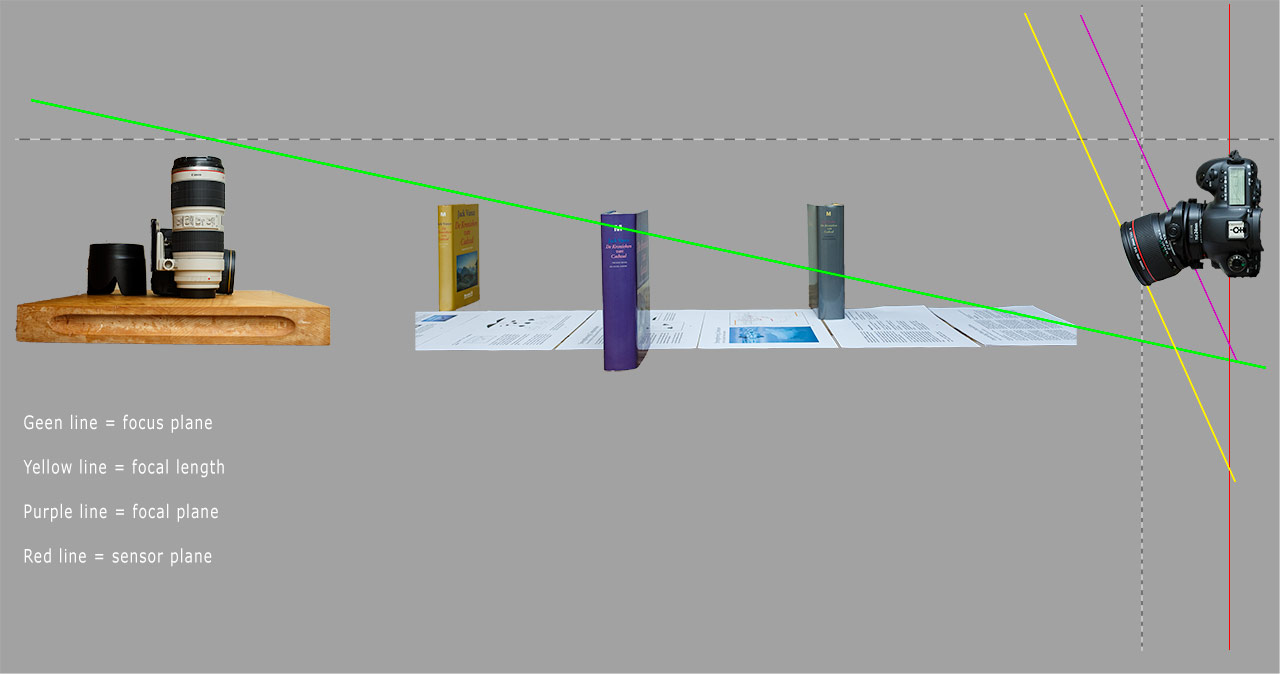
If you focus on a subject, everything at that same distance will be in focus. It is never one single point, but everything that is located at that exact distance. All those points form the focus plane and it is parallel to the sensor. Everything that is in front of that focus plane will be out of focus, just like everything that is located behind this focus plane.
By closing the aperture it is possible to get an area in front and behind the focus plane within an acceptable focus. But no matter how large or small the depth of field is, it is always parallel to the sensor, just like the focus plane itself.
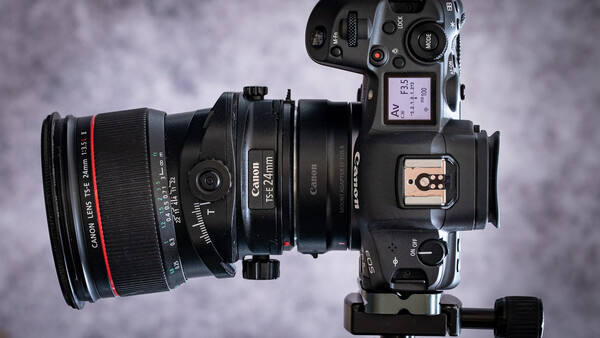
For now, I will ignore the depth of field. Just imagine the plane of focus to be a flat surface that is exactly parallel to the sensor. I used the Canon TS-E 24mm f/3.5L II for this setup with an aperture of f/3.5 to keep the depth of field at a minimum, but it also applies for every other focal length.
What Happens When the Tilt-Shift Lens Is Tilted?
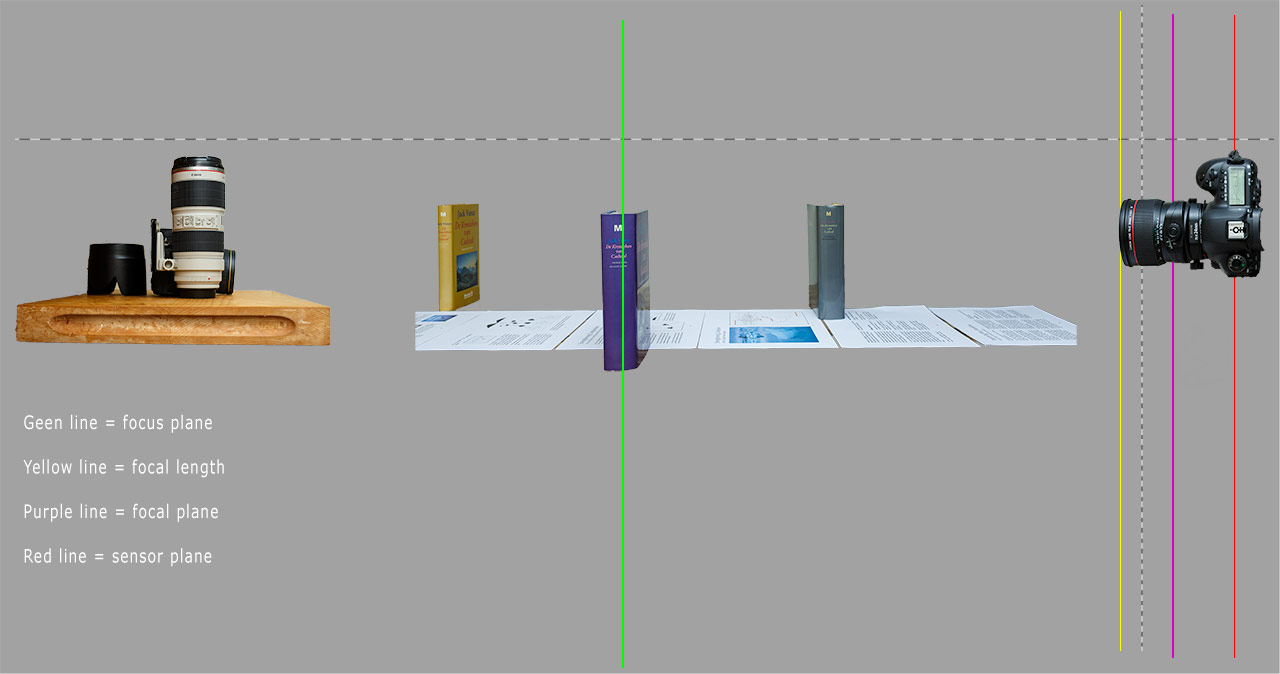
By tilting the lens something strange happens. The focus plane will no longer be parallel to the sensor plane. As you can see in the drawing below, the focus plane will tilt in the same direction as the lens. If you could tilt the lens far enough, in theory, the focus plane would even become horizontal.
This effect is called the Scheimpflug Principle. It tells us how much the focus plane will tilt. I won’t try to explain the physics behind this principle, but it is imperative to understand how this principle affects the place where the focus will be. The more you tilt the lens, the more the focus plane will tilt. But also the focal length of the tilt-shift lens will determine the amount of tilt.
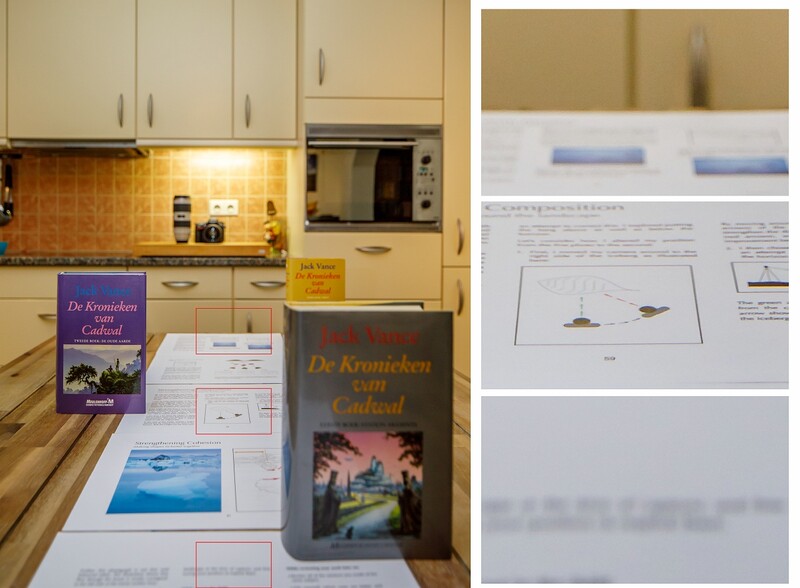
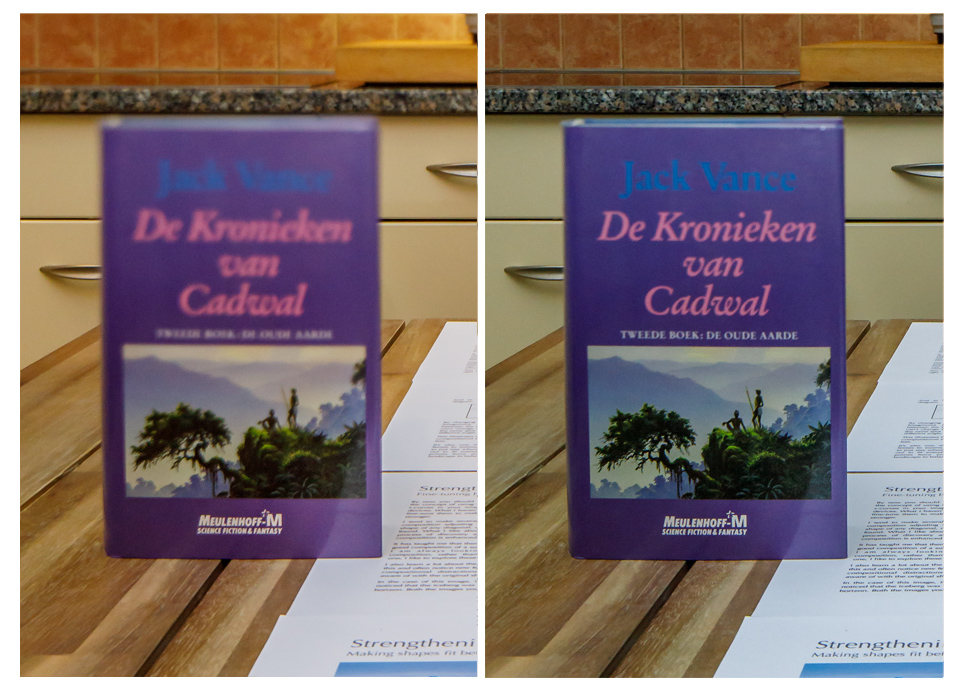
On the left is the result without tilt, on the right with tilt. Both are with the minimum depth of field (f/3.5)
By tilting the lens it becomes possible to place the focus plane not parallel to the sensor, but parallel to the surface of your subject. As seen in the example, the piece of paper is in focus from close by up until the last piece of paper. This is shot with an aperture of f/3.5, which is the minimum depth of field. Unfortunately, this lens cannot tilt far enough to have the plane of focus exactly parallel to the printed paper. But if I also tilt the camera downwards, it becomes possible to have the plane of focus exactly horizontal. Just like in the next example, which is also shot at f/3.5.


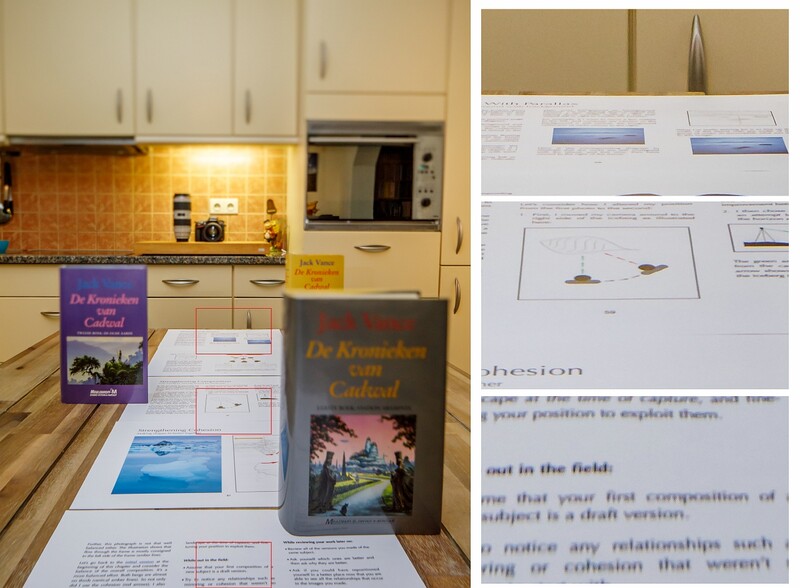
On the left no tilt is used, on the right the lens was tilted. Both images are with the minimum depth of field (f/3.5)
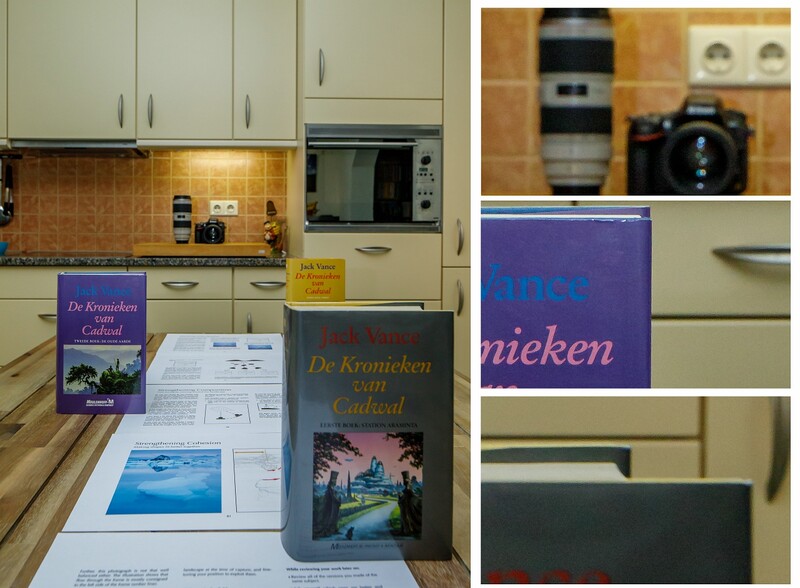
There is one thing you need to keep in mind when tilting the plane of focus, in combination with a small depth of field. Things that are raised above the plane of focus will be out of focus. This has an awkward effect as seen in the example below. The book is in focus at the bottom, while the top of the book is out of focus.
Depth Of Field and the Tilt-Shift Lens
Up until now I have ignored depth of field and regarded the plane of focus as the only thing that is sharp in the picture. As you have seen, the pieces of paper are in focus, but the top of the books are out of focus. What if you introduce a larger depth of field?
Depth of field is an area in front of, and behind the plane of focus that is also in focus. Although it is a bit more complex than this, I won’t get into the details on how depth of field works. I want to keep it simple, remember?
Having the plane of focus exactly parallel to the sensor you know that the depth of field is also parallel to the sensor. We all have seen such drawings about depth of field. When the plane of focus gets tilted, the depth of field area will also be tilted. But it is not tilted the same way as the plane of focus.


As can be seen from the drawings I made, the depth of field will become a wedge shape. With the aperture unchanged, close by the depth of field will be very small, becoming larger when the distance increases. The wedge will become wider when the aperture is closed even further. The result of the depth of field with f/8 can be seen in the images below.
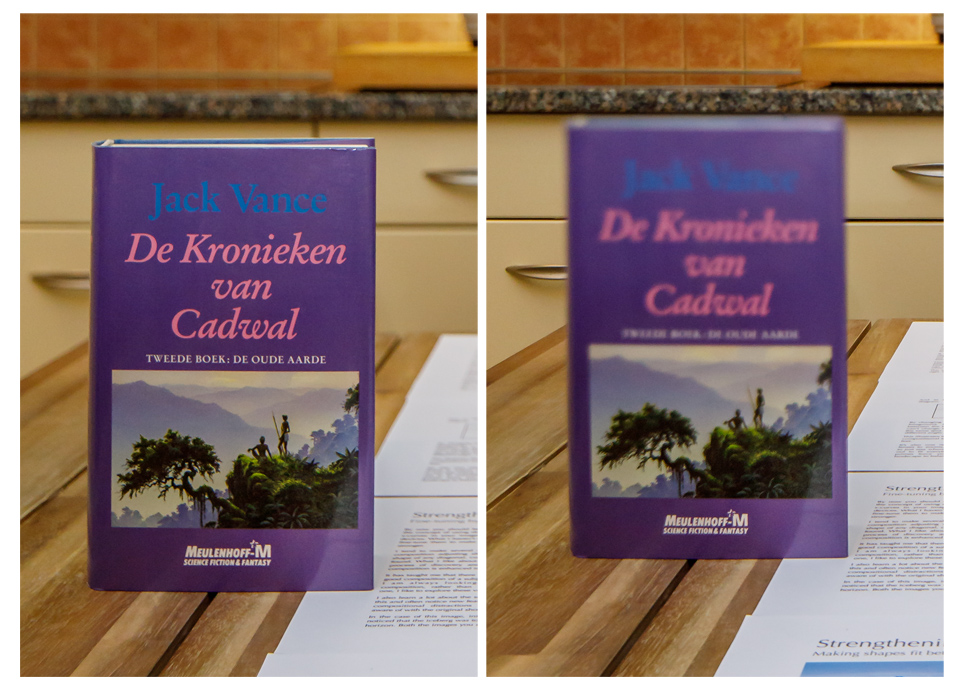
The depth of field in this example is not enough to have everything within focus. But the difference is clear when comparing the left image (small depth of field (f/3.5)), and the right image (large depth of field (f/8)).
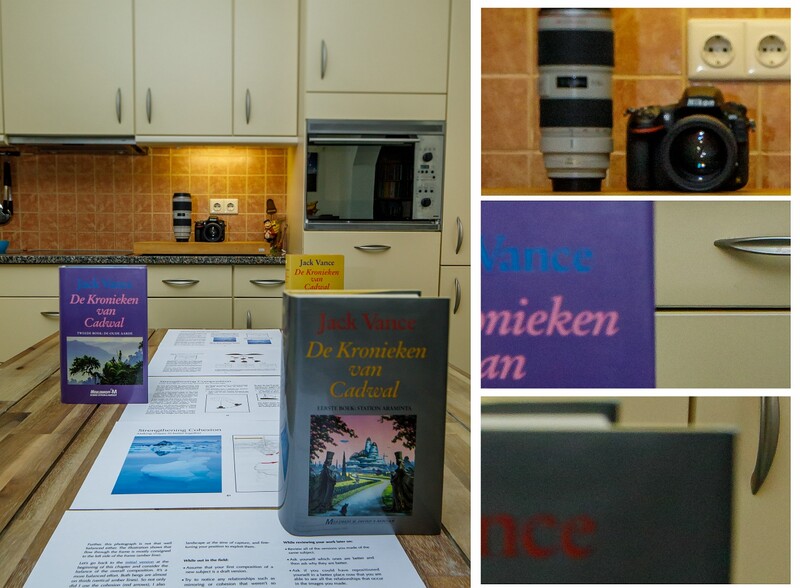
You need to be aware of large objects that stick out of the area that is within the depth of field, especially if these objects are close by where the depth of field is small due to the wedge shape. If you take a closer look at the book, you’ll see how the sharpness towards the top of the book will increase. But an aperture of f/8 seems still not enough to have the complete book within an acceptable focus.
Placing the Focus Plane at Your Will
By tilting and rotating the tilt-shift lens it becomes possible to place the plane of focus at almost any random orientation. Of course, this is possible thanks to the Scheimpflug Principle. In the example below I have placed the plane of focus in four different orientations, just by rotating and tilting the lens.


The tilted plane of focus doesn't necessarily have to be parallel to the subject. By tilting it in the opposite direction an extremely small depth of field becomes possible. I have used this effect in the image below. By tilting the lens upwards, the plane of focus is leaning over while touching the top of the bluebells. Without a tilt-shift lens such a small depth of field wouldn’t be possible with a 17mm wide-angle at an aperture f/4.

The tilt function allows a unique way of photographing. It brings almost total control over the plane of focus. But it is difficult to use and it needs a lot of practice. Focussing when tilt is applied is difficult and requires a special technique. This is also the reason why autofocus is never present. Although there are rumors of autofocus on the coming Canon RF tilt-shift lenses.
Using the depth of field takes special care also, because of its wedge shape. Nevertheless, I think the practical use of tilt is very limited. It can be very handy in product photography, and perhaps for the use of the miniature effect on real-world scenery.
What do you think of the tilt function of the tilt-shift lens? Would you have another good application for this unique possibility of the tilt-shift lens? If you do, and you know other ways to use the tilt function, please share this in the comments below.


Join the Fstoppers community for free
-
Post comments and join in the discussions
-
Browse the site ad-free
-
Share your work and get featured in the community
-
Compete in the photo contests for fun and prizes
13 Comments
Good article. While I don't have a TS lens I assume for architectural shots when the camera is shooting upwards like in the 1st article, the tilt will bring the focus plane vertical again so all the building is in focus. Is that correct?
Not really, in this that scenario you‘d only shift the lens while pointing the camera straight at the horizon, so the focal plane remains vertical, you would not use tilt at all
It's just like Raul Dederichs says. For architectural shots you keep your camera horizontal, and just use the shift.
Good article, beautiful examples.
I learned a lot from this article here: http://www.northlight-images.co.uk/using-lens-tilt-on-your-digital-slr/
Anyway, when using tilt in architecture I noticed that tilting also changes the lines in the image. I used my TS-E 17/4, ste the shift first to avoid too much floor and then tilted to get nice night light bokeh apart from my sharp building. Had to correct straight lines afterwards, may be it's better to set tilt and focus first and shift afterwards to correct the straight lines. Or it was only my mistake after all. Should try it again.
That article is a well explained one. I used it also when I first started using tilt-shift lenses.
I don't know what is best, when using tilt and shift at the same time. I guess first shift, and then tilt. You can correct the angle of the camera last if necessary. Just remember, the angle of the camera will cause perspective distortion no matter how much shift you apply.
Thanks, Nando, that's why I corrected first and shifted (and controlled correction) next. The 17/4 is rather difficult to handle in my opinion, as everything get's rather small in the viewer, and the screen on the 6D wasn't the biggest. Have to redo it with the EOS R.
Everything is smaller in the viewfinder when using ultra wide angle. It also is smaller in the photo itself, otherwise it doesn't fit within the boundries of the frame.
;)
You can enlarge the liveview image up to 10 times, of course. That might help
TS-E 24 on Lumix GH5 with 0.64 Converter.
First with tilted plane of focus.
Second with shift.
Thanks for writing. Very nicely explained.
You're welcome
It would have been nice to have mentioned the use of tilt/shift adapters on crop sensor cameras. It is then possible to use the relatively large image circle of relatively inexpensive 35mm lenses to do view camera movements, without spending a bundle on a one-trick pony.
The dedicated Canon lens featured is probably a two kilobuck solution for a $200 problem!
Particularly with macro use, such as the watch dials, a tilt/shift bellows is arguably a better approach than a dedicated tilt/shift lens.
Could I ask you which bellows system are you using? I want try something like this on my S
ony a6300
That one is a Nikon PB-4, which I modified to mount directly on a µ4/3rds body on one end, and to directly mount an Olympus OM lens on the other end, although you could do it all with adapters, as well.
Minolta also made a nice tilt-shift bellows, which after receiving one, I judged the Nikon one to be more easily modified. But if you're content to use adapters, the Minolta one is probably cheaper.
Here's some more info on the conversion: https://www.mu-43.com/threads/mirror-mirror-telescope.97306/#post-11347…