
Lightroom and Photoshop are generally considered to be tools for standard (still) photography, but simple video tasks can be handled entirely within your photographer’s Lightroom and Photoshop subscription package (no need for Adobe Premiere Pro), and without any third-party add-on tools. In particular, the pair of programs handles time-lapse videos quite nicely.
As an example, I’ll use some shots from the recent lunar eclipse (largely a bust for me). The first set of shots were a wide field (24mm) sequence shot on a mirror-less Canon RP using its internal intervalometer. The horizontal panning was done by setting a Star Adventurer tracker running at sidereal rate with the polar axis pointing straight up. The second sequence was bracketed and shot at a focal length of 425mm using a Nikon D850 with a Borg 76mm telescope mounted on a Losmandy astronomical mount.
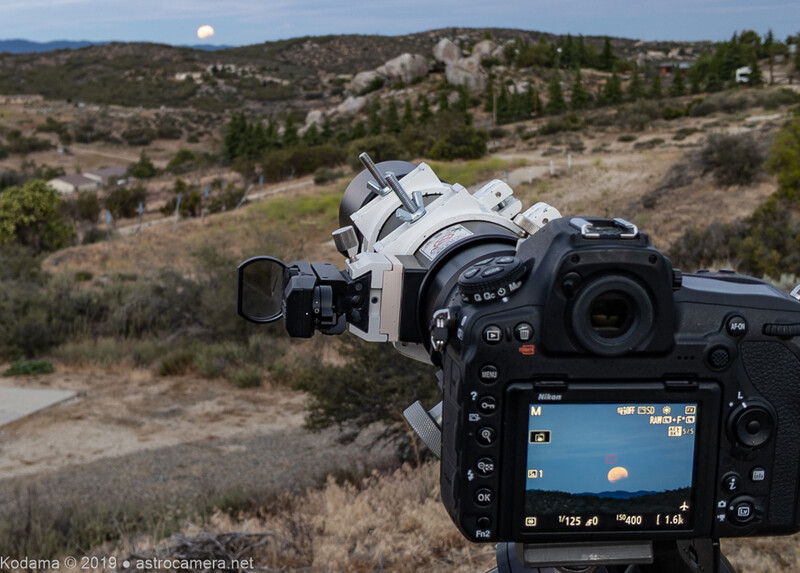
As mentioned above, the lunar eclipse was a bust for me, except at the very end. I missed seeing the moon totally eclipsed because of the heavy cloud cover, but I was able to see the moon setting while it was still partially eclipsed. The video is my attempt to make lemonade with the lemons I was given.
Preliminary Frame Processing in Lightroom
The first step is to import the wide view sequence of frames into Lightroom. Adjust the exposure, color, and other parameters using a “typical” frame in the sequence, then sync the settings for the entire set. If the light changes between the start and end of the sequence, as was the case in this example, the synced settings will be a compromise.
Since the sequence is destined for a video (1080p HD for this example), as a final Lightroom step, the frames should be cropped to the proper HDTV aspect ratio of 16:9, and exported to a temporary output location at the proper downsized resolution of 1,920 x 1,080 pixels. Doing this will minimize the subsequent processing that Photoshop will have to do for the video handling. An output in JPEG format should be adequate since no further image adjustments should be necessary and disk space will be reduced for the output.
Note that when the output frames are exported, if they are not already properly numbered out of the camera, they should be renamed so that they are a sequentially numbered set of files (important for the next step).
Video Assembly in Photoshop
Each sequence can be converted into a video clip in Photoshop with the following procedure:
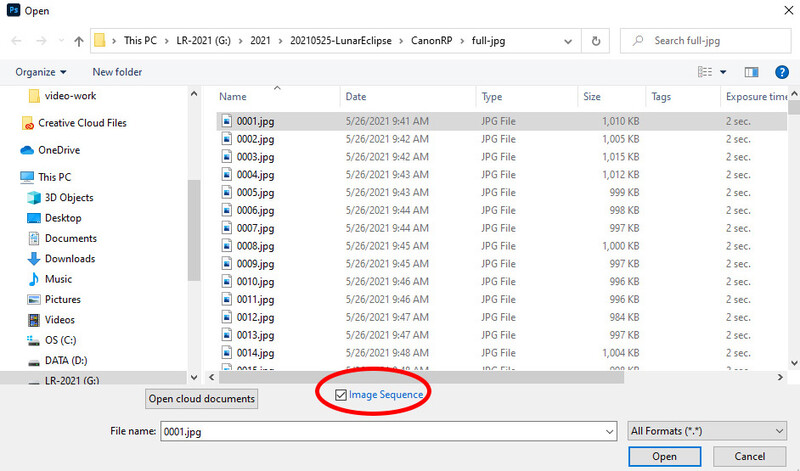
- In Photoshop, in the file open dialog, select only the first file of each time-lapse set, and then click on the check box “Image Sequence” at the bottom of the file selection window as shown above.
- Next, select the output video frame rate from the pop-up dialog box. This frame rate, in combination with the number of frames you are importing, determines the duration of your video clip. Note: This input frame rate is independent of the output frame rate you select for the output.
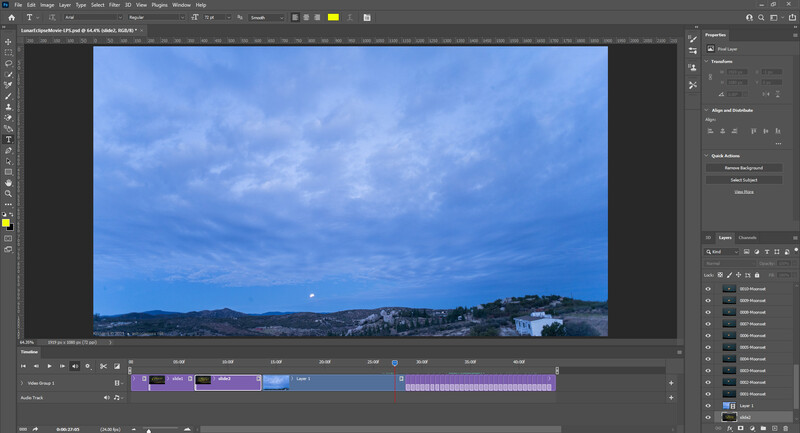
- If it’s not already open, select the “Window / Timeline” to open the video window where you can edit the video clip created by Photoshop.
- The frame rate you initially select when importing your frames will largely determine the final length of your video clip. If you click on the video timeline, a clip duration adjustment dialog will pop up and allow adjustment of the duration between 25% and 400%.
- At this point, if all you wanted was a “bare” video clip, you are done and you can skip ahead to the video output procedure described later in this article.
More Frame Flexibility
Since I wanted to add the short telescopic frame sequence at the end of my video, I wanted a bit more flexibility on the duration of each frame. The steps for this are:
- Click on the “+” at the right end of the video timeline created in the steps described above. When the file selection box appears, select all of the individual frames and do NOT select the “Image Sequence” checkbox. This will add the frames to the end of the video sequence with each frame as its own video clip.
- Adjust the duration of each frame by clicking and dragging on the right edge of each frame. The duration format you’ll see is x.yy where x is in seconds, and yy is the number of frames (30 per second).
- Add transitions between frames as desired. In my example, I added a ¼ second crossfade between frames.
- If the new sequence needs to be moved ahead of the existing video clip, drag across all of the frames to be moved to select them, then drag them to the position desired.
Title Frames
You can add title frames you create in Photoshop as well as other videos and stills in the same way as described above to create a more polished video. Just create the titles as still frames in Photoshop and add the frames to the video timeline as described above for the animation sequence. When the title frames are added to the video timeline, they will be at the end of the video. In that case, just select them and drag them to the front of the timeline.
Additional video clips can be added to the video timeline if desired. As a final touch, Photoshop even includes the provision for adding a music track to the video.
Video Output
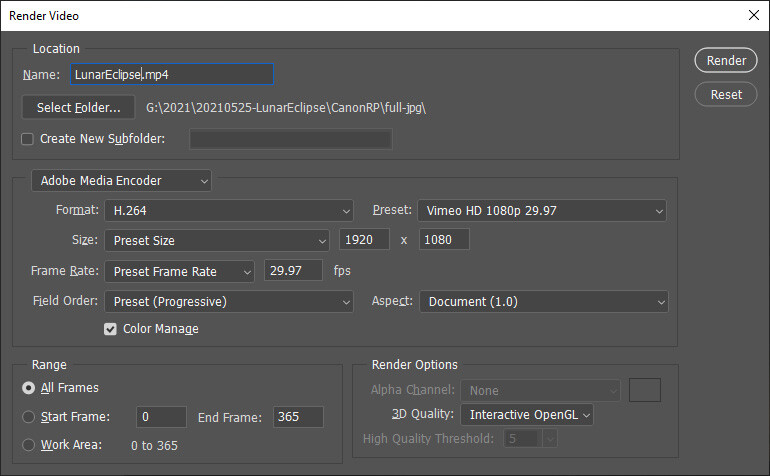
When the video sequence has been tweaked to your satisfaction, use the Photoshop “File / Export / Render Video…” items to open the video export dialog box. Be sure to set the name and output folder for the resulting file or you may be wondering where the output went afterward. For the media encoder, you can use the Adobe Media Encoder and H.264 format with the provided preset: “YouTube HD 1080p 29.97” or “Vimeo HD 1080p 29.97” if you are unfamiliar with the myriad choices for video formats. The output result will be an MP4 file which you can play on your computer or tablet or cellphone directly, or upload to YouTube or Vimeo.
Creating an Animated GIF
For a sequence with only a few frames and/or small frame size, an animated GIF is an alternative format. This is also useful since the animation can be easily directly embedded into a web page, but the dimensions and length of the animation should be kept small to avoid a large file size.
To create an animation, process your frames in Lightroom as described above, and output them to a temporary directory as JPEG frames at the final size desired. Then start Photoshop and process the frames as follows:
- Open a new Photoshop file with a canvas size matching the final output size.
- Open the timeline window and create a single frame video timeline as described earlier: Select “Window / Timeline” to open the video window and click on “Create Video Timeline” in that window.
- Click on the “+” at the right end of the video timeline and select the first frame of the sequence. Be sure to click on the “Image Sequence” check box, then start the import.
- Click on the first blank video segment and delete it.
- Adjust the duration of each frame by clicking and dragging on the right edge of each frame. The duration format you’ll see is x.yy where x is the seconds, and yy is the number of frames (30 per second).
- Add transitions between frames as desired. In my example, I added a ¼ sec crossfade between each frame.
- For output, select “File / Export / Save for Web (Legacy)...” to open the animation output page. Select GIF as the output format. Set the “Looping Options” to “Forever” for a continuously looping animation.


Join the Fstoppers community for free
-
Post comments and join in the discussions
-
Browse the site ad-free
-
Share your work and get featured in the community
-
Compete in the photo contests for fun and prizes
No comments yet