
VirtualRig Studio is the only software that allows realistic motion blur simulation, and it has many advantages over Photoshop's path blur. In this article, I will walk through the software and explain how to use it.
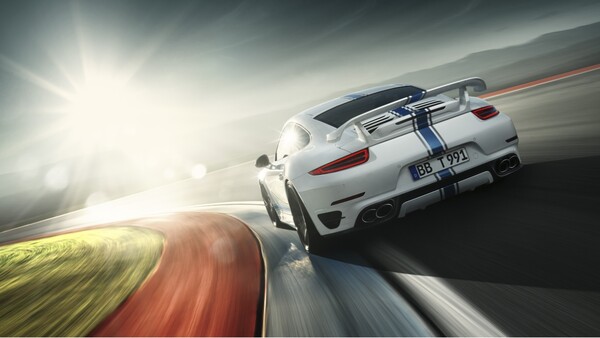
Blurring out backgrounds is essential in automotive, sports, and other types of commercial photography. Usually, it is better to achieve motion effect by using car-mount rig systems on set or by using vehicle tracking at same speed with the object. However, in some circumstances, clients might want to use a different background, and you might end up creating a composite. At this point, VirtualRig Studio comes into play.
VirtualRig Studio provides realistic motion blur simulation, and it is used by professional photographers, retouchers, and CGI artists all around the world. In general, it is mostly used in automotive imagery for blurring out the backplate images. You might think that Photoshop’s path blur feature can give similar results, but unfortunately you need some third-party solutions if you need accurate and realistic results.
First of all, the software is quite easy to use; it has a simple interface and it has a live preview feature that allows you to tweak your settings while seeing the actual result on screen. If you have a decent computer, you probably won’t experience any lag or errors while using the software.
How It Works
First, open your road image in the software. On top part of the window you will see the main toolbar, and on the left side you will find the settings for your image. To activate the real-time preview you need to start drawing your vectors. The easiest way to do this is using the blur vector tool and drawing your vectors based on the road’s curves and direction. Creating a vector will result in an arrow-shaped vector with three controllable dots on it. These dots represent start-point, direction of the vector, and the end-point speed respectively. You can adjust the size, curve, and speed of the vector by tweaking these dots and the length of the vector by using the arrow on the end-point. In general, objects close to the camera move faster than objects in the background, hence the start length should be longer than the end length. The main trick for achieving a realistic result is repeating this process for every direction on the image. Once you are done with drawing your vectors, you can adjust your speed coefficient and simply click render. The final image will be saved automatically in a sub-folder where your original image is located.


What If the Road Is Curvy?
Same principles apply, even if there is a curve on the road. You can simply bend your vectors by clicking Alt (Opt) and holding the middle square on the vectors. If you know how to use Photoshop’s Pen Tool, then you will do this easily as well. Feel free to use as many vector paths as you want; while this will take more time to do, the results will be more accurate and realistic.

Other Features
Jitter Effect
When using physical camera rigs, the camera may swing and the movement of the vehicle may cause vibrations. These vibrations create some artifacts on the image, and in the world of photorealistic composite imaging, you might want to add these artifacts on your final image. Therefore, you can simply click the Jitter Effect option on the left panel and fine tune the effect.

Overlay Layer
When preparing your background image and the motion blur, you can also place the car image on the software by simply enabling the “Overlay Layer” option and selecting the image you want to use. As a result, you can see a preview of your final composite without affecting your background image render. This feature is best used when inserting clipped car images or 3D rendered car images.
Why Choose VirtualRig Studio Over Photoshop?
VirtualRig Studio allows vector-based path drawing in a faster way, and most importantly, with variable speed coefficients and manually adjustable vector paths, you can adjust the initial speed and the end point speed, thus you can get realistic results. On the other hand, Photoshop’s path blur only allows controlling the direction of motion blur by the vectors’ direction and size, which can cause problems on images where horizon is visible.

If you want to try VirtualRig Studio, simply go to their website and you can download the trial version of the software. However, they do not offer a full trial of the software, and while most features are locked, the final outputs will have watermark on them. You can still buy the Lite version for $49, but again, you will be limited to basic features and the maximum resolution of the final image will be limited to 3000x3000px. If your work will be used in digital only, then you will be fine with the Lite version. However, if you want to use the additional features, such as using a transparent image (which might be useful for changing the sky later on), spherical HDRI image rigging (useful for CGI artists), and outputs in unlimited resolution and various formats, then you will need to pay $999 for the pro version. Even though the software is the only professional solution for motion blur simulation, all versions support only sRGB color space. So, to avoid color shifts on your image, don't forget to convert your image to sRGB.

If you want to create automotive imagery, you can buy a car camera rig system, and the total cost will be similar to the pro version of the software. When using a real rig system, you will need additional help and also you will have to remove the visible rig parts and the reflections over the vehicle and the road in Photoshop. On the other hand, if you want to create a composite image by using this software, you will need to have an image of a car with rotating wheels that has the same perspective and angle. If you are going to use CGI, then the process will be relatively easy. Long story short, the options are limited within your choice.
What do you think of VirtualRig Studio? Would you prefer using real rig systems on set or would you like to use this one? Please share your thoughts in the comments section below.


Join the Fstoppers community for free
-
Post comments and join in the discussions
-
Browse the site ad-free
-
Share your work and get featured in the community
-
Compete in the photo contests for fun and prizes
3 Comments
Sooooo, what is the 3rd party plugin you mentioned?
I use VR and Photoshop. ;)
No way does it look realistic but it’s pretty cool for shooters who want special effects.