Underwater photography is becoming more popular as technology progresses. The use of an underwater housing dates back to the mid-1800s when William Thompson was utilizing a watertight box over his camera to photograph seaweed near Weymouth, England. Since then, underwater photographs have become an incredible way to explore and understand the life under the surface.
For anyone who has looked into underwater housings, it is almost just as overwhelming as choosing your first pro-grade DSLR. The research, the forums, and the late nights almost pushing the "add to cart" buttons are something that is a rite of passage before the decision is made. There are many companies on the list that will rent or sell the products, but in time, the final call was to go with B&H for the Ikleite housing for the Nikon D810. The decision to go with the Ikelite over some of the other options was due largely to the clear casing that allows the visual of a possible flood. The ability to periodically check once above the water's surface by tilting the housing to see any water intrusion can bring a great deal of peace of mind.

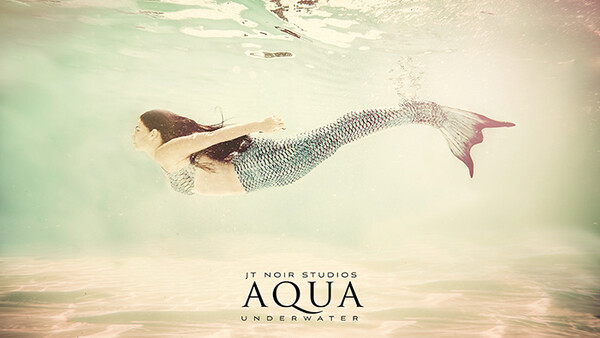
Image used with permission of Kara Pesznecker Reavis
Once the box arrived, I thought I could dive in and start shooting. I was very mistaken. I had borrowed the housing from a colleague when I tested it out before. So, all and all, it was in working order — nothing much to assemble. Although it seemed overwhelming at first, once it was assembled, the construction felt tight and solid. However, with that said, the assembly was very nerve-racking at first, to say the least. Knowing this housing was going to protect my D810, the level of worry was on high.
Lens Options and Issues
I bought the Nikon 12-24mm about a year prior to fit into my Shapewave housing. However, with the Ikelite, the rim on the Nikon lens creates a barrier issue when placing your camera into the body of the housing. Assembly requires you remove the lens, place the camera into the body, then from the outside of the housing attach the lens again. This seems completely fine in the dry, cool surroundings of my dining room where the assembly took place, but if I was ever on a dive boat and needed to readjust, I would just have to go with the flow as the idea of opening my camera body to the salt air without a lens would send me into panic mode. In all my research on the housing itself, never did I give thought to how the camera would have to be placed inside without a lens attached.
With that said, the lens itself does play an important role in the choice of your dome port. If you want the ability to go from one lens to the next, your dome must be the correct size. The dome for a 12-24mm is 8” and must be accompanied by a lens extension. While the instructions for assembly are quite clear when all packaged nicely, the process needs to be adjusted when those of us like me have two small children that think they are assisting by opening all bags and laying out the parts on the table. Yes, insert foul language here.
So, with the pieces on the table, it was the game of Tetris to figure out where the parts met up with the names provided. The other obstacle is the LCD screen protector on the D810. The construction is so incredibly tight that the protector must be removed before snapping the housing shut. If this process is not accomplished prior, you will have choice words to say when it comes time to remove the camera from the housing. So, do not worry about your LCD screen: it will be completely protected by the polycarbonate exterior that is corrosion-resistant. Once the smaller components were put in place, the larger picture seemed to finally come together.

All kidding aside, had the assembly been in a time of a better frame of mind, the instructions are quite clear. However, this was still my D810 that I was about to submerge, and all that would stop a flood of water was an O-ring and some clamps. So, off into the sink I sent it without the camera. Filling the interior with desiccant packs to gauge the severity that could have been incurred upon my camera, the inside was completely dry upon retrieving it.

The depth rating for the Ikelite is 60 m, and has a negative buoyancy in fresh water. The housing itself is 2.5 kg prior to the handles and strobes being attached. Although attempting to bring the casing from water to land can be treacherous for a shooter with a torn rotator cuff such as myself, the aspects of moving the housing underwater were flawless. The easily accessible shutter release and handles made for fluid movements when shooting.

The dome allows for a wider view and easy focusing. While it is difficult to fully see the images underwater, once back at the studio, the images were clear and crisp.

I had a little difficulty at first controlling the aperture; however, slightly pushing against the back of the housing just a bit brought the turn wheels into their contact points. Since then, I have not had any issues.


What I Liked
The feature I liked the most about the housing was the accessibility of the controls, without the accidental movement of them. For example, on a flexible housing, the controls are just as easy to maneuver, but also just as easy to accidentally push while submerged. If you submerge with a shutter of 1/250 s, you can easily bump against it and lose a lot of shooting time trying to readjust. On the Ikelite, the controls are fairly tight in a way that this does not occur.
What I Did Not Like
One thing I am not fond of is the use of multiple O-rings. One of them was slightly pinched (even after checking), which flooded the housing. Yes, Nikon is getting my repair in the morning. Yes, I am bummed that I did not get the shot to complement the behind the scenes image. But no, I do not fault the housing; these are simply user issues. Had I taken more time to secure all points of contact, this may not have been the case. But that morning was a calamity of events; there will be in a future article dealing with the importance of staying grounded in times of your busy season!
Other Images Utilizing the Housing


Join the Fstoppers community for free
-
Post comments and join in the discussions
-
Browse the site ad-free
-
Share your work and get featured in the community
-
Compete in the photo contests for fun and prizes
3 Comments
I've been researching underwater housing for a while now and this article is really helpful! Thank you for such a thorough, well-researched review! Gorgeous images, too!
I have been shooting with an Ikelite housing for at least 10 years. They work great, and I have gotten several awards for my photography underwater. The more expensive brands (Subal, Aquatica, Nauticam, etc) are more ergonomic, but also heavier. Weight is an issue for international travel, especially if you want to carry on your photo gear. And the image quality is the same – I challenge anyone to tell what brand of housing was used for the image. David Fleetham is one of my favorite photographers and he has shot at least 100 magazine covers with Ikelite. It is good stuff. laityphoto dotcom if anyone is interested.
And yeah, floods are a drag. Especially 1/3 of the way through an international trip. You learn how to maintain the o-rings and insure your gear. Get a flood alarm. And at least you get to upgrade when the trip is done.
Oh yes-insurance is the only reason why I can stay calm when something like this happens! Thank you for the comments!