
As a photographer, your average day most likely includes at least one blog, social media, or image post. Piggybacking on these posts with additional links is a great way to sell a product, promote a service or grow your following, but as with anything, there is a good, better and best way of doing things. Here are some tips that will help you to maximize the return on your daily posting efforts and generate more business.
Great Content Drives Traffic
We'll be talking a lot about ways to make your links perform better, but the first step is to actually use them in the first place, and there's no better time to share a link than in the company of good content. If you're sharing an amazing photo on Facebook, 500px, Flickr, etc., that is the time to attach relevant links to anything you want to promote. Notifying followers of an upcoming workshop or promotion with a direct posting is one thing, but nothing entices users more than seeing a great photo and building the desire to learn how to reproduce it or have a similar one taken of themselves. If you don't have a product or service to promote at the time, build a simple landing page with a subscriber list for a future product, or at the least, try to driving extra traffic to your additional social sites through cross-promotion. If people love your photos on Facebook, why not get them following you on Instagram as well? Make it a habit to include a relevant link with every photo you post and be sure to measure effectiveness (more on this later). Every time you share something without a link present is an opportunity lost, so always be linking!
Link Shorteners are for More Than Shortening Links
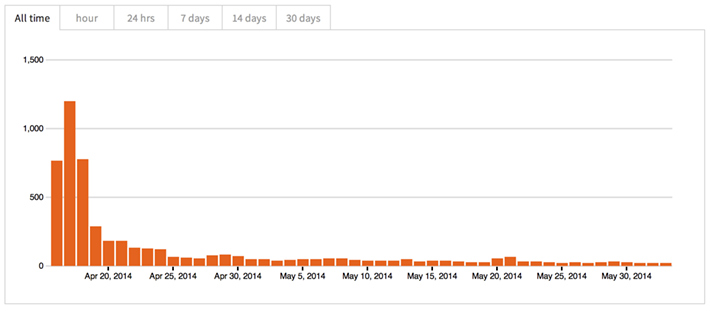
If you're posting direct links or relying on automated shorteners like those built into Twitter, you're missing out on statistics that will provide you with valuable insights going forward. If you're confused by the wide variety of services out there, I've found bit.ly to be one of the best options (we use it here at Fstoppers). It's free to use and provides a simple interface with detailed and easy to interpret statistics. It allows you track referral sources and geographic locations as well as giving you hourly, daily or weekly breakdowns of activity (see below). You will have to create an account in order to track these insights but it's a quick process and well worth doing.
If your hesitation for using link shorteners stems from their perceived lack of SEO friendliness, there are some key points you need to understand. If the link points to anything other than your own website, you of course needn't worry as SEO becomes irrelevant. If however the link is to your website, in the many situations using a shortened link still won't make any difference in terms of SEO ranking. When you link to your site in most comment threads, forums, or sites like 500px or Flickr, as well as social media posts, the links that get generated are called 'nofollow' links. The websites insert an extra chunk of text into the anchor tag of the HTML telling Google to disregard the link in its SEO rankings. It does this so that users don't bombard comment threads with links in hope of growing their search engine rankings. Finally if your shortened link does happen to get shared on a site with regular 'follow' links, Google is still able to handle these appropriately and increase your search engine ranking. Without getting too technical, most link shortening services use something called a 301 redirect which simply tells the browser that the page that the link points to has been moved, which in this case directs it to the original link you shortened. These are redirects that you can use on your own site and it's not unique to link shorteners so Google knows how to deal with them. It's also important to remember that whenever other people link to one of your pages or posts in their own blogs, they'll typically do so by visiting the page and copying the URL from the address bar and not the shortened link. In a nutshell, stop sweating about SEO.
How You Link Matters
On some sites like Facebook, Twitter or Flickr, you can't insert HTML code, and so links can only be displayed as the actual URL as opposed to a friendly line of text. For example, on Facebook we're forced to display something like "Follow me on Instagram here: http://bit.ly/vsfsinstagram". On certain sites you can however add html formatted content which makes the text more user friendly and eye-catching. 500px is one such site and allows you to create proper anchor links as shown in the image below. The benefit of this is that you can bury the long and uninformative link into a more readable line such as "Follow me on Instagram". On 500px, taking this approach is particularly important because simply putting a URL in the description (without an HTML anchor) does not convert it into a link. The URL is just displayed as plain text that cannot be clicked. I see this quite often, and as you can imagine, it doesn't bode well for click-through rates.

As you can see above, I've wrapped each of the three links with HTML 'a' tags which allows them to be displayed as textual links as opposed to displaying the path to the link itself. The above code will display below my image in following manner:

Although not all sites are as friendly as 500px in allowing you to tailor the way your links are displayed, it doesn't mean that all hope is lost. Regardless of the mechanics, you can still improve the click-through rate of your links by carefully wording the content surrounding them. Remember that each link is a sales pitch so your viewers need to know the benefit before clicking through. In my case, I finally bit the bullet and signed up for Instagram, so my mission now is to grow my follower base there (by the way, feel free to follow me for awesome content). I initially started off by attaching a link to images posts on Facebook in a manner similar to what I've described above. The line simply stated "Follow me on Instagram here: [link goes here]".
This first attempt yielded 25 clicks and around 3 followers when included along side an image. Clearly it would be a pretty slow going process if these numbers continued, so I decided it was time for a change.
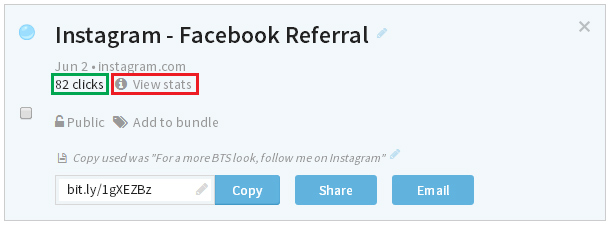
I altered the text to "For a more BTS look, follow me on Instagram: [link goes here]" in my second attempt. This new copy yielded 82 clicks on a less popular image and resulted in 10 new followers. The main difference is that I was giving the reader more value. By letting them know that they are getting something on Instagram that they won't get on Facebook, I increased the value proposition for them. The key is therefore to experiment with various messages until you find the one that is most effective. You might now be wondering, "but how do I know which message yielded the referral?", well I'm glad you asked, and we'll soon get to that.
Lastly and importantly, be sure to put your link above the fold. This essentially means, that your link should be displayed in the first few lines of text before a 'see more' or 'show more' option truncates the remainder of the description. For example, in Facebook you can get anywhere from 4-6 lines depending on where it is displayed, while 500px gives you 6 lines. Each site is different so look at existing posts to determine the cut-off. If your link finds itself in the 'show more' section, your click-through numbers will take a dive so keep your message short, direct and near the top of the description.
Track Your Sources
Even though bit.ly does give you insights on which website referred the user, there is no way to determine which particular social post drove them there. As far as it's concerned, the referral came from Facebook, Google+, Flickr, etc., without any further details. To get around this we can use a bit of trickery in the url itself. Where we would typically post a simple link such as http://instagram.com/vibrantshotphoto, we'll attach something called parameters to make it unique. The unique link would look something like this:
![]()
As you can see, I've appended some extra details to the end of the link to describe what it is that this link represents. In this case I've included two parameters 'ref' and 'copy' but the actual names and values are completely arbitrary and useful for my own reference only, they can be anything you want. We can append something like '?myref=100' to the end of the link and as long as it's unique, you'll get the insights you need. These parameters typically work by supplying additional information into the application, but since we've made up the "myref" and "copy" parameter names, the website simply ignores them and directs you to the expected page. If by chance the page you're trying to point to already has a real parameter (e.g. www.vibrantshot.com/?p=1827) then you can add additional dummy parameters by separating them with an ampersand '&' (as shown above). In the case of this sample link, my new URL would look something like "http://www.vibrantshot.com/?p=1827&myref=100".
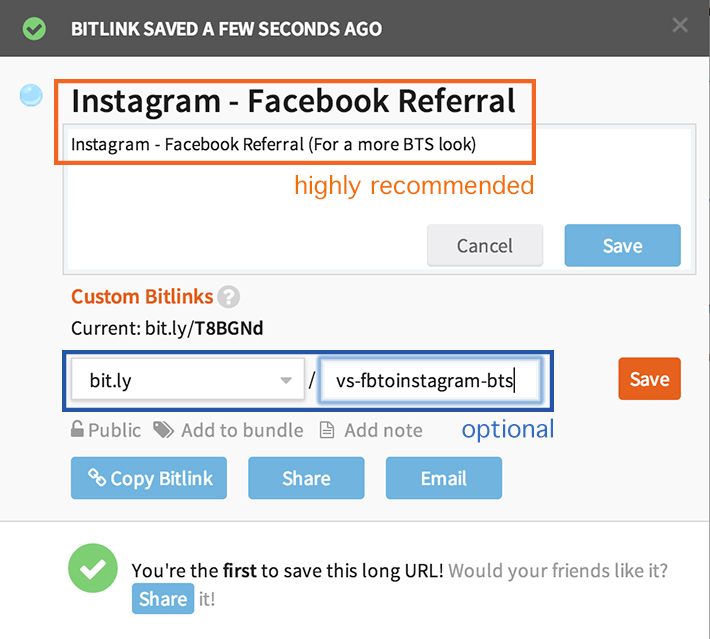
A good practice is to always test your link in the address bar to make sure you haven't used a real parameter and that it still directs you to the desired page. Once you've formed your unique link, copy and paste it into the 'shorten' box in bit.ly to generate the short link. Upon generating the short link, you'll be prompted to customize the link name as shown in orange below. I highly recommend that you at the least provide a descriptive name for your link so that you know what it represents otherwise when you come back a few days later. You can note the name of the photo that it was shared alongside, the copy on the caption, the source, whatever will help you to locate it easily down the road. If you need to write more details, there is an "Add note" feature as well. You will also have the option to customize the text in your bit.ly link as shown in blue below. This isn't necessary but does make the link a bit more readable and friendly to your audience.
Upon logging in, all your links are listed in order of creation with a quick summary of the number of clicks. To gain more insight, you can click the 'view stats' link as shown below for a more detailed breakdown. When determining the effectiveness of your copy, be sure to factor in the popularity of the photo. A quick and dirty measure is to take the number of clicks and divide it by the number of post views to calculate the click-through rate. Whenever possible, try to measure the same copy across more than one photo to improve the validity of your findings. Even if you do find a high ranking option, be sure to experiment with others to see if anything else performs even better. Remeber that different types of posts or images will require different value propositions.
As you do this over time you'll be surprised by how much better you'll become at relating to your customers and be able to pinpoint what they respond to most. You'll also learn which platforms offer up a good return on your investment and drive customers to your products and services. Gaining insights like these is crucial over the long-term as they give you a leg up on new competitors and help you to better budget your time. It may seem like more work now but it will pay dividends in the future. Happy linking!
Connect with me here: Michael Woloszynowicz | Facebook | YouTube | Twitter


Join the Fstoppers community for free
-
Post comments and join in the discussions
-
Browse the site ad-free
-
Share your work and get featured in the community
-
Compete in the photo contests for fun and prizes
4 Comments
Thanks Mike for the great article, really appreciate your efforts and the time to write this useful info, Thanks again
The URL parameters idea is a clever one! Thanks for sharing.
Thanks for the useful tips @Michael
Great informative article. Thanks for this.