
Now that things are opening up again around the world, we can start doing outdoor photo sessions again, and this one trick will help you stand out in your community.
Due to the pandemic, I've decided to start offering family shoots to people within my community in order to get business going again. Normally I am a studio shooter but I've found that shooting outdoors is refreshing, has its own challenges, and also I've found a secret to get my lighting and composition on "easy mode" so I can concentrate on getting good poses rather than trying to figure out my lighting, my composition, and my posing, all while being engaged with my subjects at the same time.
The Trick
When it comes to normal portraits or headshots, I generally prefer my key light to be coming from in front of, or beside the subject. But I've found that when photographing families and couples an easy trick to get that warm, romantic, friendly vibe is to backlight your images. Back lighting subjects, and exposing for the subject instead of the sky, often gives this beautiful, hazy, look to images that exude warmth and love.
When back lighting your images, be sure to expose for the subject's face, not the background. Yes, you can recover shadows but then the image will usually look unnatural if you bring the the shadows in order to properly expose the sky. Let your highlights clip, if you don't like it you can just replace the sky later, but the faces are what's important!
By exposing for the faces, you will likely introduce a beautiful flare into your image, washing across the whole frame. This is good, we want this. Why add it in post when you can get it in camera?
How to Get Back Lit Images Anywhere
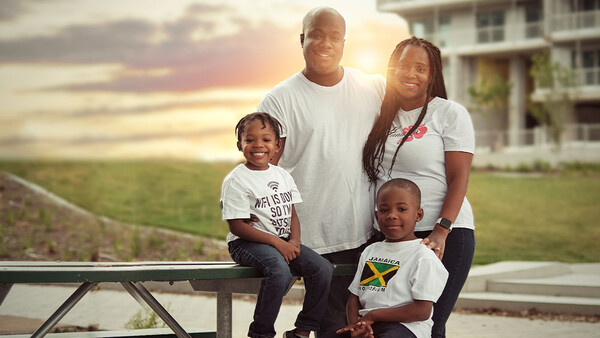
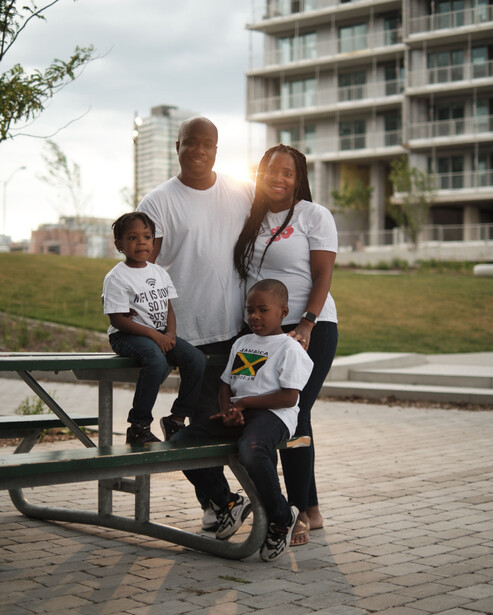
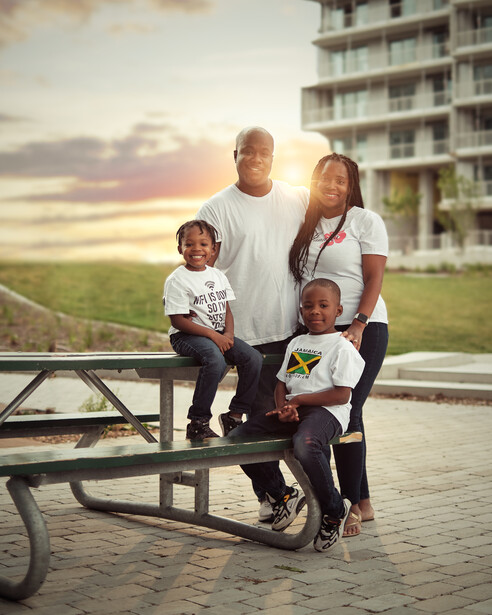
But what if the sun is on the other side of the street? Or in front of your subjects? Or what about behind a building? Well that's easy. Bring in a light! Let's break down our lead image, shall we? First let's look at the before and after:
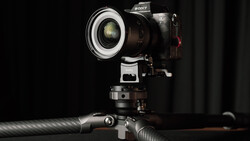
For this shot I used the Fujifilm X-T3 and the 35mm f/1.4. I shot in the shade for nice even light and, even though the sun was to our left and behind the building, I decided to make my own sun so I used a single Cactus RF-60X with a full CTO to add to that warm feel I was going for. I placed this a good distance behind them, and raised it as far as my stand would allow. I fired off a couple shots, adjusted the light's position, and got to shooting.
As you can see, the final photo is both wider than the original, lacks a tree, had a different sky, and has different faces, and if you look really closely there is some creamier bokeh in the after image. Th reason I replaced the faces is because when working with multiple people, it's often easiest to composite together multiple photos to make one perfect one. When culling photos I looked at the poses and faces separately. What photo had the best overall pose? Which photos had the best individual faces? When I got the three or four shots together, I did some color toning and brought them all into Photoshop where I aligned the shots using the "Auto-align layers" tool, and used layer masks to bring out just the faces I wanted. Next, I went to work removing the tree on the left which I found very distracting, and the photo was done! Well... Not quite.
I found the sky extremely boring, and I felt that the background was distracting so, with some help from Mike Kelley's Sky Library and the tutorials within, I cut out my subjects and put a new sky in behind them, adjusting colors, and exposure to ensure that everything matched.
With the family cut out for the sky replacement, it was trivial for me to make the background even blurrier and less distracting by duplicating the background layer, adding some blur to it, and then using a gradient on the layer mask to give it a realistic fade from background to foreground. I used the gaussian blur tool to blur out the background but the trick is to ensure that you don't accidentally blur it too much, you still want things to look natural!
One trick to back lighting is to have the light be small, approximately sun sized, and set at the widest setting for a nice wash of light. Even though the light is behind your subject, I recommend putting it in the frame. As you can see in the photos I've shared in this article, the actual light itself is just peeking out over a shoulder, giving us this illusion of a perfectly timed photo that look hours of planning to make sure the sun was exactly behind the subject
You also want to put the light as far back as possible while still affecting your image, at least twelve feet behind your subject, as otherwise you may get a harsh line where the light hits the ground.

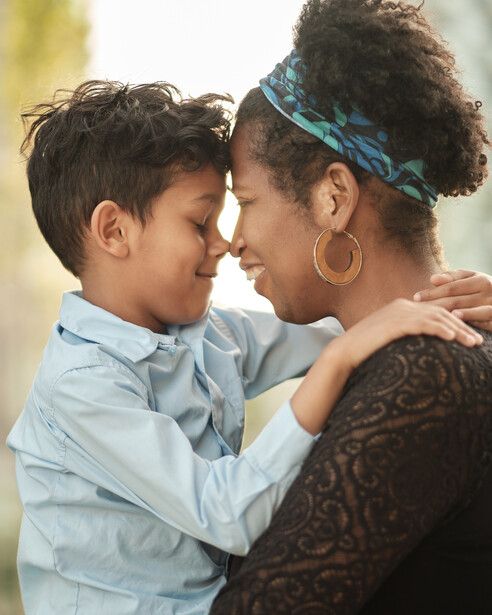
With this image specifically we used a lot of the same techniques as the previous image, minus the enhanced bokeh and sky replacement, simply a speedlight set up far behind the subjects, and exposing for the face creating that flare just between the woman's arm.
In conclusion, you can really stand out with your portraits by easily adding a simple speed light behind your subject, and throw a gel on it to make it extra warm and look like the sun. It's a rather simple technique that can allow you to have complete control over your composition, not needing to worry too much about the actual direction of the sun and getting that perfect five minute window where the sun is in a very precise spot to get a very specific composition. You can shoot in any direction with much more flexible time windows in order to get beautiful sunset/rise looks with a much broader window. If course, this won't work at high noon, but if lets you have a sunset that lasts for two to three hours rather than just five to ten minutes.
Have you ever shot with fake backlight for family portraits? I'd like to see your results below! What are some other tips you have for family portraits?

Join the Fstoppers community for free
-
Post comments and join in the discussions
-
Browse the site ad-free
-
Share your work and get featured in the community
-
Compete in the photo contests for fun and prizes
12 Comments
In my opinion flare, whether natural, made with a strobe or photoshop plug-in is sort of like oregano.
A little goes a long way. When you have a pizza the first flavor should not be oregano. The flare is there to enhance the photo not be the star of it.
When looking at a photo most people's eyes go to the brightest thing in the photo first then looks for faces. In the shot with the woman and the kid, BAM! right to to flare, then kids face...then mom. in the first photo the first thing I saw was that flare right by the man's face, I thought nice shot but too bad about the flare...
Agreed. The family shot is something I wouldn’t turn over to a client either because their faces can’t be properly made out. Defeats the purpose of a family portrait.
I think I agree. I love with natural light portraits, backlighting works best, but when the source of light is in the frame it can be distracting. I don't mind lens flare reducing contrast in the faces but only when the sun is off-camera. You can get great backlit shots from a low sun and still get the subjects nicely isolated against a darker background.
While I am impressed of the work described in the article I am not fond of the style. I do not share the opinion about oregano, I live close to Italy, but I get the point and you are right about the flare and the bright spot which attracts too much attention.
NORMALLY I'd agree with you, but clients seem to love it so who am I to nitpick ha ha
It kind of depends on what kind of work you want to produce.
I agree w/most all. Cannot wait until the flare fad is OVER!!!!
You are not kidding! So sick of it myself.
I had to make an account just to comment. The picture with the family on the bench and the removing of the tree...THATS JUST AWFUL! Why would anyone shoot themselves in the foot and do a session where you're going to completely edit the background? Too much hassle. Wonder why you stopped half way and didn't delete the building also. 🤷🏻♂️. I also don't like this style. I agree and understand that it's what the client wants, I once shot an engagement session where the couple's insisted on wearing masks...the point here is, too much flare, make picture with so much composite, and unnecessarily giving yourself more work.
Please check the direction of her legs in the last picture...quite unnatural.
Holy cow!! I had not seen that! Very sloppy choppy editing. Bad article piece. Sorry
Oh mylanta...