
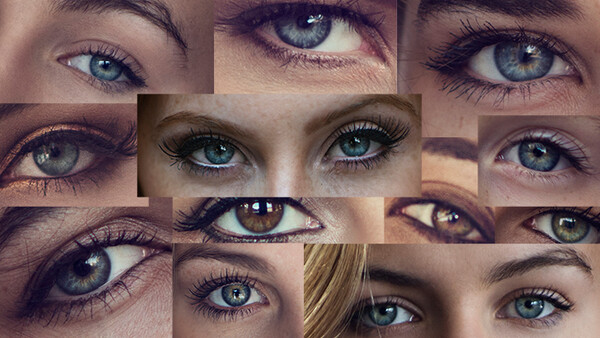
I can assure you that this isn't another boring tutorial on how not to overdo eyes with Photoshop. Searching for the perfect method has come to an end. Before diving into the simple method, it’s crucial to understand everything about the human eye and how it reacts to light.
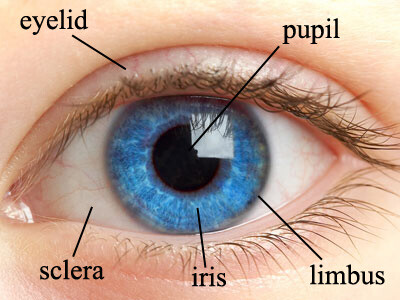
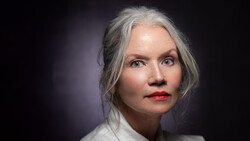
There are a few key points to take note of before attempting to retouch the eyes. By understanding the different parts of the human eye, any method of retouching can be used to successfully retouch it. Every person’s eyes are made up of the pupil, iris, limbus, sclera, cornea and eyelid. The pupil is in the dead center, and is always black unless there is a catch light over it. The surrounding area is generally lighter color and it is in some cases colorful. The darker outer edge is the limbus. This edge joins the cornea and sclera.
The eye is an extremely incredible organ. Below are three important pieces of information as to how light and shadows work and how to make the most of this information:
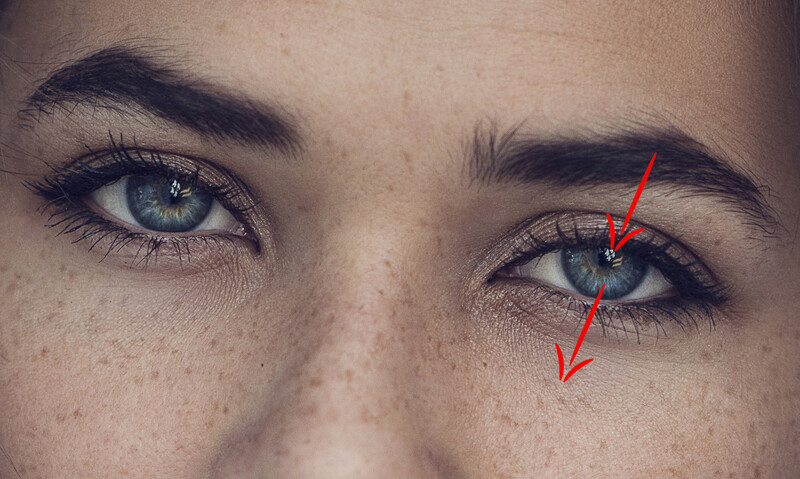
1) The light source always enters one side of the iris and is refracted from the opposite side of the iris. When editing the eyes, aside from the catch light, the brightest part of the iris has to be from where the light exits. Remember that the catch light hints to where direction the light is entering.
2) The eyelid naturally casts a shadow on the upper portion of the iris. This means the iris should NOT be equally bright throughout the entire circle.

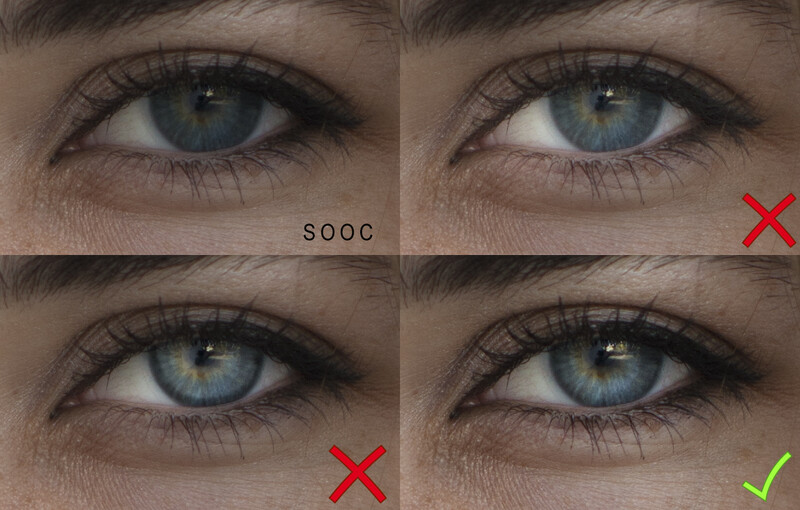
3) The only way the eyes will appear sharp, pop and look 3D is if there is contrast. Darkening certain areas of the eyes (pupil, limbus) is just as crucial as brightening the eye. (More on contrast + the illusion of sharpness HERE.)
Here is where people struggle the most. When approaching the iris and limbus, it’s crucial to think of it like dodging and burning. Adding contrast to the limbus with one or two brush strokes or lightening the iris with one or two strokes will result in an amateurish retouch. When editing the eyes, build up the highlights and shadows. The transition between the shasows on the edge and the highlight need to transition smoothly.
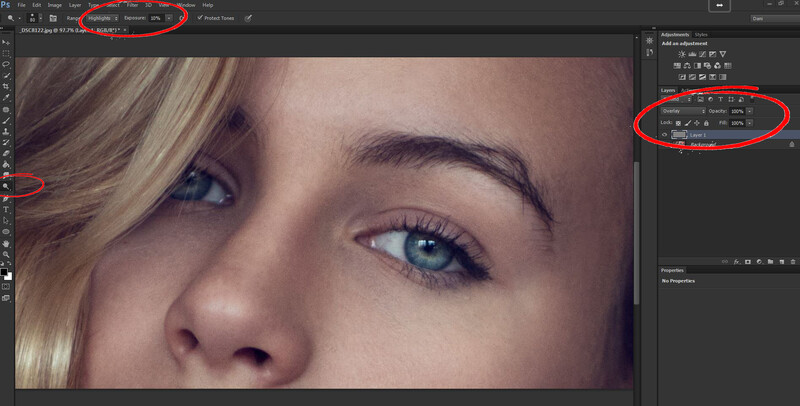
There are dozens of ways to dodge and burn the eyes. Here are 2 quick methods. Feel free to combine both for the ultimate results.
Method 1 - New Layer > 50% opacity > Overlay blend mode. Paint with a white brush at a flow of 5% - white will dodge, black will burn.
Method 2 - New layer set to 50% grey > Overlay blend mode. Use Photoshop’s Dodge and Burn tool (O) set to midtones/highlights at a low flow and start paining. For the burning select the burn tool set to shadows.
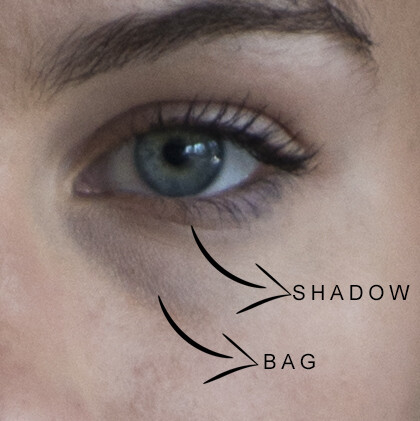
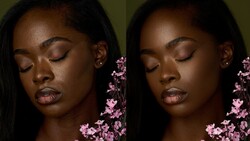
Bags vs Eye Shadow
One thing I wish someone had told me when I had started retouching was the fact that the shadow under the lower lid is NOT considered bags under the eyes, this is a wanted shadow that again, gives the eye area wanted contrast.
All images and other portraits can be found on my Facebook Page
If you found this article helpful, chances are your fellow photographers will as well, feel free to share this article with them.


Join the Fstoppers community for free
-
Post comments and join in the discussions
-
Browse the site ad-free
-
Share your work and get featured in the community
-
Compete in the photo contests for fun and prizes
34 Comments
I'd thought I'd share my method 1 and method 2 attempts. Tried to attach it but its not large here, go to this link for the original size to zoom. http://chrisadvalproductions.com/images/2342.jpg
I don't really see a difference.
EDIT: Actually there is no difference at all. Could you do it again? Your picture is perfect for this exercise.
awesome article as always Danny wish there was a vide some how i learn more from watching.
Dani could you dodge/mask the whole eye at say 15%. That would keep all the lights and darks equal. Then work on the iris more separate?
That's actually what he does. Use a high pass layer to dodge and burn it globally. Set it to a higher radius (18px) and then brush it in and lower the opacity to your liking. Then brighten the eyes. Use levels or curves,set it to screen and adjust to your liking. Brush over the eyes. And as the last step you can use the overlay technique to brighten up the iris and the catchlights.
Always appreciate the straight forward and simplicity, you did a fine job illustrating it in a beautiful way Dani. Thank you my dear.
This is a great tutorial.
I've been using the patch tool for under the eyes and whenever it ends up looking decent, I feel like it's by accident.
Very useful content, thank you.
Great writeup as usual! It's the fine details that matter just as much as the large ones sometimes! thanks!
Thank you for sharing Dani! Looking forward to trying these 2 techniques.
I'll be editing some headshots this weekend and will definitely try it out!
I think this is a great article and one of the best treatments of the topic I have seen. In my day job I am an ENT surgeon and so do some eyelid surgery. The area you are calling eye bags is formally called the nasojugal groove or tear trough. Some degree of shadow or darkening is normal or expected there so I would caution against completely retouching it away or completely smoothing it out. But otherwise I agree wholeheartedly. One other amplification: the limbus is naturally a bit unsharp so making that edge too crispy looks unnatural.
Definitely some subtleties here that I have missed in my own work. Thanks Dani...great examples.
More articles like this please! Great stuff, and glad you're not trying to sell a product to us.
Dani, great work!
Regarding under-eye shadow/bagging, you didn't get to elaborate much on the shadow portion. Is the shadow something that you completely leave alone? I get the impression that certain models have heavier, darker under-eye shadows. Take this one for example
Just soften it but don't get rid of it. I made that mistake myself and it always looked unnatural.
Wow, Dani... just wow.
Ok, does anyone else wanna tip their hat to the awesome Mr. Diamond for giving us all a free lesson in biology? I usually just dab the eyes with the dodge tool and call it a day. If there's one thing I notice here, it's the enhancement of catchlights—which—for natural light photographers like Dani and myself, are often lost.
BTW, nice job featuring only blue-eyed people Dani!
Great article. Personally I feel that in the last two Images, the sclera is almost glowing, and this makes the eyes look un-natural. It may just be me, but I find this is the most abused part of the eye during post production. Is this the trend these days, or am I somewhat right that it may be a bit too overdone?
Good article. Eyes can make or break a photo. I struggle with them. I see some people go crazy retouching them (I am a still a victim of this but have gotten better lately).
anyone give me perfect tutorial link to make perfect potrait???
Very thorough piece! You have me wanting to go snag tons of eyes shots to practice editing.
Wow this was extremely helpful! Thanks for the tips.
I have bookmarked this article to keep it handy.
What would you do differently for black eyes?
Best eye retouch tutorial I've ever seen!!!