You finally got that Canon 5D Mark III camera you have been desiring and now you are trying to figure out how best to take advantage of all it's great new features. Here are five ways I have customized my camera to best fit my needs while shooting weddings, events and portraits.
There are many different ways you can customize your camera's settings and I'd definitely encourage you to explore the camera and play with the settings to find out what works best for you. Here are the 5 settings I have changed to make an already great camera even better. While the focus of this article and accompanying screen shots are from the 5D Mark III it is also relevant to other cameras as many of these settings can be located on numerous camera models.
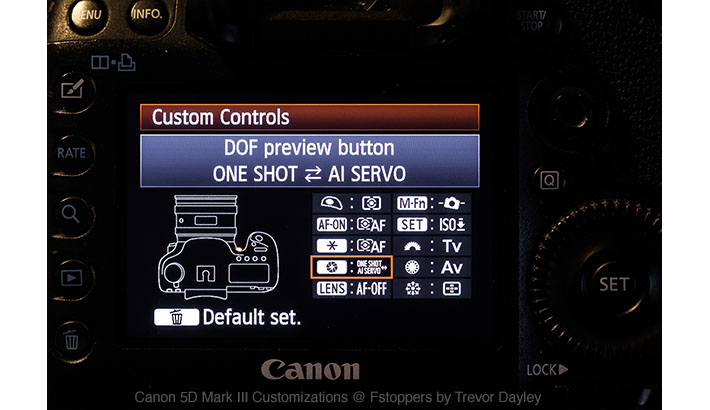
1. Change the DOF button to immediately change One Shot to Ai Servo
The DOF (Depth of Field) button is one of those forgotten buttons that most camera users hardly ever use or even know it exists. It is located on the front of the camera by the lens mount below the shutter release button. Since I never use it to check the depth of field, I decided to assign it using the Custom Menu Settings so that when I press and hold the button down it changes my camera from One Shot to Ai Servo.

By making this customization I can shoot most often in my favorite focus setting (One Shot) but when I encounter movement in my photo (people walking towards me for example) I can use my ring finger on my right hand to hold this button down thereby changing my settings from One Shot to Ai Servo allowing my camera to track the subject and continually focus on them.

2. Use only cross-type Autofocus points
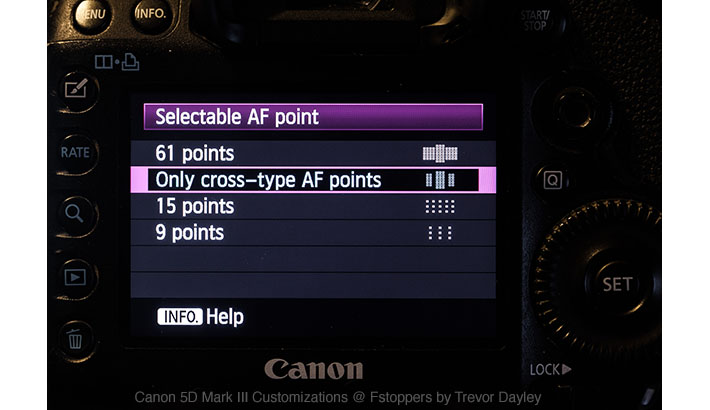
While I appreciate that the 5D Mark III has 61 Auto Focus points, I really only want to use the 41 points that are cross-type focus coverage thereby giving me a higher level of focus. In order to insure that I am always using one of the cross-type focus points I turned off all others. It's very simple to do.
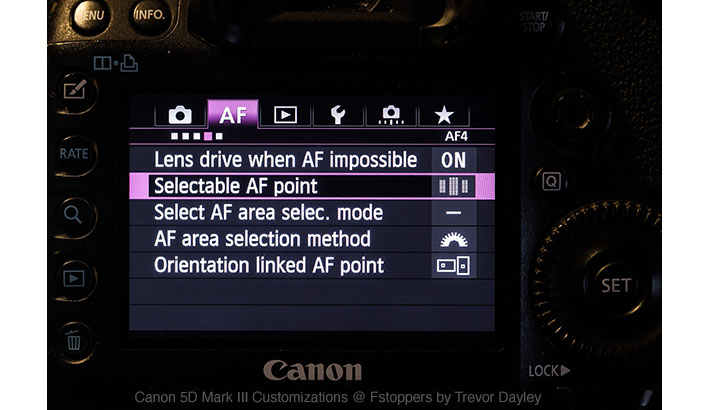
Just go to the fourth page on the AF settings of the Menu. There choose the second option down "Selectable AF Point" and then "Only cross-type AF points."
3. Turn off Star Rating 2-5
While out on a shoot I love using the new "Rate" button so I can do some initial culling in camera. I do this for two reasons. 1. So I can show some of the best photos at the end of a shoot to the clients immediately using the in camera slideshow and set it to only show the photos I rated good. 2. I can download the photos I star rated during the dinner time at a wedding to quickly create a slideshow of some photos from the wedding.
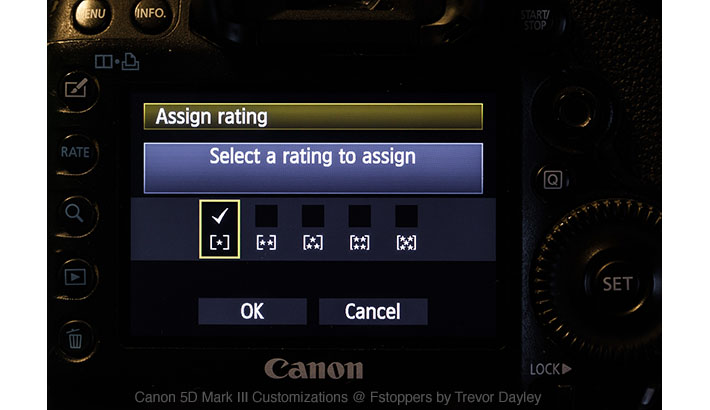
The camera allows you to rate photos 1, 2, 3, 4 or 5 stars. I don't need all those options. I either rate a photo with one star or no star. So I went in the camera and turned off 2-5. Here's how to do it.
First, go to the third page of the yellow wrench.
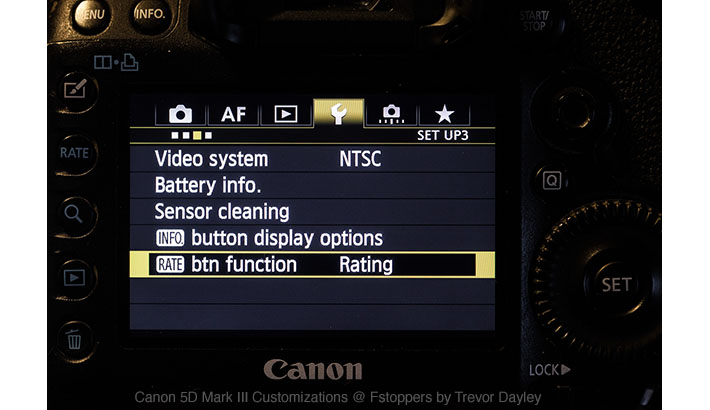
Now press the "Q" button on your camera to bring up the settings for the Rating button.
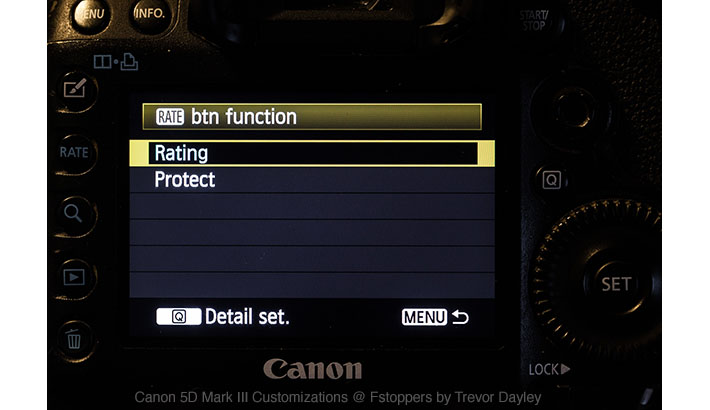
Then just toggle off settings 2-5. Now when you press the Rate button you either get one star or press it again it will turn it back to O. No need to cycle through ratings 2-5.
4. Change ISO speeds to 1-stop increments
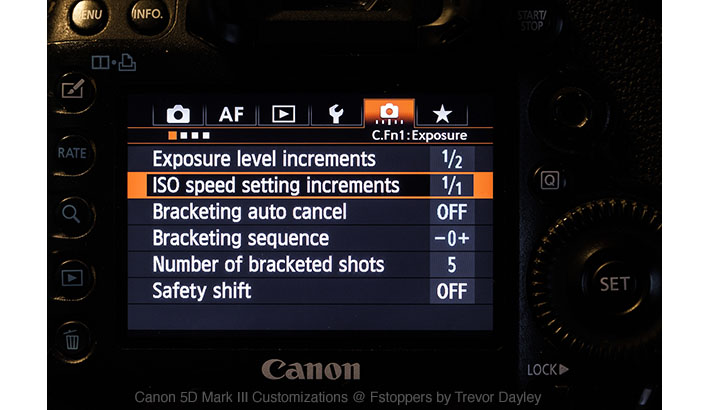
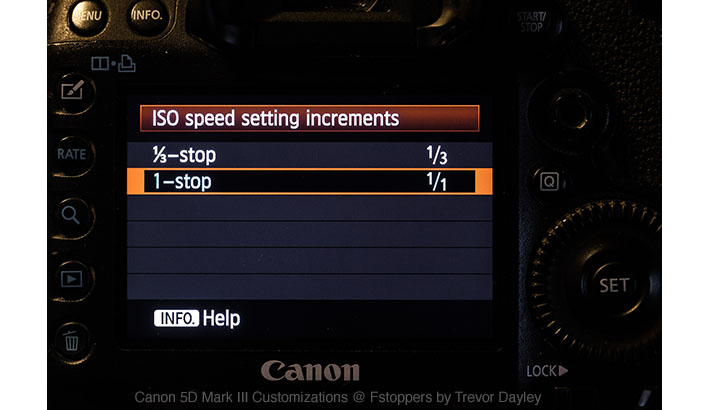
I like to keep things simple on the camera whenever I can. For me I have really found no reason to have precision control over my ISO speeds. So rather than change them in 1/3 stop increments I changed it so my ISO only changes in full stops. I still get plenty of control, 100, 200, 400, 800, 1600, 3200...
5. Change ISO using Set button and Shutter Speed Dial
One other customization that I love is while I am looking through my viewfinder if I feel need to change my ISO all I need to do is use my thumb to hold down the SET button (large button in the middle of the large dial on the back of the camera) and then rotate the Shutter dial on top of the camera. I have found this to be much easier than trying to choose the correct ISO button on top of the camera.
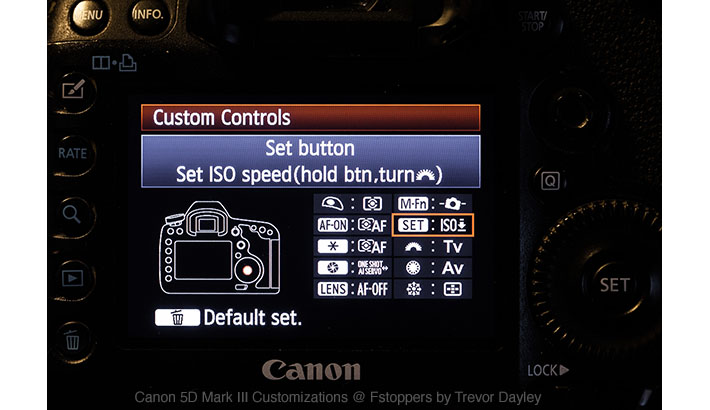

Lastly, here is a bonus tip. It surprises me to find out how many Canon photographers are not using this menu function on their camera. In fact, it is probably the one I use most often. In the camera menu settings if you move all the way over to the right you will find a green star with the title "My Menu."
What this allows you to do is set up that page so that you can put your favorite, most accessed menu settings on one page so that when you press the menu button it will take you right to a page of those menu options. That way you can access them quickly without having to try and page through your menu system. For instance on "My Menu" I have...
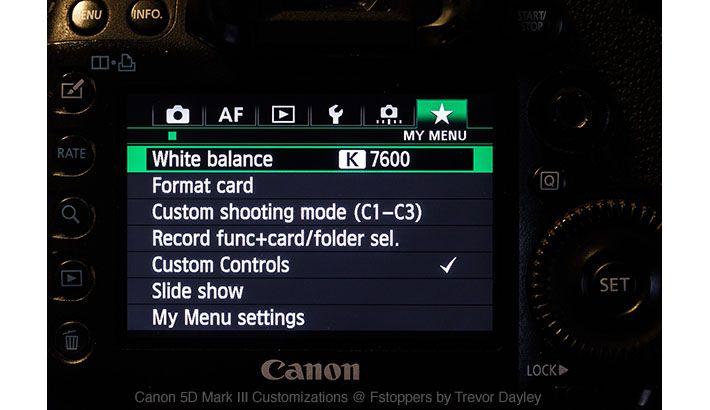
A. White Balance - allows me to quickly dial in my custom Kelvin temperature.
B. Format Card - easily format my cards before a shoot.
C. Custom Shooting Modes - so I can register my settings to C1, C2 or C3
D. Record Func+Card - so I can choose which card to play back photos from
E. Custom Controls - in case I want to change any custom settings
F. Slide Show - so I can quickly set up a slide show on my camera to show clients photos that I have already rated from the shoot. After choosing to play a Slide Show just go into the settings and select to have it only display the photos you "rated" that way it doesn't show everything you shot.
There are many others that I have on the camera, such as back button focus, but I felt like these might be ones that are not quite so obvious and could help people setting up their cameras. What are some customizations you have on your camera? Let me know in the comments below. If this has been helpful please be sure to share it with others.
If you're passionate about taking your photography to the next level but aren't sure where to dive in, check out the Well-Rounded Photographer tutorial where you can learn eight different genres of photography in one place. If you purchase it now, or any of our other tutorials, you can save a 15% by using "ARTICLE" at checkout.


ooo i need to setup "my menu"
Thank you Trevor for the information!
You bet. Glad it was helpful.
Great tips here. Thanks! I especially like the depth of field button to Servo AF. Brilliant!
Awesome. Thanks mfmg.
#1 is a great tip and I'm going to set this as soon as I get home. I have #2 set already as well!
Right now I have my rate button set to "Protect" but I never delete photos on camera anyways so I'll probably change it to a single star rating.
Hey Joel fantastic. Let me know if you come up with any other great ways to customize the camera.
Nice tips - thanks ... more??? ;)
Glad you liked it. I'll try to think up some more that I use and post about it in the future. Hopefully a few of you will leave your favorites here in the comments as well.
How do you download the photos rated with just one star? Can't be done in lightroom i beleive?
Are you using other software and setting?
I believe Photo Mechanic can do that, if you open the card as a contact sheet, then select by rating, then drag them to a folder. I need to try this out when I get home to be sure, though.
Hey Steve - As Christopher mentioned below the information can be accessed in Photo Mechanic which is my program of choice for ingesting and culling my photos. It is also the only way I am familiar with reading that data while using a Mac (though I am sure there are probably other programs out there that can, but LR cannot.) If you are a PC user you can just open the card up in Windows Explorer and add a column to the list view that says "Rating" then just click the title of the column to sort by rating and select all those rated one star and drag them to a different folder on your computer to copy them over. I use both PC's and Mac's in my work so I have been able to get familiar with doing it using either computer I am on at the time.
Hia!
Photomechanic, can as far as I knwo only import protected images, not rated.
I´m on OSX, so I cant do the windows explorer/rating trick.
Is there anyone out there how knows somethin about software for mac to import rated/tagged pictures from the canon 5d Mk3?
Hey Steve, in Photomechanic you can bring up a contact sheet of your photos on your card. Sort it by rating and then copy over just those with a star rating.
I'm thinking of getting this camera.
Thanks for the great info.
I like my pictures with nice deep colors.
How can i set up this camera to do that?
Andy - its a great camera but what you have suggested is available on most DSLR's with what is referred to as a "Picture Style". The closest to what you have described would be "Landscape" as it renders richer blues and greens... but there's a caveat! This is only for the in-camera processed image - i.e. the JPG and also the preview on the LCD. Shooting RAW will give you the flexibility to do what you want with the colours - in the editing program of your choosing!
Great tips Trevor! Thanks for sharing. I will definitely be using some of these tips, especially my unused DOF button!
Glad it could be helpful Gbenga!
Now I know why my AF is sometimes great and sometimes hit and miss, I must have been using non cross-type point without realizing it. Great stuff!
I need this information!! I got a 5D III this Christmas; this is my first DSLR. I've been using film with my Canon A-1 that I bought new 34 years ago. So I am experiencing "Culture Shock".
Wow... Thanks for this one Trevor! The Servo AF and the ISO on the Set button will prove invaluable in my setup. This is a great post!
Awesome tips Trevor! Thx man!!
This was the best, most helpful article on F Stoppers ever. Ever. Thank you.
Thanks so much David. Glad it was helpful and super appreciate your comment.
I would have thought that any story on 5D mk3 customization would have included something about Magic Lantern ( http://magiclantern.fm/ ). I've been shooting with the nightly builds for quite some time, and the customization, including focus peaking and "dual ISO" single-shot HDR images, is phenomenal.
Yeah Magic Lantern is nice but it is another beast when it comes to customization. There is definitely a lot you can do with it and I have it on a card in my Mark II. We have written about it a few times here on Fstoppers.
http://fstoppers.com/using-magic-lantern-with-focus-peaking-for-free-len...
http://fstoppers.com/no-joke-magic-lantern-gets-raw-video-out-of-the-can...
http://fstoppers.com/magic-lantern-raw-video-workflow-tutorial
...and quite a few other articles. Definitely a great firmware addon to bring some new customizations to your camera, but as ML says themselves. "Magic Lantern was created by reverse engineering an undocumented system that controls hardware. Therefore, we can't be certain that it's 100% safe." So I just use it on my back up camera, not my work horse.
The "Magic Lantern was created by reverse engineering an undocumented system that controls hardware. Therefore, we can't be certain that it's 100% safe." disclaimer is a CYA thing. They have been known to *occasionally* break things with nightly builds, but it's very stable. I use it with my primary camera units, and haven't experienced any breaking issues or damage to the camera body or lenses. (Primary body is a 5Dmk3, but also have used it on 7D and 60D bodies)
I tried ML on my 5D3 and tested some of the functionality - great for videographers and the trap focus caught my eye too - but I have an issue now that when I press the shutter button half way to wake the camera - there is a noticable delay, enough to miss a shot sometimes. Is this something I can reset somewhere?
If you're using autoboot / boot flag enabled, it doesn't quite take as long as that (at least, not for me). Also, if you're interested in working with MLV files (Magic Lantern RAW Video v2.0), I had put together some tools here:
https://github.com/shootthemoonfilms/mlvtools
I also have a nightly build repository with 5D3 builds with RAW, dual_iso, etc, modules, if you're interested.
This is so awesome, Trevor! Thanks so much!
Trevor ,
Thanks for taking the time to do this. It would be awesome if you guys could do this for other brands as well.
Indeed very very useful Tips! Thx Trevor ;) ... what could have been added, is the customization of c1, c2, c3 ... there i have different settings for my "auto iso" saved, and silent 3fps, and 6fps for action shooting. Chears Frank
Hey Frank, yeah I love using the C1, C2, C3 dials but I actually change them up throughout my wedding shoots and use them for various different purposes. I actually am working on putting together an article that will specifically just talk about using those, how to do it, set it up and best practices. Definitely a great function that is often overlooked.
Hey Trevor... did you end up doing a write up on the C1-3 set-ups for weddings (for example)? It would be interesting stuff.
Great write-up. Reassigning the DoF button is an inspired bit of genius. So simple, but so useful.
i shoot with a d7100 and i assigned the DOF button to switch between crop modes for when i need the extra little reach.
I shoot with Nikon D700 but a good friend of mine shoots with the Canon 5D Mark lll.. I also love that camera.. if anyone knows of a excellent shape used one that won't break the bank let me know.. Plus I need to justify getting it to my wife...
Check out Canon Direct in the Refurbished category. Great prices and you get a one year warranty with Canon refurbs now. If you purchase with a Discover or Chase Freedom card it will double the warranty.
Cool to know that many of these features are also on the 6D. There was a recent article explaining how intermediate ISO stops are actually just interpolated by the sensor and not exactly native themselves, so it's surely one good thing to set it to 1-stop. Thanks Trevor!
jet other movie reviews have shown that these interpolated numbers produce less noise than the regular ones... just to keep in mind when doing video
I do use the My Menu option. I also put date and time setting there. The default menu is the my menu when i click menu button. So during a soccer game i can quickly see what time is left ;-)
How about selecting AF-ON to "METERING AND AF START"???
This setting is the first thing I do for any new camera.
Hey Ty, yeah definitely one of my favorites. I addressed that one in the last paragraph. "There are many others that I have on the camera, such as back button focus, but I felt like these might be ones that are not quite so obvious and could help people setting up their cameras."
Great article. I always use the "my menu" tab to quickly format cards, change off camera flash settings while using my YN-622's, and others without having to dig through all of the other tabs. I'm definitley gonna try the DOF preview button tip, as I never use it for it's intended purpose.
Great Tips! I love the set button iso control. Personally I keep my dof button set to a home position focus point.
Still waiting on my Mark III to arrive in the Mail (Military Mail) then I'll be setting it up similar to how you described. Thanks.
You know the trick to get less nois on images is to shoot on native ISO right? 160 - 320 - 640 - 1280 - 2500 - 5000 (and 1600 and 3200 are universal). Give it a try. Compare a 1280 shot to an 800 shot and you'll see there's less noise do some electronic pole something something.
This is interesting. Do you have more info on this topic. I will like to check it out. An article maybe...
Thanks so much for the star rating tip!
I personally like the orientation linked AF points. When the camera is in landscape orientation it defaults to a certain type and location of AF point(s). Then, when you turn the camera to portrait orientation it automatically defaults to another type and/or location of AF point(s) that you have chosen! Great!!