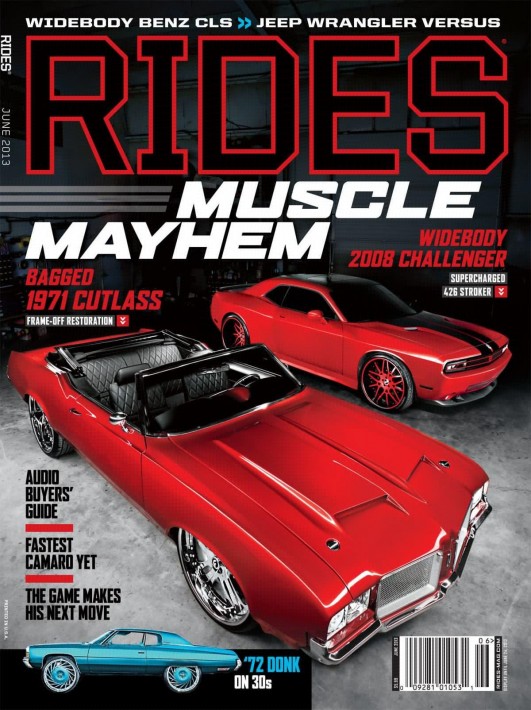
When people think of high end commercial automotive photography, they’ll sometimes call to mind images of cars with that distinct light streak down the side. That light streak that so many automotive photographers lust after is actually not a product of black magic, as it seems to be when you’re starting out, but actually incredibly easy to replicate with a technique called light painting.
As an automotive editorial photographer for the last 7 years, I've adopted and developed many techniques to help me adapt to each and every situation I can be dropped into. I adopted light painting for a few reasons, one of which being it's speed. Once you've gotten the hang of it, light painting can be done fairly quickly, which helps me get car owners back on their way. Also, it allows me another option for shooting at night and involves taking less gear in the event I can't cart my whole location case full of strobes with me.
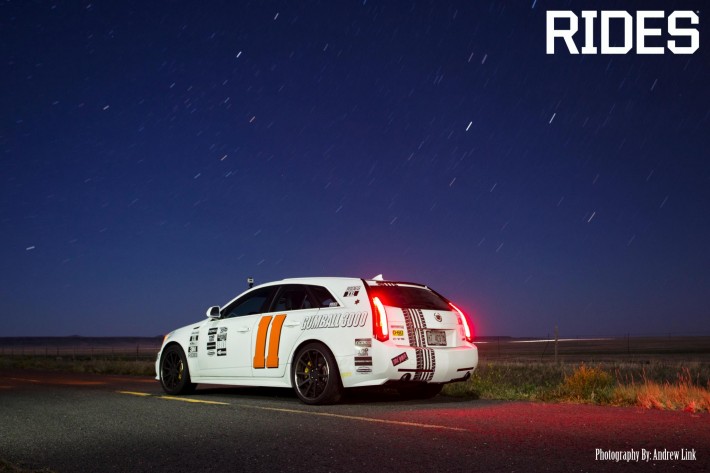
To light paint you’re going to need a tripod and a light source, almost any constant light will do. I personally use a Westcott Icelight, but I’ve been known to experiment. I’ve even used the LED on the back of an iPhone while covering the GUMBALL 3000 Rally. You’ll also need some darkness. The reason it’s done in the dark is because you’ll need a long exposure, (about 10 seconds or higher) to pull off the effect. You’re goal is to get at least an exposure of the ambient light in your background and a light painted exposure of your car, so make sure not to bump that tripod or your exposures will not line up properly in Photoshop later.
Start with your camera on a tripod and set to a long exposure, let’s say ISO 100, F8, 15 seconds. Trigger the camera and turn on your light, you’re literally going to walk around the car and bathe it in light. Having a friend to help will make it much easier, you’ll look through the viewfinder as your friend lifts the light up and down to see where the light is reflecting in the paint. You’ll usually want it to reflect along the body line of the car beneath its windows. Once you’ve found the proper height, you’ll keep the light moving at that height all the way around the car. After making a pass around the car that you’re satisfied with, it’s as simple as pasting the lit car into your background exposure, setting your blending mode to lighten, and masking out the excess. No black magic, just some simple Photoshop and some patience. The biggest immediate benefit you’ll notice with light painting is that your raw shots have a very surreal look to them before you get into any post production. Lots of shooters gravitate to this technique because it’s a very polished and clean look if done properly.


Above is the image shot on the GUMBALL 3000 Rally and lit by the LED of an iPhone. By downloading any free app that will turn your LED into a flashlight, you get an instant light painting source to be used in a pinch!


Now there’s no excuse not to try it, just grab a light and a friend and get shooting!


Just did this the other night actually. Gonna post them up on FB. Great job Andrew!
-Brandon L
so glad you did a post on this Andrew
Nice post but the title isn't the best. Would have named it "Comprehensive Guide to Light Painting". A Complete Dummy Guide would include a bit more than a few images and a few written sentences of the process. For instance a video of HOW you best light the car. I know I may get some answers like "dude don't you know how to set one foot in front of another and walk around a car with a light....". That's not the point! A Car is one of the most complex things to light!!! It is more or less a highly reflective surface. To see a simple video how a "master" does it can help a dummy to get to an better effect. I had to light a black car 2 days ago with natural light. Since then I have a whole new respect for car photography!!
Great little rundown Andrew, so glad you finally made a post about this, welcome to FS as well...Morts
Awesome to see Andrew on here, great write up and shots as usual!
Were there other lights used on the RIDES cover shot or is this all light painting? Looks great
That RIDES cover is all light painting. One exposure for each car and one for the floor.
Thanks by the way!
You forgot to mention that if your camera sees the actual light source it will show up on the exposure in streaks..... if we're catering this for dummies that's probably a handy note.
If you would like to see more hands on:
https://www.youtube.com/watch?v=VjyX-A9cujs
http://www.profoto.com/blog/commercial-photography-2/how-to-light-a-musc...
https://www.youtube.com/watch?v=rF9GRhxWbLU
The truck video isn't the same technique. Taking a bunch of stills with your strobe in different locations and blending them together is compositing. Light painting uses a constant light source not a strobe and can get the car lit in one exposure most of the time. Very similar, but different.
To be honest I only read the title and thought it was a post about compositing. Since, in a way, it is light painting too.
Nevertheless, your approach seems really efficient in terms of equipment and time. Thanks a lot for this, I will definitely try this.
Um, you're still compositing...
"After making a pass around the car that you’re satisfied with, it’s as simple as pasting the lit car into your background exposure, setting your blending mode to lighten, and masking out the excess. No black magic, just some simple Photoshop and some patience."
Spy, I know I am, what I meant was I'm only using one background and one lit car. Rather than in the video where he's building the car out of a bunch of shots also. It's faster and easier this way. Also, with some practice it's possible to get the whole shot, background and car, in just one shot.
Very cool post. I got to try this soon.
http://dr5000.com/dodge-challenger/
This was lightpainted as well - 20 seconds exposure, it was pitch black :) Actually I built a special lamp to do it. These are barely photoshoped...
Really cool shots!!
Could really use some advice or critique on the latest lighting experiment I did with my personal vehicle. I do automotive photography usually with natural light, but want to get into lighting the cars for a more dramatic look. Any input would be great.
https://www.facebook.com/photo.php?fbid=550579031646641&set=a.131809...
@AndrewLink:disqus you do what others fail at... and that is do more with less. Your light throughout the scene...is tastefully applied.... never distracting.. and thoughtfully included/excluded.
I think ( IMO ) that while the techniques of learning how to manipulate any lighting source or modifier are readily available... what truly makes the artist stand out is the ability to make the decisions as to what feels right.. what feels wrong. ( I just wrote an article expounding about this for Light IT.) Clearly you excel at this. The viewer of yoru images is invited to have a peek around.. but just enough to get a feel.. and then always pulled back in to the subject.. Its a wonderful dance.
It seems so simple, yet its truly the placing of light as brushstrokes, deliberately...that gives an image depth..directs the viewer's eye, and sets the mood in subtle ways that the viewer isn't even aware that they are being so mindfully guided. That is what's so wonderful about your work.
Thanks for making great images.
Appreciate that Jason!
Am I the only one who noticed he wrote"You're" instead of "Your"? Anyways, this article was really helpful for me, given the fact that I am trying to simplify my work most of the time. Thank you!