
Sometimes even the widest wide angle lens is not enough. In those cases you have to shoot multiple images and stitch it together into one extreme wide angle shot. You can go as far as 360° around, if you want. But you have to avoid parallax errors.
Shooting wide angle is fun. Almost every smartphone has the ability to make panoramic shots. But have you seen the stitch errors, often visible at the bottom of the image when there is something close to the camera? Those errors are caused by parallax errors. These errors also occur if normal cameras are used for panoramas.

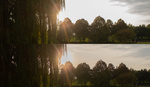
A panorama made from three individual shots. There is no foreground present, which will reduce the risk of parallax errors. This could also be made with an smartphone, but I used a camera and a nodal slide for this.
Everyone has experienced parallax at some time. Even those people who don’t take any pictures. Just look at something close by and hold your hand against one eye. Watch how the orientation against the background changes if you hold your hand against the other eye. Suddenly the object has moved a bit against the background. The closer the object is, the more extreme the change will be. If the object is far away, closer to the background, the effect won’t be that obvious, or even invisible at some point.
This is similar to what happens with panorama photography. If you use your smartphone or camera to make a panorama with everything in the distance, there will be no stitching errors. There is no parallax error visible. This is one solution to avoid parallax; just make sure you don’t have any objects that are significant closer compared to the background.

When there is a close by foreground, parallax errors will likely occur if you don't look out. I used a Really Right Stuff PG-01 Compact Pano-Gimbal Head for this panorama at the Faroe Islands
The other solution makes use of the entrance pupil of the lens, and how the light rays find their way through the lens. By choosing the rotation axis at the right location, parallax will be eliminated. This point is known as the entrance pupil, but we commonly use the term nodal point or no-parallax point.
The Parallax Error
When the relative position of a subject changes while rotating a camera, it is called parallax error. This can be best explained with some examples. I have placed a camera on a tripod, just like we always do. The tripod is underneath the camera, with the lens sticking out. The rotation point when shooting panoramas will be approximately at the sensor location. This can be seen with the animation I made.

This is how a camera is fitted onto a tripod. I used an L-bracket and a panorama mount for rotating the camera. The rotation axis is approximately at the sensor location of the camera.

This is how the camera is rotated. The location of the lens is changing dramatically. This is how parallax error arise.
I have placed two objects in line with the lens, and took a three shots with different angles, as seen in the animation. As you can see in the example, the two objects are aligned in the shot straight ahead, but not when the camera is rotated.
If you would try to align these three images, there would be a stitch error. The objects are not at the same place relative to each other, between each shot. This is a parallax error.

This is how the objects in the three frames are orientated relative to each other. Stitching these images will be difficult, or even impossible stitching errors.
How to Avoid Parallax Error
The parallax error has occurred because the rotation point is at the sensor location of the camera. The effect is the same as the experiment when holding your hand against each eye. The solution for this, is to rotate the camera at the entrance pupil location, or nodal point in common tongue. I will use the term nodal point from now on.

By rotating the camera over the nodal point, you can avoid parallax errors completely.
By rotating the camera this way, we avoid the parallax. I have done the experiment with the camera on the tripod again, but now the camera is rotating over the nodal point. This way we don’t change the lens position, and thus changing the orientation of the lens relative to the subject, but we rotate the sensor itself.

By rotating over the nodal point, the lens doesn't change its position relative to the subject. Now it is the sensor that is rotating.

The result of rotating over the nodal point is very clear. The subjects have the same location relative to each other. Stitching will be possible without stitching errors. Compare this image to the previous one, to see the difference.
As you can see, the foreground and background have the same location relative to each other. There is no parallax error. Stitching software will have a much easier job, and stitching errors will be less likely to occur.
What Do You Need for Parallax Error Free Panoramas?
You already can guess by looking at the images. You need a way to change the position of the camera on the tripod. For this you need to buy a nodal slide. Or you can build your own, of course. It is a very simple and lightweight piece of metal, that can easily find a place in your camera bag. You only need to know where the nodal point of your lens is located.
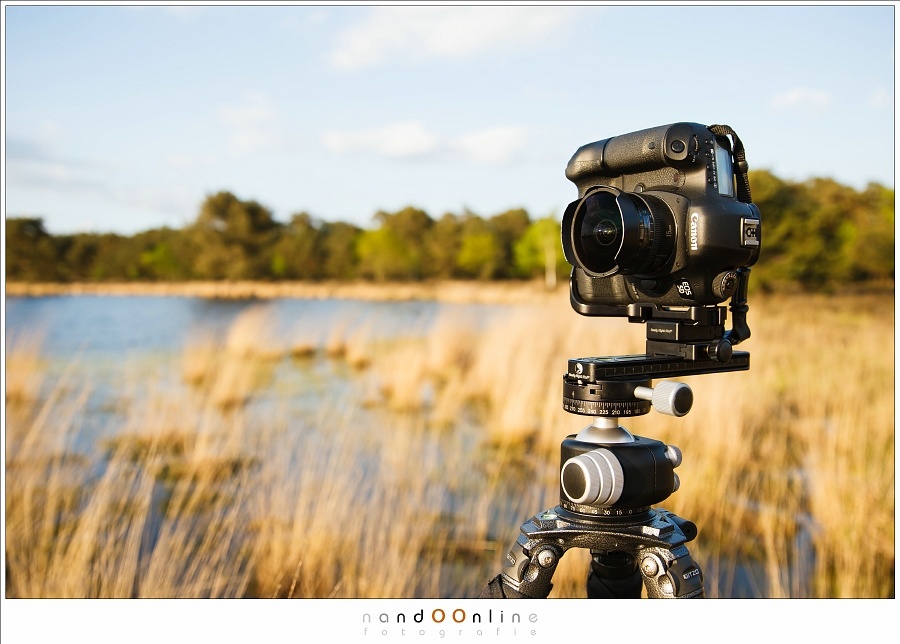
Using the nodal slide in a real life situation. Here I am shooting with a full frame Canon EOS 5D and a Ef 15mm f/2,8 fisheye lens, on a Really Right Stuff nodal slide.
You can search the internet to find out the exact position of the nodal point of your lens, or you can find out yourself by doing the same experiment as I did. Just change the offset of your camera on the tripod, and find the distance where two objects stay in line. Write the numbers down, and put the note in your bag. I made one myself, with every bit of information I need when I am going to shoot panoramas.

For years I had this little sealed card in my camera bag. It had all the necessary information for parallax error free photography.
One Step Further
A nodal slide is perfect for horizontal panoramas up to full circle. But what if you want to shoot in multiple rows? The parallax error not only occurs with horizontal panoramas, but also when changing the vertical angle.
If you want to shoot multiple row panoramas, or even 360°/180° panoramas, you will also need a nodal slide for the vertical rotation. I once bought the Really Right Stuff, the PG-01 Compact Pano-Gimbal Head, which allows me to avoid parallax errors with vertical and horizontal rotation. It can be quite a challenge to set up the system, but it makes stitching a lot easier. Now I can also make vertical panoramas without the risk of parallax errors.

One step further. The Really Right Stuff PG-01 Compact Pano-Gimbal Head is a compact and light weight panorama package that can easily fit the camera bag, and can avoid parallax errors in both horizontal as vertical rotation.
How About You?
Do you have a nodal slide for panoramic shots, or do you avoid close objects? I would love to see your setup for shooting panoramas, so feel free to share an image of your setup and tell me about the good things, and if present, also the downsides. I'm looking forward to your comments.
If you love landscape photography, consider checking out our Photographing the World Series with Elia Locardi where we go to some of the most beautiful locations in the world and teach the process of creating world class landscape images. Save 15% by using "ARTICLE" at checkout.


I took a workshop in this last year. This article is very well written and explains how to make high-quality panoramas the right way. Thanks!
Thanks for your comment. Appreciate it.
Nice picture, by the way :)
Sweet image!
Reading this, I just realized I have enough components from my astro rig to piece together a panoramic mount. I meant to pick up one unit a while back that was quite economical, but I forget the brand. I might give this a shot at with my astro gear. Nice article, thanks!
I hope it turns out a to be great use for panorama shooting
Curious, does it matter how far away the subject is from the front object, can it be any thing in the background? How far out from part of the image that is included in the foreground? I'm planning on setting up a few lenses for my Z6.
Would love to see a well explained tutorial on Multi-row panos. Have you tried using a High-Rez feature and then include them in a pano?
Technically it can be anything, but you'll only have issues with objects that are within a certain distance. Probably twenty feet or so? Distant objects just don't move as much when you're panning without a nodal slide. It's not necessarily an insolvable problem, photos will still stitch, but ghosting artifacts may occur around near-field objects.
Honestly I think software stitching in programs like Photoshop has come a long way and it's less of an issue than ever, but I don't leave the house without my RRS MPR-192 & mini clamps because Im a sucker for taking panoramas in the forest and trees have a natural near-field photobombing tendency there.
I particularly recommend that slide because it is infinitely useful, and has close and dependable markings to make lens swapping much quicker, just make sure to figure out your nodal points and adjustments for each lens on that rail and have the info ready when you set off to photograph.
I can't speak to high Rez modes, but bracketing panos gets insane quickly, and almost impossible if your working with any breeze or cloudy skies. If you're willing to put the time into post and are looking to print big the rewards can be worth the struggles
Although stiching software is very clever nowadays, I found out stitiching errors because of parallax is almost impossible to correct.
Often it is possible manually in Photoshop, with layers and masks, and some cloning and healing brushes. A nodal slide prevents those hours of painstaking Photoshop work
I haven't done multi row panoramas a lot. Just for fun, but not seriously. I could use my RRS PG-01 for that. Perhaps I will try.
About your question, the most important thing is the distance of the camera to the foreground object. If there is a large distance, it will become less of a problem. How much further will depend on the focal length, I think.
The panorama I posted is two rows...I think 7 shots in each row. Assembled the image in Lightroom and let it do all the heavy lifting.
Great article Nando! Hadn’t even realized my Panos could improve since LR does such a nice job on them and I haven’t printed anything large enough to notice the difference but ... Knowing this for the future might be very helpful. : )
Glad to be of help :)
I built this bracket for my 10.5mm
Nice one.
Is does take a lot of space in the bag, I guess. But it works :)
The article is absolutely right. Panoramas should be taken around the nodal point. The issue I find is to find the nodal point values for each lens. This is specially hard with zoom lenses since the values changes with the focal length.
I don't understand why lens manufacturer doesn't include these values into the tech specs. That would help us a lot.
Lens manufacturers should mention a lot more, even on their lenses itself, like a good depth of field scale for instance. Laowa has the entrance pupil point mentioned on the 12mm zero-D lens. A real benefit, I would say.
Or you can do what I do and shoot a panoramic camera
Not everyone has such a camera. Of has the money to buy one. But I agree, if you shoot panoramic shots all the time, it can be something to consider.
Which one do you have, if I may ask? And how wide does it go?
Excellently written and illustrated for the those first FAQ on stitching. It’s bookmarked for my club.
Thanks
But you can still see the parallax effect in the second example as the top of the film encroaches on the 'Panasonic' label of the battery. I would also say that the angle of the camea to the horizon makes a significant difference. Ideally you dont want any objects in the foreground if you're central field of view is not aligned to the horizon.
I was thinking: what Panasonic label? Which battery? But now I think you refer to the box in the back that contained the Fuji filmrol. And indeed, there is some parallax left since it's not at the exact nodal point.