Photoshop might seem tricky for starters, but once you understand the basics, you can take your editing skills from zero to hero.
1. Working With Layers
Layers are the core components of Photoshop. Consider the layer panel as a book with transparent pages, and each of your actions will be written on those pages on top of each other with every new layer. So, before adding or changing anything on your image, make sure to create a new layer. This allows many options, such as adjusting the effect of that layer by simply tweaking the opacity, changing the blending mode for various effects, and even broader options inside the Layer Style section. To go into the layer styles, simply double-click on that layer. The Layer Style section is the magical part where you can adjust the Advanced Blending Options and even apply some legacy features such as shadows, glows, and overlays to your layer. The advanced blending modes, on the other hand, determines how your layer will interact with the dark or light parts of your image. This provides great options for certain situations, and you will find it quite useful once you start doing composites.
You can always arrange the layers by clicking and dragging and even flatten your files to save some space on your hard drive later. Working with many layers may slow down your PC or Mac, but you will be fine unless you are working with more than 50-60 layers. So, even if you want to tweak the brightness and contrast of your image, simply add a Brightness/Contrast adjustment layer, rather than applying that effect on your background image. Remember, the key is keeping your background image as it is until you’re done with editing.
In Photoshop’s layer system, an adjustment layer affects all other layers underneath it. If you want an adjustment layer to affect a specific layer or layer group, simply use the clipping mask feature to attach the adjustment layer to the desired layer and limit the effect within the selected layer by right-clicking and choosing "Create Clipping Mask."
2. Using Masks
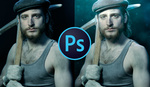
Once you get used to working with layers, the second most feature you will be using is masks. You can add masks to any layer for erasing certain parts of that layer. Photoshop adds a mask in white by default, which indicates the effect is valid on all parts of that layer. When you start painting while the mask is selected by using the brush tool with 100% black color, you will erase that section on your layer. You can adjust the percentage of the black color when using your brush in order to make subtle changes. The masks and painting with a brush work both ways. You can simply invert the default white layer to black (CMD + I on Mac or Ctrl + I on Windows), which disables the effect of that layer. By painting the black mask with 100% white color, you enable the effect on the painted areas. It’s that easy. So, always use masks rather than the eraser tool to keep your original layers.

3. Complex Selections and Alpha Channels
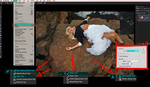
Since you are familiar with the layers and masks, now you can start working with the advanced selections inside Photoshop. First of all, Photoshop keeps updating its quick selection tools in each version by adding new features and improved algorithms; however, these tools don’t always work perfectly as they’re advertised. Therefore, it’s better to know the basics when you need to make complex selections. The key for complex selections is creating a contrast between your subject and the background. The more contrast you create, the more precision you will achieve when masking your selection. This is where the Channels section comes into play. You will see each individual channel in RGB, red, green, and blue. You can simply click each layer and see how much contrast you can get in your image. Once you pick the best one, duplicate that channel by dragging onto the plus icon at the bottom right corner on the Channels panel. Now, you can tweak the levels and curves settings by using the Image Adjustments panel on the command panel to increase the contrast between the white and black area on your selected channel’s copy. If you want to work more precisely, pick the brush and set your color to either black or white and change the blending mode of your brush to Overlay. Painting the light gray areas with white will make those areas lighter and vice versa. Once you are done, simply click on the working channel copy by holding CMD on Mac and CTRL on Windows, and you will get the selection on your image. You can always refine the edges of your selection or adjust the feathering values by using the Select/Modify section on the top panel of Photoshop.

On this image, the Blue Channel has the most contrast, so it is duplicated and tweaked with Levels for more contrast between the white and black areas. Further tweakings can be done by painting with brushes set in either Overlay or Soft Light mode.
Smart Objects
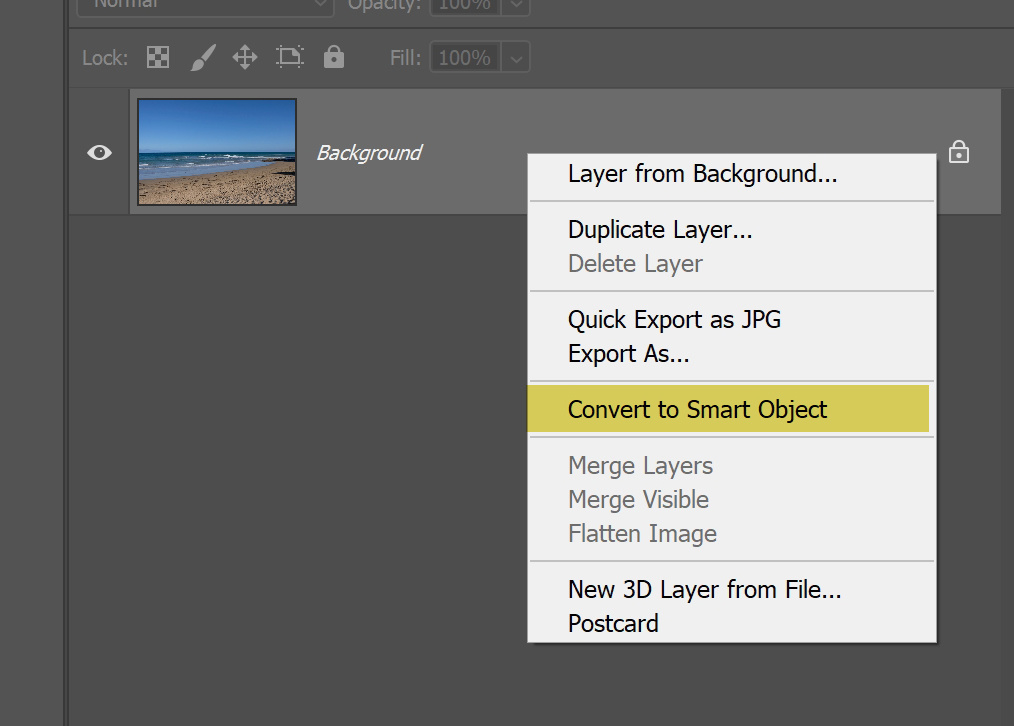
In a nutshell, smart objects keep the original data of an image or a layer. Therefore, when you change the size of a Smart Object or simply add an effect onto it, you can always revert back to the default settings without deforming that layer. To convert a layer into a smart object, simply right-click and choose “Convert to Smart Object.” To make changes on a Smart Object, you can double-click on that layer and open the image on a separate tab. For adjusting the settings on a Smart Object, you can simply turn on or off the smart filters underneath that Smart Object.
When working with a raw image in Adobe Camera Raw, you can even open it as a Smart Object by holding down the shift key and clicking “open as a smart object.” This allows you to go back to the default camera raw settings or make any changes when you edit inside Photoshop.
In the second part of this series, I will explain the key points for compositing and color-grading techniques for beginners.