
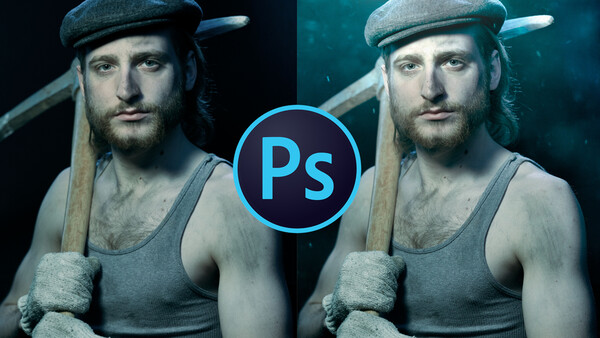
As time goes on, the tools and technology keep getting better and more powerful. Today, learn how you can take a boring seamless paper backdrop and give it life with added texture and easy to follow steps using Photoshop.
After diving into the depths of the Photoshop software for years, I still find myself finding new ways of achieving unique results. There's always something new to discover.
For a majority of those starting out, many photographers may not have the space in their studio for a fixed textured wall to shoot against or in this case, a smoke machine. So, to fix this problem, I take you behind the scenes on a shoot I did in my friend's garage and walk you through how I brought the image to life using the magic of Photoshop.
The best part about this technique is the same principles apply to any picture with a black or gray background! If you're looking to enhance a smooth background with a small amount of texture, this technique opens up a whole new world of background styles and endless possibilities.
The Process
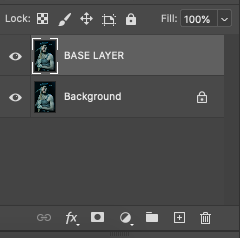
Step 1: Copy Background Layer Twice
To start, open your image in Photoshop and duplicate your background layer. You'll notice that the background layer is locked. Keep it this way. This locked layer will serve as the untouched version of your image in case you want to go back and restart at any point. To duplicate the background layer, press Command+J. Once your background layer is duplicated, this will become your working layer where you will do any adjustments, like using the clone stamp tool or cleaning up blemishes.
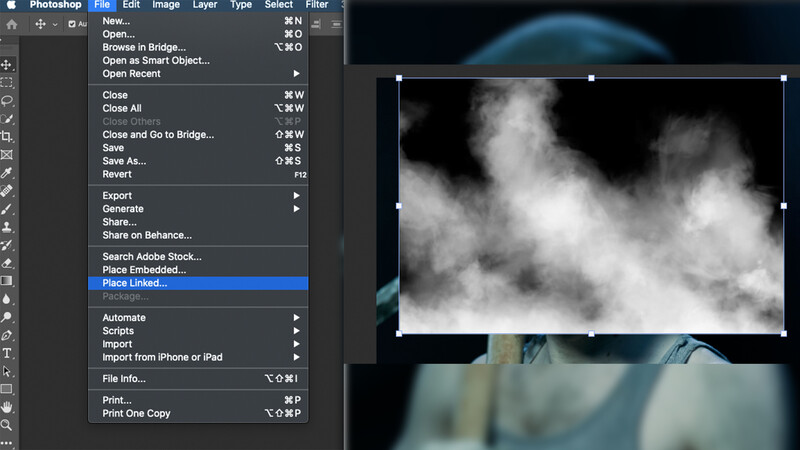
Step 2: Place Your Texture Over Your Image
Before you begin the process, be sure to have the textures you want to overlay at the ready. I highly recommend the texture pack put out by RGG EDU and Kelly Robatille. It has all the high-resolution textures you could ever need. After you have made any necessary adjustments to the base layer, head over to the File tab, and scroll down to Place Linked. Go to wherever you saved your texture file, and press Place.
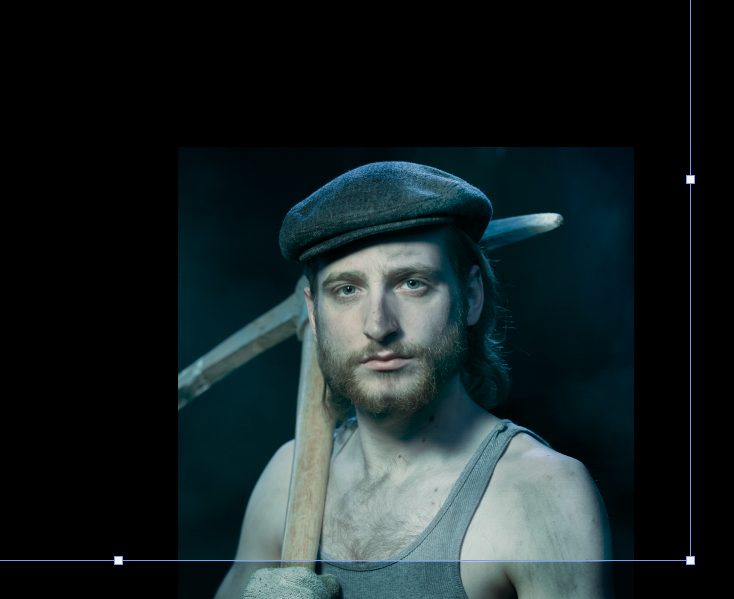
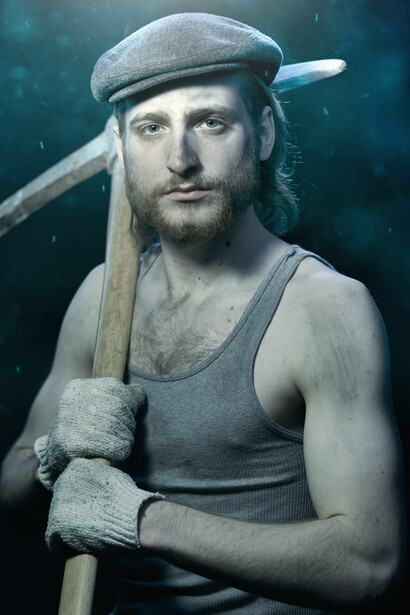
Once the texture is placed over the image, hold down Command+T to bring up the transform tool. Using Shift, scale your image up to whatever size you want, rotate it, and move it to the place you think it fits best. One thing to keep in mind when positioning it is that you want to match the perspective of your lens and how you shot it. For the portrait below, I shot with a Canon 100mm f/2.8L macro lens, so the background becomes compressed and more enlarged. When you're done resizing and positioning the texture, press Enter, and Photoshop will lock all of your adjustments into place.
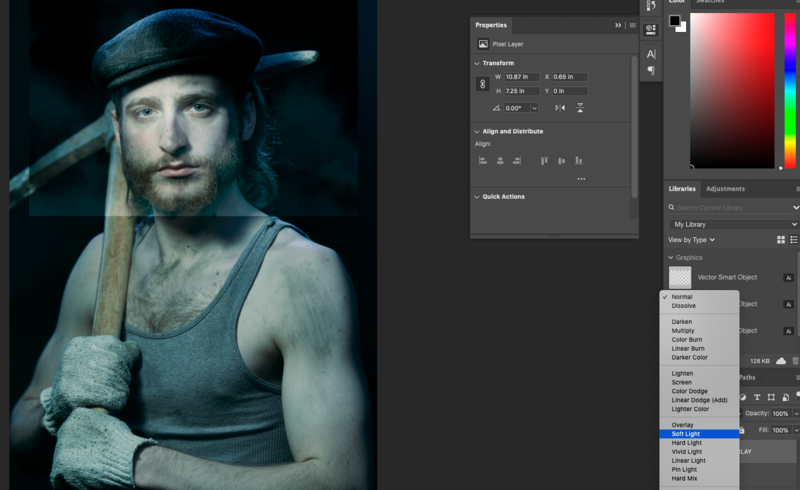
Step 3: Change the Blend Mode
When applying texture to any image, you want to be sure to make it blend into your environment and match the feel of the image. The first and easiest way to begin to make your texture feel like it belongs is by changing your layer's blend mode. The best part about shooting your portrait against a seamless black or gray roll is that you can easily drop your texture on it, and it will seamlessly overlay when changing your blend mode to Soft Light. To change your layer's blend mode, head over to your layers panel, and on the left corner, next to your opacity slider, click where it says "Normal" and scroll down to soft light.
Step 4: Be in Control of Where You Want Your Texture to Be
Even after you change the blend mode on the texture, it will still be visible on the subject's skin or clothing. To solve this problem, all you have to do is make a layer mask.
A layer mask is your way of telling Photoshop what you want to be seen on a layer or what you want taken away. By default, when you make a new layer mask, Photoshop will fill the mask white, which means everything on that layer is visible, but when the mask is filled with black, it means everything on that layer is invisible.
In this case, I stuck with a blank white layer mask, but to get rid of the texture on my subject's face, I chose to add a linear gradient mask to it. This just means it will get rid of the texture with a smoother transition than if I were to paint it by hand.
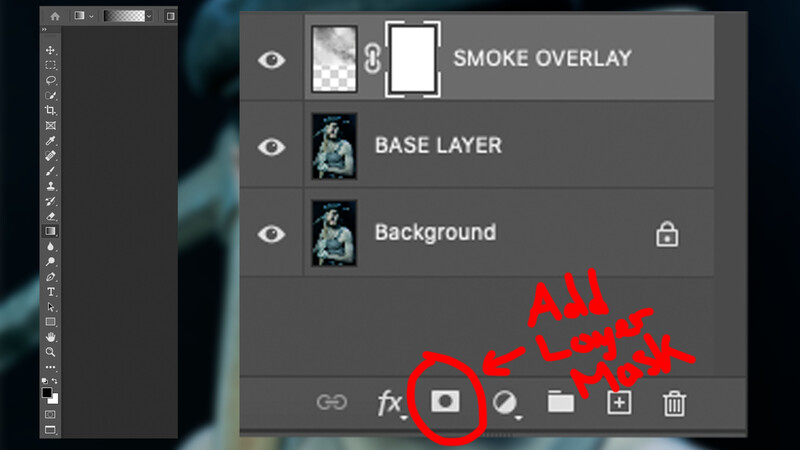
To add a gradient mask, press G. Head up to the top of your screen and set the gradient to linear and from foreground to transparent. Make sure that your foreground color is set to black and your background color is white. Black is taking the texture away, and white is bringing it back.
Step 5: Giving the Texture Life and Matching the Environment
To make your added texture the most convincing, it must feel like it's actually sitting in the background. It must match the lighting that is on the subject. If the subject is lit with a soft light source and your background is lit with a specular spot light, the image won't feel right. Before beginning this step, you need to establish where the light is coming from in your scene and break down its qualities. Is it coming from the left and diffused? Is the light in the middle of the background with a specular quality? In the case of the image below, the smoke is generally backlit, and in the raw image, I knew I wanted to add smoke later, so I lit the subjects hair from the top and back.

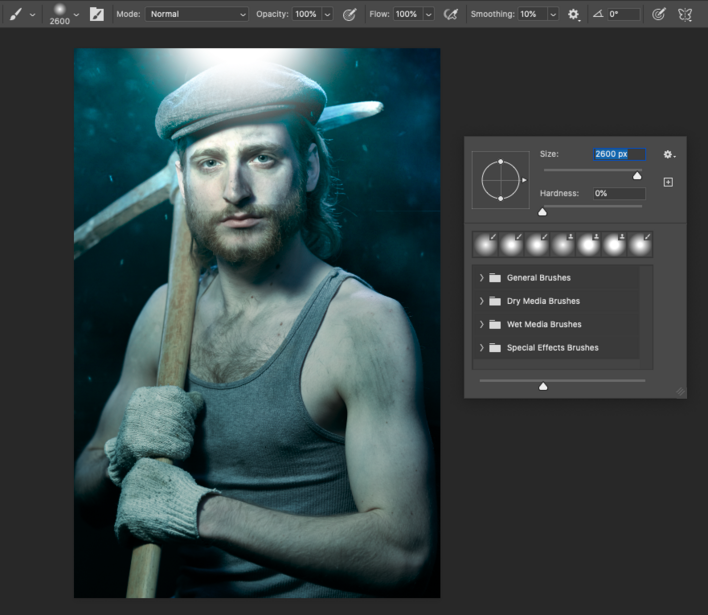
Step 6: Making the Light Source
The last and final step to bring the image together is by adding a light source to the scene and to bring the background to life. When making your light to add into the image, make sure it matches the quality of the preexisting light in the scene. In the shot above, the light on the subject's hair is soft and diffused. So, to match that, my added light was placed from the top corner and diffused.
To make it, simply create a new blank layer by holding shift+option+command+N, and call this layer "light source."

Next, right-click anywhere on the image to bring up your brushes panel. Then, select your softest brush and make a massive dab of white anywhere on the image with an opacity and flow of 100%. Once that's done, press Command+T to bring up the transform window. To create a more diffused look, I scaled it up, so the light was subtlety peeking into frame, which tells me that it is coming from the right direction and matches the quality of the preexisting light.
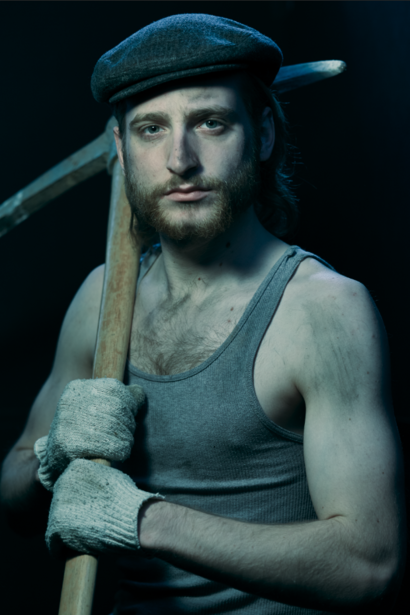
The Final Results
Closing
For the work I do, the texture I add brings my photos to life. If I am not able to create the effect on set, I am always thinking with the end in mind and considering how I will edit the picture later in Photoshop.
In just a few simple steps and a few minutes in Photoshop, you can make your images come to life through adding texture and overlays to them. Do you have any pictures you have done using the same techniques? Drop them in the comments below!


Join the Fstoppers community for free
-
Post comments and join in the discussions
-
Browse the site ad-free
-
Share your work and get featured in the community
-
Compete in the photo contests for fun and prizes
6 Comments
Noted.
I really like your article Eli and the tutorial. The composition and texture idea is excellent and I really like it.
However, I have to agree with Alexander Petrenko on it being black and white. (Edit: That I think it looks better as a B/W. Not that you have to make it B/W to be art. I want to clarify that.)
As for my personal tastes I find that the top of the photo and his hat are too bright and distracting. I also think it would look better as a high key photo. I downloaded it and made adjustments in Ps to see what it would look like with my preferences applied. I liked what I got and I want to see what you think. ;-) I sincerely hope you don't mind. This is all in good faith for a positive discussion so I hope you are in no way offended. Your composition is excellent. I only adjusted the lighting.
Sigh, too many people rely on BW conversions as a crutch. I much prefer the author's final edit version.
Eddie I looked at what you wrote and what I wrote and updated what I wrote. That is converting to B/W doesn't make it instant art. That I think we agree on. I just like that particular photo as a B/W better. It's all good! I looked at your photos on here and you only have one B/W and I like it. Fine work all around!! ;-)
A truly beautiful composition Eli, I love the scene it's setting and your texture really makes it pop!