

There’s more to creating a good photo than just moving the sliders. A huge part of wowing your viewers can come down to just a few settings that many forget. Before you export or save your next image, make sure you check out these options for the best results.
Just a few weeks ago, I found myself needing to create finalized versions of some images for entry into a contest. These pictures ran the gamut from a single raw file edited in Lightroom to a heavily edited panorama whose constituent frames had been preprocessed, merged, then further edited in Photoshop. This meant I had files in different places and different formats. Since they were all going to be entered alongside each other, it was important that they were consistent and abided by the specifications of the contest.
Understanding the Deliverable
If you’re looking at how to optimize your entry for a contest, I’ve found it’s very helpful to dig into the otherwise boring terms and conditions of the contest. Here, alongside a bunch of legal terms, the contest organizers will spell out the details of what they’re looking for. That can also be a helpful way of understanding just what the theme is they’ll actually be judging on, but that’s an issue for another time. Getting back to the specifics, you’re looking for a few key terms: file format, size, resolution, color space, and details on the judging process.
For file format, you’re probably going to end up entering a JPEG, although I’ve seen some that will take a TIFF. Color space is similarly simple: exempting the rare edge case, sRGB is a good choice.
When it comes to size and resolution, things can become a little less clear. You want your file to be large enough to show all the image quality possible, particularly if they have a minimum size, but be careful of entering massive files. In my case, a 400 MP panorama was going to be overkill; taking 30 seconds to load probably wouldn’t leave a good impression on the judges, no matter how sharp it was. This also ties into how it’s judged, as a file for a popular vote on social media has a very different set of priorities to one in a juried print competition.
Preparing the File
Once I’ve picked out my entry, I like to bring the file over to Photoshop. While 90% of my images are good to go right from Lightroom, I find that Photoshop offers a few options to really refine the image, as well as helping me focus in on just that shot. Whether it’s something as simple as doing a bit of delicate cloning work (if the rules allow it, of course), or a case of resizing, reducing noise and sharpening for a specific size, PS gives that extra bit of control over the single image.
Before I actually start the process of saving the file, however, I’ll take one last pass at the adjustments. For social media, for instance, a bump in saturation and brightness might help it stand out in a crowded field and among viewers' uncalibrated displays.
Saving the File
Once I’ve got the image to a point I’m happy with, I like to save a separate copy as a PSD. Not only does this mean I’ve got a lossless version for my own reference in the future, but I also have a great record to refer to in case of any copyright or rule-based dispute.
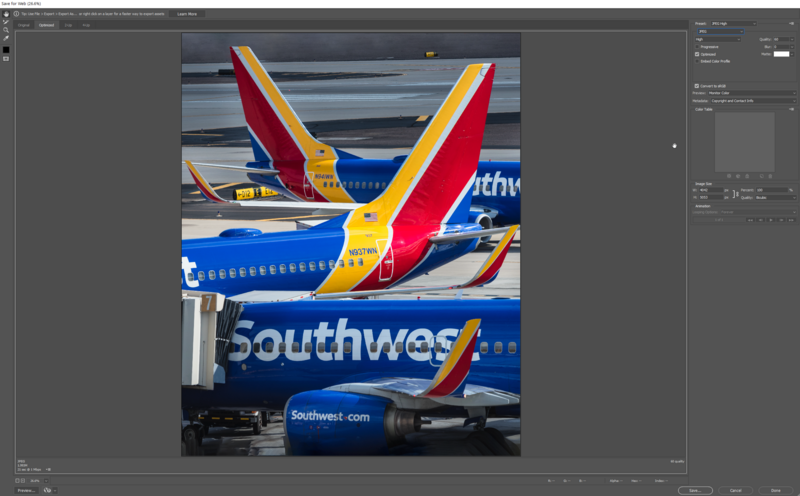
With that copy saved, I like to use Save for Web for my final copy. Not only does this provide more granularity over the final size than Lightroom’s export dialog, but you can also tweak how resampling is handled, and get a great idea of how the image will look via a large preview window. Via this interface, you can also ensure that the sRGB color space is set and control what metadata is embedded.
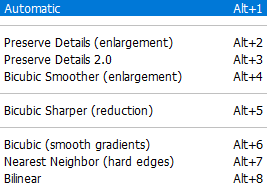
One important thing to remember is how the different resampling modes can affect the image. Bicubic sharper can often preserve sharpness without appearing oversharp or artifacts, but nearest neighbor resampling can bring a bit of extra bite back into an image that has been massively downsampled.
Even the file name can be an opportunity for stacking the deck in your favor. I make sure to align my filename with the title it’s entered under for added protection against a lost entry. It’s also an extra bit of polish over the interminable horde of “DSC_1234”, but that might just be a placebo.
Once you’ve got that final file saved out, you can even go so far as to check it out on some other devices. I’ve found that a picture I love on my monitor might not read as well on even a high-quality phone or tablet screen. The only thing to watch is a weird limitation of the save for web dialog, where your longest edge can only be 8,192 pixels in length. Now, this isn't a deal-breaker for most contests, but is something to watch if you need a larger file or have a very skinny aspect ratio.
Conclusion
Whether you’re entering a contest, or just want to make sure you have as polished a file as possible for printing or sharing, there are a few things to keep in mind. Firstly, consider what requirements you may have. If it’s a contest, check the terms and conditions for the actual requirements. If these aren’t available, check out how they ran the contest in previous years; if there was something like an online voting gallery, this can greatly influence your next steps.
If you’re prepping a file for another purpose, consider what size and format make sense. Getting a print done at a pro lab means a big file and maybe a special color space while emailing the shot to family and friends calls for a heavily compressed JPEG.
Once you know your target, use Photoshop to make any last tweaks to the image. I save a PSD at this point for my own reference, but it isn’t essential. From here, use the Save for Web interface to set up any necessary resizing, then adjust the compression until you’ve got a file light enough for the intended use.
Are these steps going to turn a loser into a contest winner? Probably not. What they can do is help you avoid any simple mistakes revolving around size, profile, and color space. Simple issues like that have derailed even friendly photo reviews at workshops and club meetings, so it makes sense to watch for them when the stakes are higher.
Join the Fstoppers community for free
-
Post comments and join in the discussions
-
Browse the site ad-free
-
Share your work and get featured in the community
-
Compete in the photo contests for fun and prizes
No comments yet