Virtual Copies and Snapshots are powerful features in Lightroom that often go unused or underutilized. In this article, we'll cover what they are and how they can be used to make your editing workflow faster and easier.
There are many different reasons for using virtual copies in Lightroom; perhaps, I'll be able to give you a few ideas or maybe teach you something you didn't know.
What Is a Virtual Copy?
A virtual copy in Lightroom is an editable copy of an imported image that exists only in Lightroom. The virtual copy points to the original file, just like the initial import, and doesn't create a duplicate file on the disk.
The ability to have virtual copies means you can have two or more different edits using a single original file (raw, JPEG, PNG, TIFF, PSD) as the source image.
How to Create a Virtual Copy
You can create a virtual copy in either the Library or Develop modules.
There are three ways you can create a virtual copy with one or more selected images (original image or another virtual copy):
- Press Ctrl+' (Command+' on macOS).
- Select Create Virtual Copy from the Photo menu.
- Right-click and select Create Virtual Copy from the context menu.
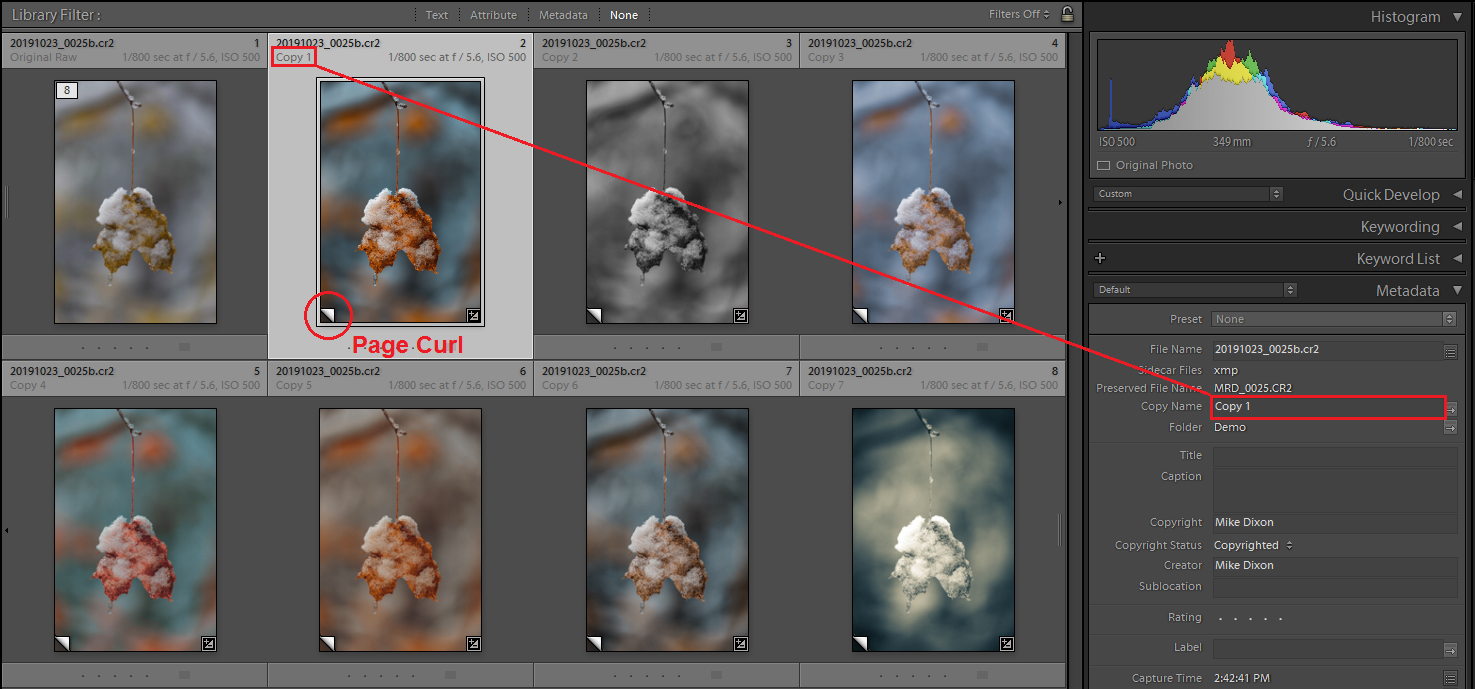
When a virtual copy is created, it inherits any previous edits, keywords, star rating, color label, and metadata changes such as title and comments as a starting point. It is also stacked automatically with the original image. Virtual Copies will have an indicator on them in the lower left that looks like a page curl, and the Copy Name metadata is changed to "Copy X," where X is a number that indicates the number of virtual copies.
After creating the virtual copy, edits and changes belong just to that copy (except for snapshots, more on that later).
One thing that is not copied over to the virtual copy is the develop history. A virtual copy's develop history will only contain "Create Virtual Copy (date/time)" until additional edits are performed.
Virtual Copies are just that, virtual. They exist only in Lightroom, and therefore, changes are not written to the original image's DNG or XMP file.
How Can Virtual Copies Be Used?
Comparisons: You can use the Compare feature in the Library module to compare the differences between your virtual copy and the original image or another virtual copy.
Testing Presets: If you have an edit, but want to see what a preset might look like when applied without having to "undo" it if you don't like it.
Different Crops: I often use virtual copies to create different crops for my images for printing or social media sites. If I make a tight crop for social media, I'll often leave the original image uncropped and create a virtual copy for the tight crop. I do this so that at a later date, when I'm going through my images, I can easily see that I have a larger original image than the tight crop virtual copy shows.
Preservation of a Photo: A virtual copy can be useful to preserve an edit that was used for a contest submission or any other edit that you may have to revisit later.
Client Edit Tracking: Keeping track of multiple edits for a client is a great use for virtual copies, especially when they change their minds often.
Viewing Just the Virtual Copies
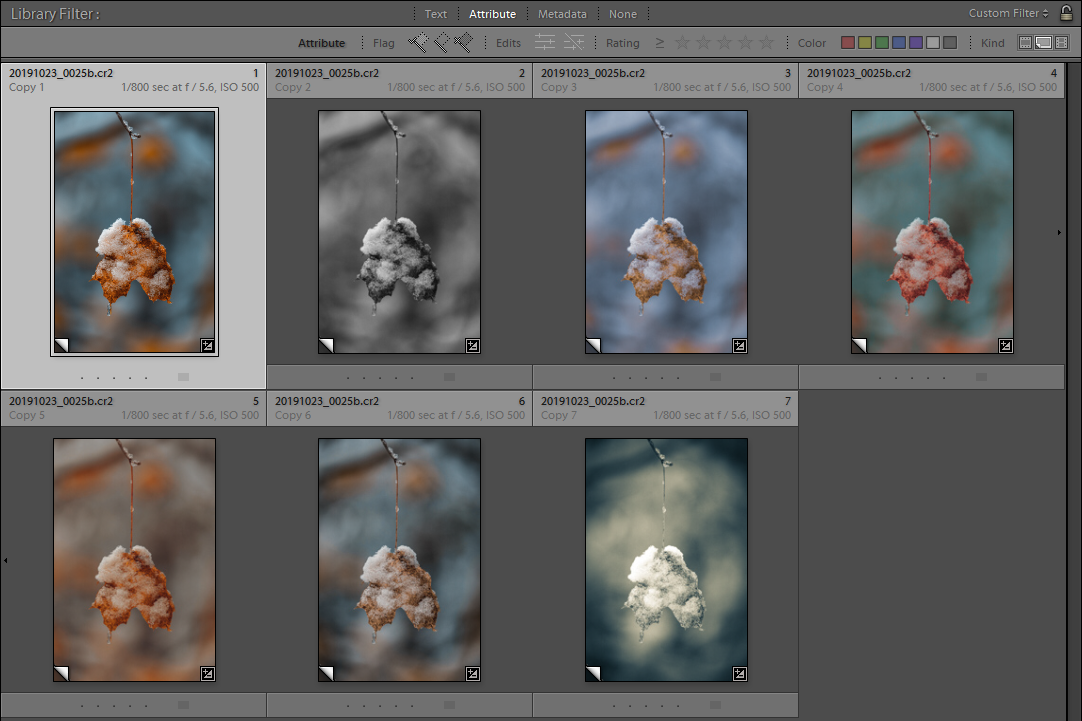
There's a little known trick to being able to view only virtual copies in the Library module. Press the backslash key (\) or choose Show Filter Bar from the View menu in the Library module, click Attribute in the filter bar, then on the far right, there is a setting for Kind which includes Master Photos, Virtual Copies, Videos. Click the Virtual Copies in the middle, and the Library grid will only show virtual copies.
Snapshots: An Alternative to Virtual Copies
I prefer virtual copies over snapshots, but snapshots do have a few uses also.
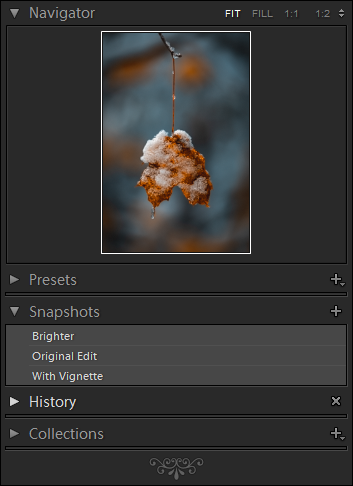
A snapshot is just as it sounds, a snapshot in time of the edit settings for an image. To create a snapshot in the develop module, simply press Ctrl+N (Command+N on macOS). The New Snapshot dialog will appear, allowing you to give the snapshot a name (the default name is the date and time).
Snapshots appear in the Snapshots panel on the left side of the develop module.
You can also right-click on a Snapshot name to show a context menu with the following options: Copy Settings to Before, Rename, Update with Current Settings, and Delete.
Snapshot Advantages
- Snapshots differ from virtual copies in that they don't appear as separate images in the library module; they are basically named history points.
- "Open as Smart Object in Photoshop" carries over the ability to switch between snapshots within Photoshop since the snapshots are embedded within the DNG file.
- Changes are written to the original image's XMP or DNG file.
- Snapshots will appear in the original image and all virtual copies, meaning that if you later want the snapshot to be a virtual copy, all you have to do is create a virtual copy and select the snapshot name, and you'll have a virtual copy with that snapshot's edits.
Snapshot Disadvantages
- You must enter the Develop module and select each snapshot to see it.
- There is no ability to compare snapshots.
- Because there is only one original image for that image's snapshots, you can't have different keywords for each snapshot.
- You can't export multiple snapshots at the same time.
- There is no indication in the Library module that an image has snapshots. You have to go into the Develop module and look for them.
Conclusion
Using virtual copies and snapshots can help streamline your editing workflow, as well as make organization much easier. Comparing or exporting different edits becomes much easier and less error-prone.
Do you use virtual copies or snapshots for a reason that I haven't mentioned? Let me know in the comments!


I've been using LR for several years and have never tried virtual copies or snapshots. I guess it's about time!
I use virtual copies quite a bit, and it is a great tool. One area where it is useful is for soft proofing. I soft proof for 1 type of paper and then virtual copy for soft proof of a different kind and I can go back and forth to lock in on which I want to use. Of course it allows one to compare different edits before settling. I have yet to use the snapshot tool.
This i(virtual copies) s a great solution for how I go about cropping for the best outcome of a photo.. I will definitely start utilizing this, thanks!
Virtual Copies are useful for blending images together. For example, situations where you can't capture the entire dynamic range in one image. Overexpose one copy to recover shadows. Underexpose another copy to recover highlights and blend together. Not as good as bracketing but can produce acceptable results.
I was asked about something offline by a friend, so I thought I would relay that here. I mentioned in the article that you can easily make snaphots into virtual copies, but the opposite is also true.
You can simply go to each virtual copy and create a named snapshot for it. Because these snapshots are saved with the original image and all virtual copies, after doing so, you can delete your virtual copies, and all of the edits of them will be saved in the snapshots of the original image.
I’ve always used snapshots but after reading this, it’s obvious virtual copies would better fit my use case.
I use virtual copies for cropping. Every time I have to crop an image in a different aspect ratio, I save that as a new virtual copy. Some images my have 4 or more - the original, 8:10, 16:9 for video production, 1:3 for website banners and possible more if it was used in an add and they needed an exact size. If I had outputted these as JPEGs and saved the JPEGs it would be eating up my hard drive space. Instead, I send the JPEGs on and delete them. I can always recreate them in just a few seconds by simply reexporting the virtual copy.
I've been using Virtual Copies for a long time, and really like them. Snapshots, not so much.
This was one of the best articles on Fstoppers in recent memory. Thanks for posting it.
Thanks!